LED Nightlight Louver
thingiverse
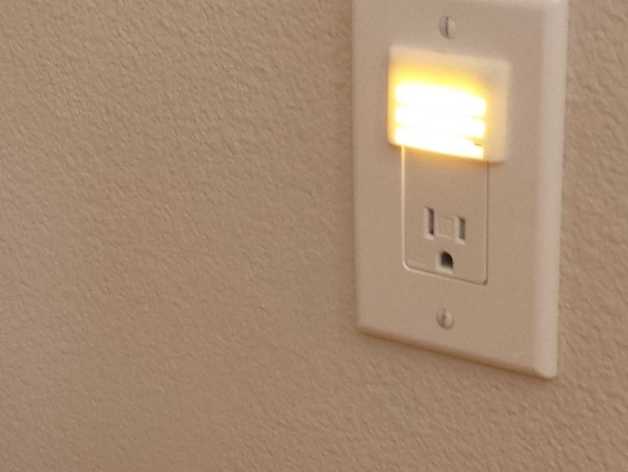
I like having enough light to wander around the house at night, but dislike plug-in nightlights because of their clunky look and often weird or garish light. Recently I found this outstanding wall-outlet replacement that includes a full-function LED light source It's nice: It can either be a nightlight (turning off when it senses the room is bright) or a "guidelight" (on all the time). You can also select various brightness levels, which it remembers, and make all these adjustments without tools by just pressing on the light plate. It draws only 1 watt when operating (1/7th of a traditional nightlight!) The only drawback is that the flat light plate shines straight out into the room with a lot of glare. I designed this louvered cover that attaches to the surrounding outlet cover plate and redirects the light downward in a nice soft glow. Good locations are near stairs, in bathrooms and hallways, and in kids' (or adults'!) bedrooms. Instructions (1) Turn off the AC power, remove the old outlet, and install the LED nightlight outlet where you want it. Good directions are included (it's pretty simple, but of course, we're all respectful of wall power, so get a handyperson or electrician if you're not comfortable doing this). Turn the power back on and verify that the light works. Check out the instructions for how to set the device appropriately. Note how glaring it is, esp. in a dark room. Let's hurry on. (2) Print the STL design. I used white plastic to match the outlet cover (see below). I had best results by setting my slicer to "solid", i.e., use 100% solid layers instead of using meshlike infil layers in the interior: This made the louver opaque instead of semi-translucent (which some people might like, I suppose). Sand and clean up the part as needed. (3) Get an outlet cover with a rectangular opening at the hardware store (you'll need one anyway with this device; it doesn't come with one). Use plastic epoxy or regular epoxy to attach the louver to the plate in a way that the louver covers the light plate (the top of the louver should be a little less than 8mm above the top of the slot in the outlet plate when mounted). I roughed up the cover plate a bit with sandpaper so the glue would have a better grip. (4) Once the glue hardens, attach over the outlet. Ahhh! Much better! (5) You can still change the outlet settings with the louver in place. Use a key, knife, paperclip, etc. to poke through the louver slot and press on the light plate as before. Note: Despite various attempts, I was not able to get the nightlight mode to work right with the louver attached. Evidently, the louver reflects enough light back into the outlet's light sensor that it thinks it's "day" when the light comes on, causing the light to cycle on and off. So, I set the outlet to "guidelight" mode, leaving the light on at all times. The things only draw a watt, which is pretty negligible in the scheme of things.
With this file you will be able to print LED Nightlight Louver with your 3D printer. Click on the button and save the file on your computer to work, edit or customize your design. You can also find more 3D designs for printers on LED Nightlight Louver.