LED TARDIS Earrings
thingiverse
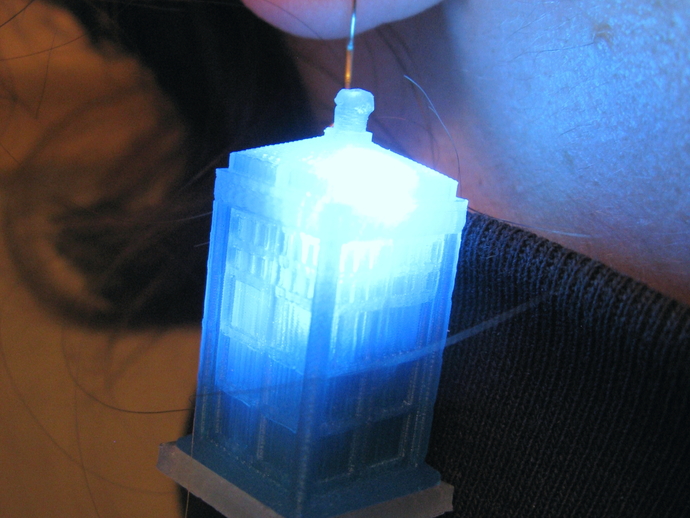
LED powered TARDIS earrings from Doctor Who Choice of file sets to print: 1 TARDIS 1 Bottom plug - for the LED option or 2 TARDIS 2 Bottom plugs - for the LED option Instructions 3D Printing: I printed my TARDIS both in ABS and PLA. For the PLA (pictured) I used Makerware with settings: High Infill: 15% Number of Shells: 3 Layer Height 0.1 Temp: 230 Speed of extrusion: 80 Materials LED - 3Volt 3 x 1.5V LR41 NL Button Batteries (These can be taken directly from LED Fingerlight Item 65997) Tape Earring Hoops Jewelry jump rings Tools 1/16th drill Pliers Directions 1) Print 3D parts 2) Drill (probably best by hand) at the very base of the small nub (pictured) 3) Insert a jump ring into the TARDIS and earring hook 4) Tape the button cells into a column 5) Bend the LED wires into the configuration pictured above. The long end of the LED is positive and needs to be the wire that top of the battery column. You will probably have to cut the ends to length. I also recommend taping the positive wire to the battery column. 6) Insert battery/LED group LED first into the TARDIS. 7) Plug in bottom piece to turn on. (will be difficult at first to get the plug to snap into place - press hard)
With this file you will be able to print LED TARDIS Earrings with your 3D printer. Click on the button and save the file on your computer to work, edit or customize your design. You can also find more 3D designs for printers on LED TARDIS Earrings.