LED Tower Lamp | WLED Tower Lamp
prusaprinters
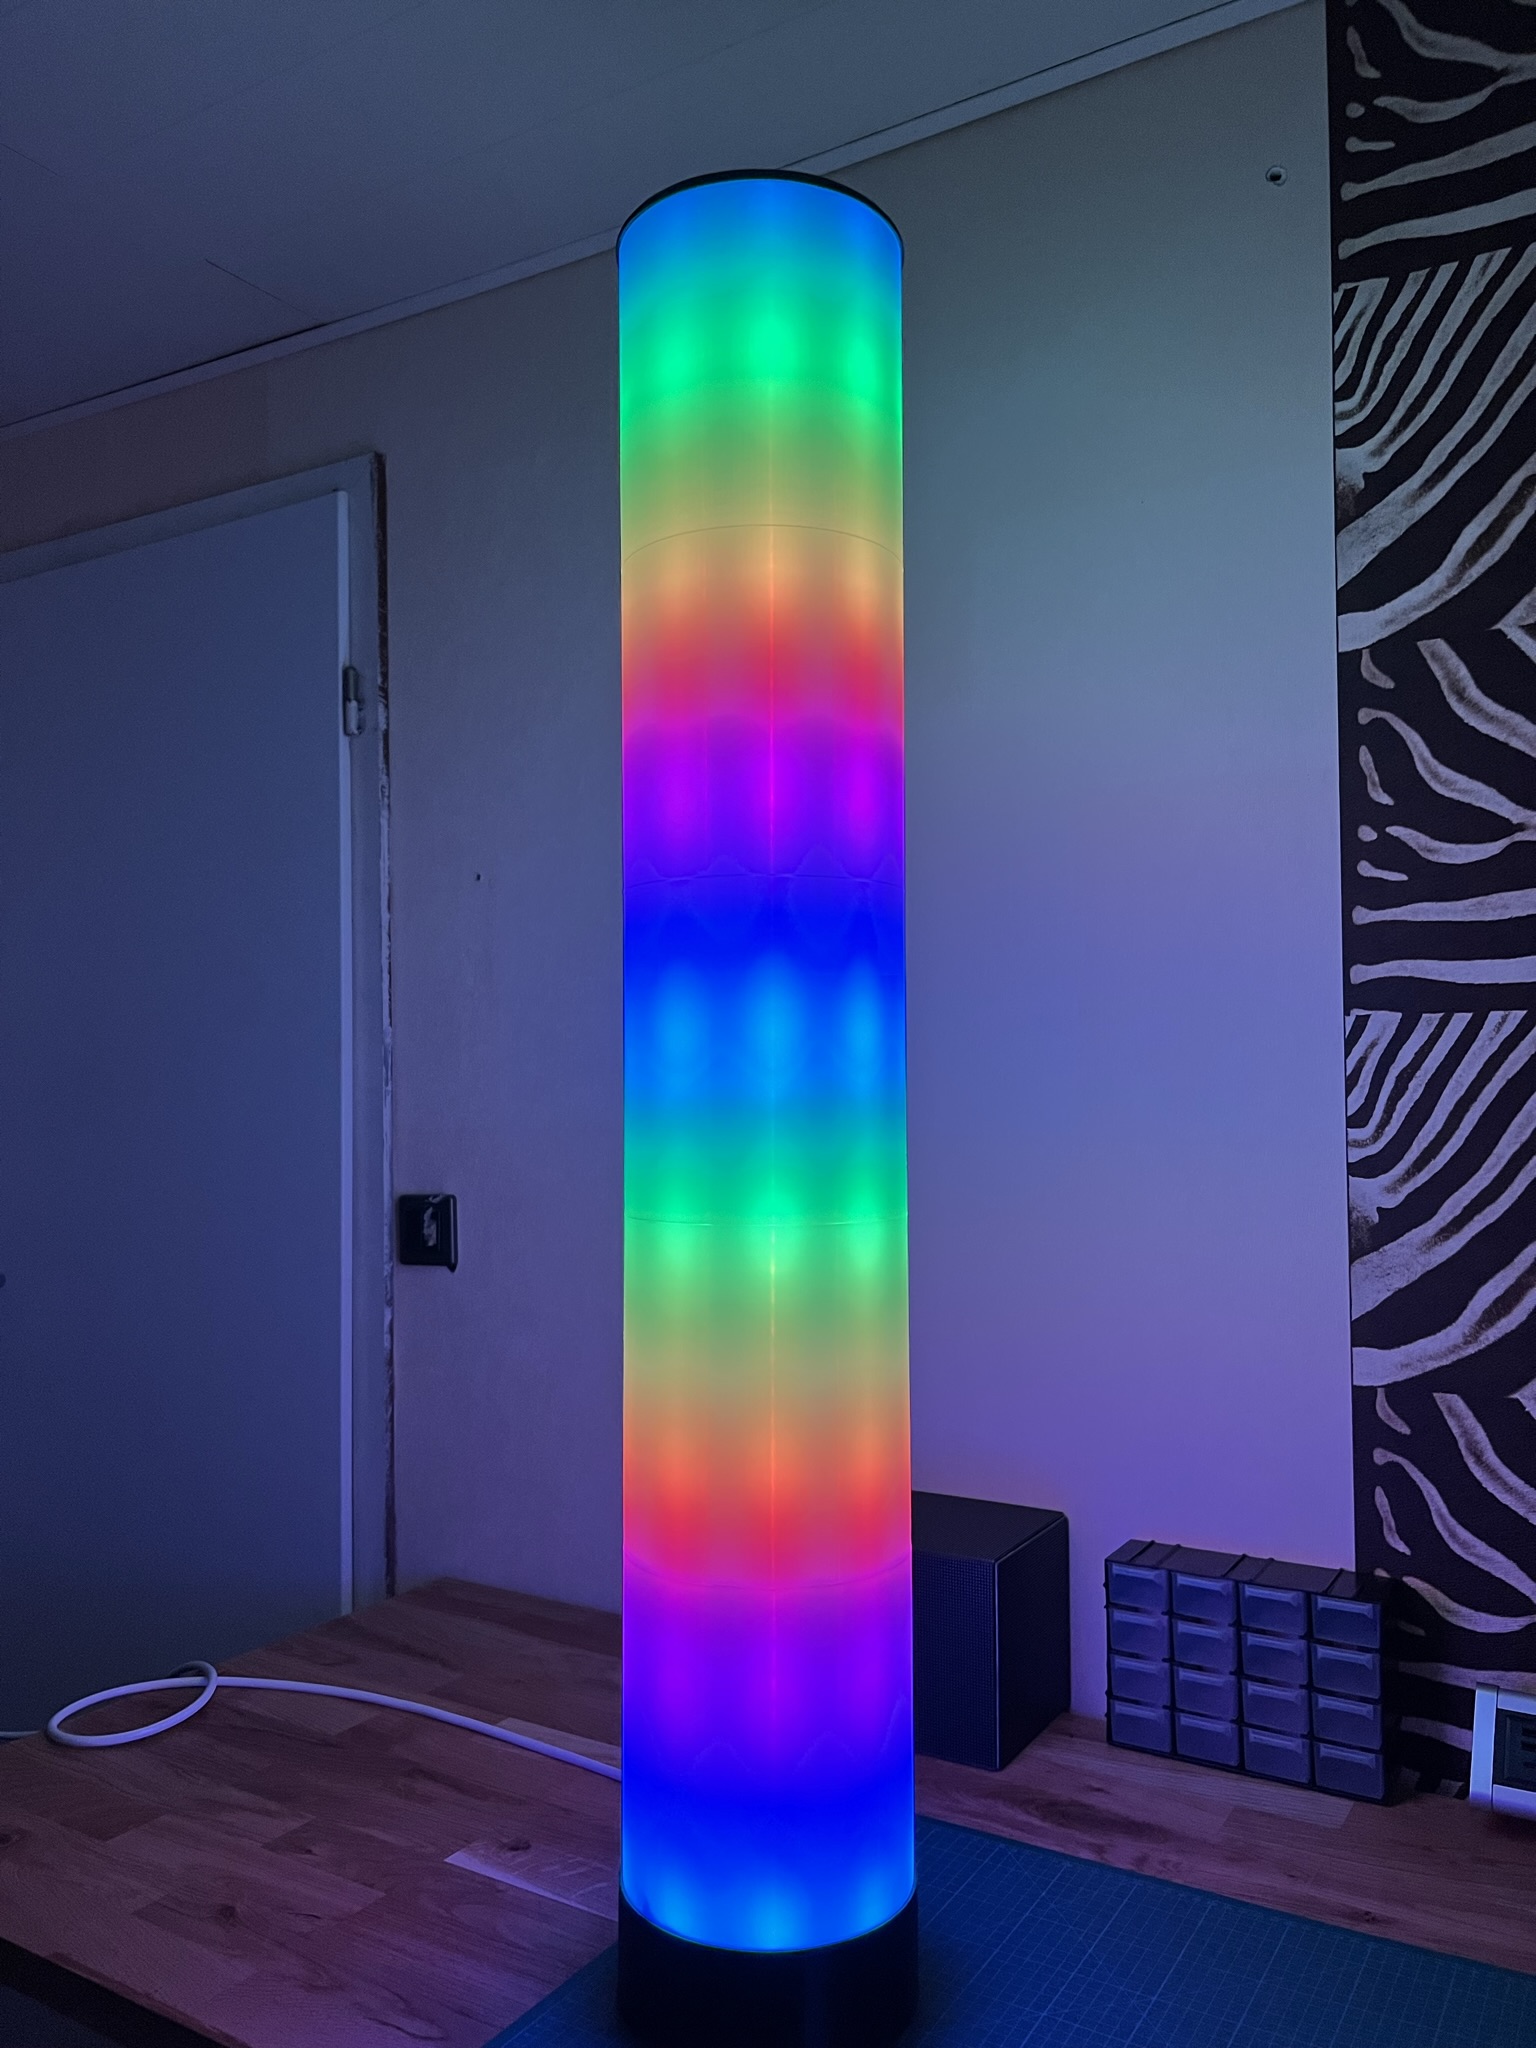
<p>Die deutsche beschreibung steht als Txt Datei zum Download bereit.</p><p>VIDEO here :</p><figure class="media"><oembed url="https://www.youtube.com/watch?v=nFOJG8j8fQo"></oembed></figure><p> </p><p>LED Tower Lamp<br>I would like to present you my LED tower lamp. In my case this is 5 segments high. You can theoretically build the lamp as high as you want because the entire lamp consists of plug-in parts. The lamp is fully printable. <br>It is controlled by an ESP32 controller which was flashed with WLED. The whole thing is supplied with a 5 volt and 12 ampere power supply which is hidden in the base. WS2812b LEDs make the whole thing shine. The Tower is 1m in high the outer cylinder is about 180mm</p><p>Print<br>Printer used: Prusa i3 MK3s+ <br>Print Height : 0.2mm Quality<br>Support required for “cylinder inside” and “housing power supply”</p><p>Printed Parts<br>-Base plate <br>-Housing power supply <br>-Lid <br>-Cylinder inside <br>-Diffuser --> could be replaced by a milky plastic foil <br>-Diffuser with rings -->even not yet printed <br>-Ring for diffuser -->even not yet printed <br>The tower was printed in PETG black and white by the Eryone brand. I also recommend using Brim or Outlines for more pressure grip on all parts.</p><p>“Plate”:<br>The base plate has a recess for the power supply. The power supply is glued in this recess with double-sided adhesive tape. In addition, I have a holder for the ESP32 designed this can be inserted there and attached with some of the double-sided adhesive tape.</p><p>“Power Supply”: <br>The Power Supply Enclosure must be printed with supports</p><p>“Cylinder inside”: <br>The cylinder must be printed with supports. The cylinder can be inserted on top of each other as often as desired. For more print bed adhesion, switch Brim or Outlines a 3-5mm. The "cylinder inside" is plugged into "housing power supply" and glued. Cylinders over cylinders are also glued.</p><p>“Diffuser”: <br>This version of the diffuser has a small groove (0.6mm) on one side and a nose (0.4mm) on the other so that the parts remain in position. This groove is very thin and small. If the parts do not fit, try to "bend" the groove with your fingernail a little and carefully. The parts later have visible <br>transitions, but they are hardly noticeable during ongoing operation of the lamp. You have to test if this version of the diffuser is printable with you. Also switch to the diffuser Brim or Outlines a 3-5mm. This ensures more print bed adhesion. As a little tip for gluing the diffuser parts, <br>I can give the following: take a piece of plastic or packaging waste and a toothpick, drizzle a bit of the superglue on the plastic, soak the toothpick in the "puddle" and hold the toothpick to the place to be glued. The adhesive is automatically absorbed so that they can stick around without "spilling" much.<br>You could also replace the entire diffuser with a milky plastic film if they find one in the right size. Either you stick them on the diffuser or you leave it completely out.</p><p><br>"Diffuser with rings": <br>This diffuser has no groove or nose, and is 1mm shorter. This diffuser is installed in combination with "ring for diffuser". The rings hold the diffuser in place. You can also print only these diffusers and glue them together, they have a smooth upper and lower surface. <br>I haven't printed this version (diffuser and rings) myself yet, so I can't say if it fits and is printable at all.</p><p> </p><p>I TAKE NO RESPONSIBILITY FOR FIRE OR ELECTRIC SHOCK CAUSED BY INCORRECT WIRING. I'm not an electrician, I connected the electrical part this way, which doesn't mean everything is correct or perfect. FOR MORE SECURITY, INSTALL A FUSE! THE CABLING IS AT YOUR OWN RISK! <br>PLEASE USE GOOGLE TO FIND OUT EXACTLY HOW TO CONNECT IT. I'M JUST DESCRIBING HERE HOW I DID IT. Incorrect handling with 230V can lead to DEATH!</p><p> </p><p>Parts:</p><p>-5V 12Ampere power supply in the dimensions 135mmx100mmx33mm, 1-2.5mm larger is also <a href="https://www.amazon.de/gp/product/B01HRS7Y10/ref=ppx_yo_dt_b_search_asin_title?ie=UTF8&psc=1">https://www.amazon.de/gp/product/B01HRS7Y10/ref=ppx_yo_dt_b_search_asin_title?ie=UTF8&psc=1</a> <br>!Attention!: THIS is a power supply from Europe this means it has 230V. <br>You have to find the Powersupply with the required voltage for yourself<br>IMPORTANT: <br>You have to set the power supply in WLED to 12 amps. go to config, led preferences, tick enable brightneslimiter, and type in maximum current 12000mA for 12Ampere.</p><p> </p><p>-WS2812b How many of them you need depends on your height and whether you place the stripes directly next to each other or always leave a row free. I had consumed 3 rolls on 5 segments with a row of space <a href="https://www.amazon.de/gp/product/B07TPSGG2D/ref=ppx_yo_dt_b_search_asin_title?ie=UTF8&psc=1">https://www.amazon.de/gp/product/B07TPSGG2D/ref=ppx_yo_dt_b_search_asin_title?ie=UTF8&psc=1</a> </p><p>-ESP32 Controller <a href="https://www.amazon.de/AZDelivery-NodeMCU-Development-Nachfolgermodell-ESP8266/dp/B071P98VTG/ref=sr_1_2_sspa?__mk_de_DE=%C3%85M%C3%85%C5%BD%C3%95%C3%91&crid=30ADRHNJ10AY3&keywords=esp32&qid=1664379639&qu=eyJxc2MiOiI1LjQxIiwicXNhIjoiNC4zMiIsInFzcCI6IjQuMjEifQ%3D%3D&s=ce-de&sprefix=esp32%2Celectronics%2C89&sr=1-2-spons&psc=1&smid=A1X7QLRQH87QA3">https://www.amazon.de/AZDelivery-NodeMCU-Development-Nachfolgermodell-ESP8266/dp/B071P98VTG/ref=sr_1_2_sspa?__mk_de_DE=%C3%85M%C3%85%C5%BD%C3%95%C3%91&crid=30ADRHNJ10AY3&keywords=esp32&qid=1664379639&qu=eyJxc2MiOiI1LjQxIiwicXNhIjoiNC4zMiIsInFzcCI6IjQuMjEifQ%3D%3D&s=ce-de&sprefix=esp32%2Celectronics%2C89&sr=1-2-spons&psc=1&smid=A1X7QLRQH87QA3</a> </p><p>-Soldering iron, a cheaper one does too!</p><p>-Solder</p><p>-Superglue <a href="https://www.amazon.de/gp/product/B07CHV7PSH/ref=ppx_yo_dt_b_search_asin_title?ie=UTF8&psc=1">https://www.amazon.de/gp/product/B07CHV7PSH/ref=ppx_yo_dt_b_search_asin_title?ie=UTF8&psc=1</a> </p><p>-Cable <a href="https://www.amazon.de/gp/product/B07YFXG4KX/ref=ppx_yo_dt_b_search_asin_title?ie=UTF8&psc=1">https://www.amazon.de/gp/product/B07YFXG4KX/ref=ppx_yo_dt_b_search_asin_title?ie=UTF8&psc=1</a> </p><p>-if necessary, stripping pliers</p><p>-Double-sided adhesive tape <a href="https://www.amazon.de/gp/product/B00G6SCZ5S/ref=ppx_yo_dt_b_search_asin_title?ie=UTF8&psc=1">https://www.amazon.de/gp/product/B00G6SCZ5S/ref=ppx_yo_dt_b_search_asin_title?ie=UTF8&psc=1</a> </p><p>-110V cable and one plug</p><p>-MAX9814 Microphone If desired you can let the lamp react to sound <a href="https://www.amazon.de/AZDelivery-Mikrofon-Amplifier-Verst%C3%A4rker-kompatibel/dp/B086W79GPG/ref=sr_1_1_sspa?__mk_de_DE=%C3%85M%C3%85%C5%BD%C3%95%C3%91&crid=2IMD5T0HIELCX&keywords=max9814&qid=1664380606&qu=eyJxc2MiOiIyLjc2IiwicXNhIjoiMi40NSIsInFzcCI6IjIuMzkifQ%3D%3D&sprefix=max9814%2Caps%2C79&sr=8-1-spons&psc=1&smid=A1X7QLRQH87QA3">https://www.amazon.de/AZDelivery-Mikrofon-Amplifier-Verst%C3%A4rker-kompatibel/dp/B086W79GPG/ref=sr_1_1_sspa?__mk_de_DE=%C3%85M%C3%85%C5%BD%C3%95%C3%91&crid=2IMD5T0HIELCX&keywords=max9814&qid=1664380606&qu=eyJxc2MiOiIyLjc2IiwicXNhIjoiMi40NSIsInFzcCI6IjIuMzkifQ%3D%3D&sprefix=max9814%2Caps%2C79&sr=8-1-spons&psc=1&smid=A1X7QLRQH87QA3</a> </p><p><br>Connections</p><p>I will not describe here how the power supply is connected to 230V. Leave that to a professional. Make sure the cables are long enough to work on them without any problems. Better too long cables than too short. This helps later if the base plate has to be removed again.<br>Connect 5V+ from the power supply to the ESP32 VIN Connect 5V- GND from the power supply and ESP32 GND Connect D4 on the controller to the DATA line of the LED strip an extra cable from power supply 5V+ and 5V- directly to the LED strip. When the LEDs have been glued on, <br>connect the stripes with cables from GND to GND and from +5V to +5V once around, pay attention to the polarity when you have placed the stripes in snake lines. This is required so that no voltage drop occurs. <br> </p><p>Microphone</p><p>If you want you can let the lamp react to noise, but this microphone is not absolutely necessary. The microphone can be placed in one of the holes of the "cylinder inside" and fastened with glue. Microphone connectors I used a MAX9814 as my microphone. <br>For 40db you have to connect GAIN and VDD, for 50db you have to connect GAIN and GND. Connect OUT to D35 on your ESP32 Connect VDD to 3.3V on your ESP32 Connect GROUND to GND on your ESP32 Microphone settings in WLED Go to SOUND SETTINGS and change the analog input PIN to 35.<br>If you have connected OUT to a different PIN, enter this number. After saving, restart the device.</p><p><br>WLED</p><p>Download: WLED SoundReactive : https://github.com/atuline/WLED/releases<br>WLED without micro: https://github.com/Aircoookie/WLED/releases<br>As software I used the WLED Sound Reactive software, but you can also install the normal WLED software if you do not want the microphone. On YouTube you can find various videos on how to flash the ESP32, install WLED, and configure it. <a href="https://www.youtube.com/watch?v=TOEnFKLm9Sw&t">https://www.youtube.com/watch?v=TOEnFKLm9Sw&t</a> <br>IMPORTANT: <br>You have to set the power supply in WLED to 12 amps. go to config, led preferences, tick enable brightneslimiter, and type in maximum current 12000mA for 12Ampere.</p><p> </p><p> </p><p>WLED Segments</p><p>You can select and adjust segments in WLED when everything is fully installed, which is quite interesting because completely different effects can be created with it. After assembly, the effects will also run in snake lines. However,<br>you can reverse the stripes that point downwards via WLED so that they run upwards. If you do that with all the stripes that point downwards, you get fantastic effects such as the "Fire 2012" effect as seen on one of the videos.</p><p><br>LED</p><p>At the beginning, think about how high you want to make the lamp. Thus, they save themselves the work of soldering off and re-gluing the stripes. The "cylinder inside" has many recesses for the LEDs. You don't have to glue all of them with stripes, for example,<br>I always left a row free. It is important that you do not power the LEDs via the controller, but create an additional power supply. The LEDs are placed in queue lines, we start from below and go up. Once at the top, we solder a data cable and connect it to the next one right next to it which points downwards,<br>there we repeat the whole thing until we have come round once. NOTE if you leave a row of spaces: Due to the number of depressions, 2 bands run in the same arrow direction at the end. You can see this in the effect and you should think about where you want to see it, front or back.<br>I used WS2812b as the LED strip.</p><p>If you have any comments or suggestions for improvement, please write a comment.</p><p>Note: <br>This whole text was just translated from German into english with google, I am sorry for textual errors</p><p><br>If you have a coffee left for work :P <a href="https://www.paypal.com/donate/?hosted_button_id=FBFCQKWQXVXB4">https://www.paypal.com/donate/?hosted_button_id=FBFCQKWQXVXB4</a> <br>Of course, donations are up to everyone.</p><p>Greetings qrot3c</p><p> </p>
With this file you will be able to print LED Tower Lamp | WLED Tower Lamp with your 3D printer. Click on the button and save the file on your computer to work, edit or customize your design. You can also find more 3D designs for printers on LED Tower Lamp | WLED Tower Lamp.