LED Track Lights
prusaprinters
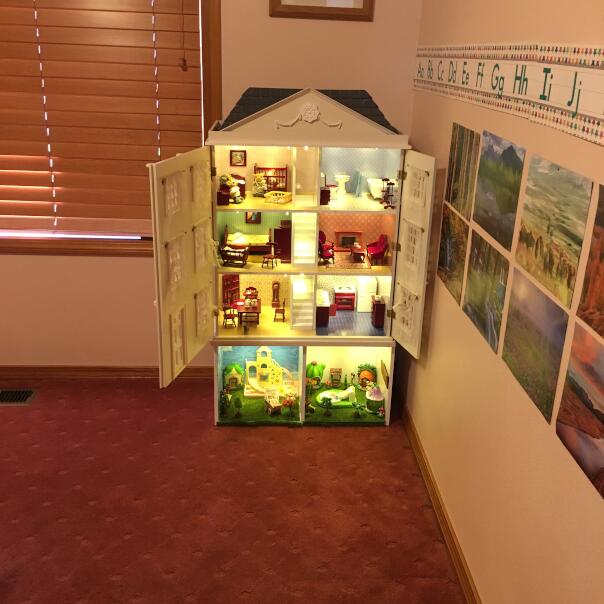
<p>Light it up! I created LED track lights for a doll house but they can be mounted anywhere. It is surprising how the light draws you into the display! Great for taking surreal photos with simple props, or simply shedding light on the subject.</p> <p><img alt="" src="https://media.prusaprinters.org/thumbs/cover/640x480/media/prints/19505/images/223035_851bf242-ad04-4c29-bb14-de629235c7b0/dollhouse_01_s.jpg"/></p> <h3>Print instructions</h3><ul> <li><p>Concept: Running power through a 3D Printed part</p> </li> <li><p>Simplest Solution: A bare copper wire</p> </li> <li><p>Proof-of-concept: An LED Track light</p> </li> </ul> <p>Combine this print with:</p> <ul> <li><a href="https://www.amazon.com/Solid-Copper-Round-Wire-Spool/dp/B01C3EDH6O/ref=pd_di_sccai_6/140-2571828-2368508?_encoding=UTF8&pd_rd_i=B01C3EDH6O&pd_rd_r=1cdc8258-1059-4303-84c7-c7a347b88c16&pd_rd_w=D3TX4&pd_rd_wg=keFmV&pf_rd_p=e532f109-986a-4c2d-85fc-16555146f6b4&pf_rd_r=T14AQ3RW6DA4R9EYRCM9&psc=1&refRID=T14AQ3RW6DA4R9EYRCM9">18 gauge bare copper wire</a></li> <li><a href="https://www.amazon.com/gp/product/B074SV1FYD/ref=ppx_yo_dt_b_asin_title_o03_s00?ie=UTF8&psc=1">9-12V LED lamps</a> used for instrument panels and this print for mountable LED Tracks mounted with 2mm x 10mm screws.</li> <li><p>12V DC Power source (<a href="https://www.amazon.com/TOP-SPEED-Adapter-AC100-240V-Charger-Compatible/dp/B07JVK84G1/ref=pd_rhf_se_s_sspa_dk_rhf_search_pt_sub_0_10?_encoding=UTF8&pd_rd_i=B07JVK84G1&pd_rd_r=6e9e1d5a-6473-4338-8df6-3de2f69f983f&pd_rd_w=aSGxq&pd_rd_wg=NkqvE&pf_rd_p=2143a135-2cab-44b3-8f20-6a9d06da3a56&pf_rd_r=425PYN8NXZ1PBQK01GBQ&psc=1&refRID=425PYN8NXZ1PBQK01GBQ&spLa=ZW5jcnlwdGVkUXVhbGlmaWVyPUExNlpFRjIwV0ZJRVVBJmVuY3J5cHRlZElkPUEwMzUzMzEwMVowVFlJU1NTSEpXSCZlbmNyeXB0ZWRBZElkPUEwNDk1MjExUkhXSk5COTZRN1dXJndpZGdldE5hbWU9c3BfcmhmX3NlYXJjaCZhY3Rpb249Y2xpY2tSZWRpcmVjdCZkb05vdExvZ0NsaWNrPXRydWU=">example</a>)</p> </li> <li><p><strong>Thread wire into channels.</strong> With all of the clamps in place use pliers to push bare wire through channels. If you encounter a lot of resistance open slots to see if the wire is aligned with the far end hole. The clamps maintain the channel but a slightly bent end may hang at the transition. To prevent bending pinch the wire close to the guide and push just a small amount of wire at a time.<br/> <img alt="" src="https://media.prusaprinters.org/thumbs/cover/160x120/media/prints/19505/images/221503_b155c9b1-e42e-4748-bf2b-a88132e894b6/05_wirepush_s.jpg"/></p> </li> <li><p><strong>Insert LED</strong> with positive (long) lead on the left side<br/> <img alt="" src="https://media.prusaprinters.org/thumbs/cover/160x120/media/prints/19505/images/221508_03ec488e-dd51-462d-81cc-5f1bda4688c5/09_bulbinserted_s.jpg"/></p> </li> <li><p><strong>Pull LED flush</strong> [or bent at the desired angle]<br/> <img alt="" src="https://media.prusaprinters.org/thumbs/cover/160x120/media/prints/19505/images/221511_40646b81-b481-4f76-be14-bbb7d33acf15/11_ledsidepull_s.jpg"/><img alt="" src="https://media.prusaprinters.org/thumbs/cover/160x120/media/prints/19505/images/221510_6e7baf81-7782-4d7c-b3b7-c38227fda2b6/10_bulbflush_s.jpg"/></p> </li> <li><p><strong>Pull leads across bare wire and crimp</strong><br/> <img alt="" src="https://media.prusaprinters.org/thumbs/cover/160x120/media/prints/19505/images/221513_854bb85a-c94d-4bd5-aaea-60348a99f67b/12_leadcrimp_s.jpg"/><img alt="" src="https://media.prusaprinters.org/thumbs/cover/160x120/media/prints/19505/images/221506_e5fc7d52-981a-4c33-b5e6-e5752c3fcb9b/13_readyforcap_s.jpg"/></p> </li> <li><p><strong>Push clamp into place</strong> using pliers to crimp if necessary<br/> <img alt="" src="https://media.prusaprinters.org/thumbs/cover/160x120/media/prints/19505/images/221509_7763900a-2684-4e73-8e39-8818b31289bb/14_capinplace_s.jpg"/></p> </li> <li><p><strong>Clip leads</strong><br/> <img alt="" src="https://media.prusaprinters.org/thumbs/cover/160x120/media/prints/19505/images/221514_df70421d-b5d2-4c76-9ccb-d38c976b9b34/15_trimleads_s.jpg"/><img alt="" src="https://media.prusaprinters.org/thumbs/cover/160x120/media/prints/19505/images/221517_f6864aa2-224f-468c-9ef8-a5ed58349269/16_ledinplace_s.jpg"/></p> </li> <li><p>Add LEDs until done.</p> </li> </ul> <p><img alt="" src="https://media.prusaprinters.org/thumbs/cover/160x120/media/prints/19505/images/221512_628d9815-9f4a-4315-85cb-9ef1e474a229/17_smalltrackdone_s.jpg"/><img alt="" src="https://media.prusaprinters.org/thumbs/cover/160x120/media/prints/19505/images/222345_98b47790-ba6a-4718-8a96-7ec57ca6a16c/03_insertleds_s.jpg"/></p> <p><img alt="" src="https://media.prusaprinters.org/thumbs/cover/160x120/media/prints/19505/images/222351_8ff3c177-0949-422c-a660-9ed1144d5384/04_ledsinserted_s.jpg"/><img alt="" src="https://media.prusaprinters.org/thumbs/cover/160x120/media/prints/19505/images/222346_31f9a63d-ff49-4502-befc-a9141030fb50/05_prelock_s.jpg"/></p> <p><img alt="" src="https://media.prusaprinters.org/thumbs/cover/160x120/media/prints/19505/images/222348_a9dd1a0f-cbda-4da2-a240-85c8dc876126/06_postlock_s.jpg"/><img alt="" src="https://media.prusaprinters.org/thumbs/cover/160x120/media/prints/19505/images/222350_7d952521-72f0-4bb7-8663-d7882340ab62/led_anglemount_s.jpg"/></p> <p><img alt="" src="https://media.prusaprinters.org/thumbs/cover/160x120/media/prints/19505/images/222349_de1dd7d0-867c-47e1-8e3b-3556cd917a8a/07_clipped_s.jpg"/></p> <ul> <li><strong>Power 'Tails'</strong> to protect and connect I solder 22 AWG Solid hookup wire to the bare wire, clip it and shrink-tube. I like solid 22 AWG wire because it can be used as a pin to make a breadboard connection. </li> </ul> <p><img alt="" src="https://media.prusaprinters.org/thumbs/cover/160x120/media/prints/19505/images/222356_c57b56da-80a0-44aa-8a9c-0b77afce5afa/01_powertrack_clipleads_s.jpg"/><img alt="" src="https://media.prusaprinters.org/thumbs/cover/160x120/media/prints/19505/images/222353_13bebbc9-f18f-47db-82cf-62d651f045ef/02_powertrack_clippedleads_s.jpg"/></p> <p><img alt="" src="https://media.prusaprinters.org/thumbs/cover/160x120/media/prints/19505/images/222347_97dc9cb0-4665-4f36-972e-ab409484863d/02b_powertracktails_s.jpg"/><img alt="" src="https://media.prusaprinters.org/thumbs/cover/160x120/media/prints/19505/images/222354_92627e55-043e-4ee8-9a42-b2e892bf4b05/08_complete_s.jpg"/></p> <h3>Connections</h3> <p><img alt="" src="https://media.prusaprinters.org/thumbs/cover/160x120/media/prints/19505/images/222702_8f616a39-ba88-4773-b884-0dd7b3025322/01_powertrackprint_s.jpg"/></p> <p>For the dollhouse I was looking at a lot of connections so I printed a power track using spring clips from a breadboard. I simply press them into place in the power track.<br/> <img alt="" src="https://media.prusaprinters.org/thumbs/cover/160x120/media/prints/19505/images/222699_74417776-0631-473c-960d-da625b54c0a5/02_springclips_s.jpg"/></p> <p>Simply plug into the power by pushing the power tails into the power track.<br/> <img alt="" src="https://media.prusaprinters.org/thumbs/cover/160x120/media/prints/19505/images/222700_14556214-c22f-4507-a29b-b265677bfa01/03_powerconnect_s.jpg"/></p> <h3>Photography</h3> <p>Showcase your creations in lit up boxes that draw attention.</p> <p>The lights really bring the scenes to life which can be easily captured with a cell phone. Create scenes, take photographs and put it all together in a story.<br/> <img alt="" src="https://media.prusaprinters.org/thumbs/cover/640x480/media/prints/19505/images/222899_3cba96e8-d5cc-4d75-8e48-8d48aedb366c/room_03b.jpg"/></p> <p><img alt="" src="https://media.prusaprinters.org/thumbs/cover/640x480/media/prints/19505/images/222897_3dc80256-63d1-448b-b59c-f079efaddd5b/room_02.jpg"/></p> <p><img alt="" src="https://media.prusaprinters.org/thumbs/cover/640x480/media/prints/19505/images/222894_11e060b3-51e0-4233-8979-7257cc4b63ca/room_04.jpg"/></p> <p><img alt="" src="https://media.prusaprinters.org/thumbs/cover/640x480/media/prints/19505/images/223036_14b69bca-a529-48c6-bc48-011d1fe5e5bc/dollhouse_02_s.jpg"/></p> <h3>Final note</h3> <p>I would insulate the spring clips in the power track if there was any chance of shorts. Mine are mounted on wood.</p> <p>I haven't found a source for spring clips other than extracting them from a <a href="https://www.amazon.com/DEYUE-breadboard-Set-Prototype-Board/dp/B07LFD4LT6/ref=sr_1_10?keywords=breadboard+electronics&qid=1582570967&sr=8-10">breadboard</a>.</p>
With this file you will be able to print LED Track Lights with your 3D printer. Click on the button and save the file on your computer to work, edit or customize your design. You can also find more 3D designs for printers on LED Track Lights.