Left Center Right Dice Game
thingiverse
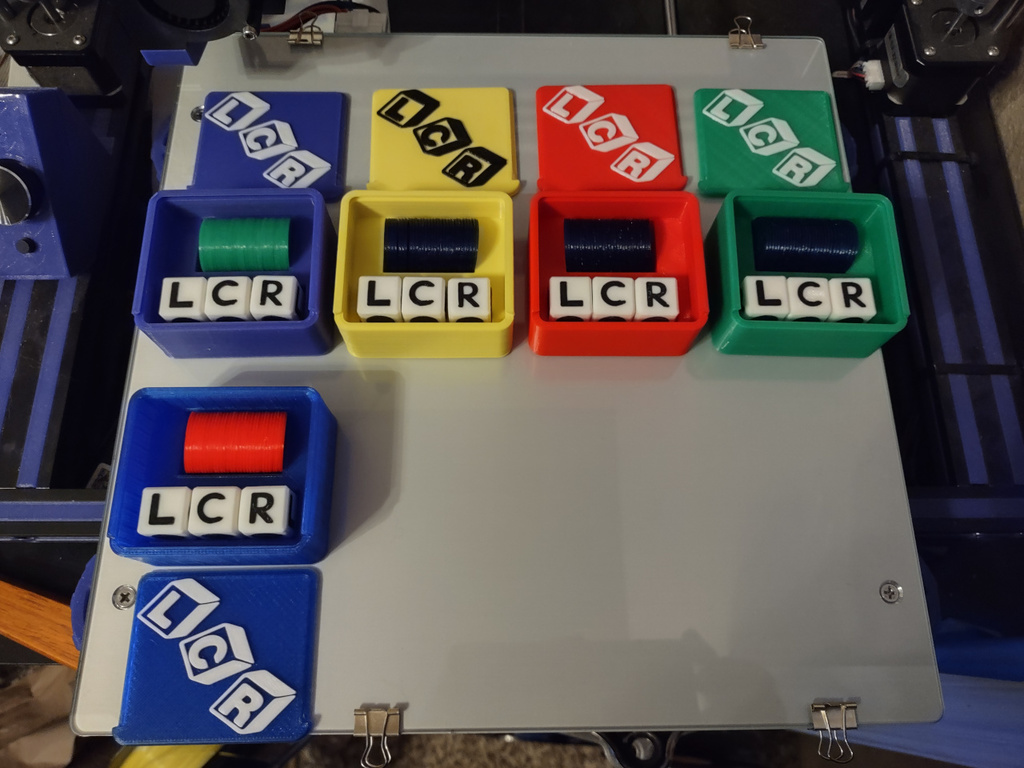
My wife's friends all play a card game named "Phase 10" and they travel with their ratty looking worn out card boxes from house to house. I found RockstarTS's Phase 10 lid which he remixed from an UNO card box he acquired from: https://cults3d.com/en/3d-model/game/uno-card-game-box I printed several of those boxes and lids for my wife and all her friends and they were a really big hit. The same friends that play Phase 10 introduced us to "Left Center Right" a few weeks ago. Left Center Right is a dice game based completely on chance, or luck, but can spectacularly be played by large groups of people. We played it this past New Years eve with a group of 8 and it was a blast. Nobody in the group, aside from my neighbor who's game we played had their own set. Additionally, my neighbor was missing some chips so we played with pennies as well. My neighbor asked me if I could print her some and of course I agreed. Meanwhile, I thought maybe everybody else in the group would like their own "Left Center Right" game so I decided to model not only the chips, but the dies as well. I thought since everybody in the group was so fond of the Phase 10 card box that I would use that design for the case containing the 3 dice and chips. Thus far, everyone my wife has given these things to has absolutely loved them. The game is cheap. At its core, it's just 3 dice and could be played with pennies rather than chips, but these little sets are cute and make for some very nice and inexpensive gifts. I would recommend that whatever colors you decide to print these things with that you choose a high contrast scheme, and that if you're handing these out to multiple people, like at a party, that you print them all using the same color scheme. Otherwise, there may be fighting, especially if alcohol is in use. I'd stick with white for the dies and black for the die faces. I'd print the chips any color that isn't the same as the box. With PLA, I print mostly on bare glass because I like the shine it puts on the bottom of the models. That said, I oriented the chips opposite as they appear in the STL so that the LCR lettering is on the shiny side. Since I print mostly on bare glass, there's always some level of elephants foot on the first layer. If there is too much squish on that first layer of the lid, be sure to sand the edges so that it slides easily into the box. I messed up one of my Phase10 boxes by trying to force the lid before cleaning up the edges. It should also be noted that I spent more time gluing the faces into the dice than any other portion of the build on these. My hands are not as steady as they once were... NOTES 01162023: For the dice to have a proper weight to them, I used 100% infill. I used only 20% infill on the case, and typically, the chips will be at 100% anyways regardless of your slicer settings as they're only 1mm thick. Additionally, I printed the LCR logo's on top of the lid by adding a key to the lid, and a tower to the logo so that it would begin printing the logo at the nearly 3mm height of the top of the lid. This worked wonderfully, saving me from trying to line up multiple pieces of the logo for gluing. I know there are other ways to do the same thing so the models for both the lid and the logo I posted do NOT contain the alignment key or height tower for the lid pieces. Aside from the difficulty in explaining how I lined up the two separate models in my slicer so everything would print properly, I omitted those pieces because I destroyed a fan duct on one of my printers by not paying attention. I had these things printing on 3 different printers, and decided to throw a 4th into the mix without paying attention to differences in printer design... Oops... So my keyed files were setup for my Anet A8, which worked fine on the Anet A8 Plus since it's got a nearly identical head setup. I was using my Anycubic I3 Mega as well which still didn't present a problem as it's cooling duct is on the left side, but when I through the model on my Tronxy XY-2 Pro, the fan duct smashed into the lid while the 3 mm tower in that key was printing. Rotating the models for both the lid and the logo by 180 degrees would have solved that problem but of course add more complication to printing instructions. If there is enough interest in what I did to print my lids with the logo, I'll add the models with the keys and try to write an explanation that makes some sense. It's a cumbersome process that requires the maker to be present at the moment the lid model completes. I had to be there to turn the heater for the beds on immediately after the blank lids printed to prevent the model from releasing from the glass surface. Again, it worked well for me until I tried using the same orientation on a Ender 3 style cooling fan setup. Easy fix but complicated instruction... :(
With this file you will be able to print Left Center Right Dice Game with your 3D printer. Click on the button and save the file on your computer to work, edit or customize your design. You can also find more 3D designs for printers on Left Center Right Dice Game.