Left Hand robot InMoov
thingiverse
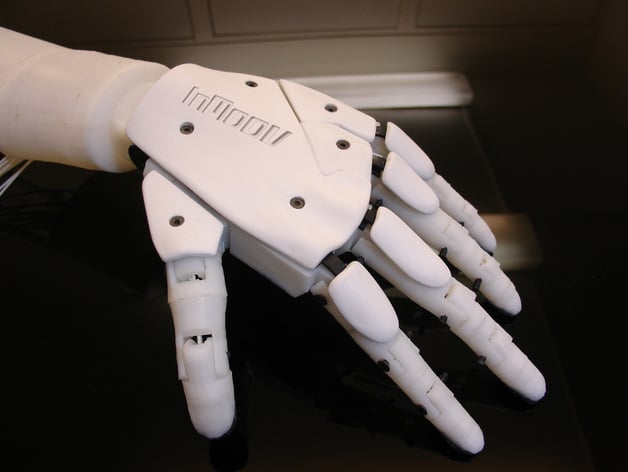
This is the left hand robot "InMoov", derivative of the right hand, I have already done. For more parts and info, see http://www.thingiverse.com/thing:17773 IMPORTANT: Before printing these files, check my website for the latest updates. Site:http://www.inmoov.frhttp://inmoov.blogspot.comhttp://www.youtube.com/watch?v=r_rQ2WJ0dq4http://www.youtube.com/watch?v=JztSQpwZaRUhttp://www.youtube.com/watch?v=zvbNcuUPHyQhttp://www.youtube.com/watch?v=BAs2F4sFVdA Last of all:http://www.youtube.com/watch?v=tXYF6yY1c9M Instructions This is a work in progress, files might change until it is finished. Print one of each STL files attached. I did it in ABS. Find a full tuto here:http://www.inmoov.fr/hand-and-forarm/ Print leftwriargeV3, leftwristsmallV3,leftthumb4, leftopsurface, arduinosupport, cableholder, with an infill of 30%, 3 shells, best with no support, no raft. Print from: http://www.thingiverse.com/thing:17773 auriculaire2,index2,majeure2,ringfinger2, with an infill of 30%, 1 shell, best with no support, no raft. Print leftrobpart2V3, leftrobpart3V3, leftrobpart4V3, leftrobpart5V3 with an infill of 30%, 3 shell, best with raft. Print leftcoverfinger with an infill of 30%, 3 shells, with support. You will also need the rotational Wrist: http://www.thingiverse.com/thing:25149 And the simple servo support. Available here : http://www.thingiverse.com/thing:65274 Big bolts are now printable. (Not really strong but enough for tests.) You can replace the 16x3mm for the fingers with pins/pegs of filament instead of bolts, it's cheap, easy, and strong enough. It was a suggestion of FreddyA. 1x8mmx8cm bolt is required for to attach leftwriarge to leftwristsmall. 1x8mmx4cm bolt is required for to attach leftwriarge to thumbbottom. 1x8mmx6cm bolt is required for to attach leftwriarge to leftrobpart1. 16x3mmx2cm bolts are required for all fingers hinges(I have recut each bolt to adapt to finger width) Glue with acetone like on pictures: Thumb4 flat parts together but Not the tip. Finger flat parts but Not the tips(Be carefull not to mix them up, they all have a different size) Redrill 8mm holes if needed. If necessary reDrill all finger hinges with 3mm drill. If you plan on using filament pegs, redrill at 3mm(Be careful not to break parts) Fingers should move freely. Print the forarm without support but with raft. I have already set in some extra parts intended to support overhangs in leftrobpart2V3, leftrobpart3V3, leftrobpart4V3, leftrobpart5V3 Once printed remove the added supports and the anti-warp structures. Make sure to remove only the added parts and not the servo brackets. Redrill the brackets if necessary. Glue with acetone leftrotawrist1V3, leftrobpart2V3 and leftrobpart5V3. Make sure the servo brakets are aligned. Glue together leftrobpart3V3 and leftrobpart4V3. Mount the simple servo bed. Fit and bolt in the 4 servos HK15298. Wire the servos to the exit of Robcap.. Run from each servos two rods of fishing Braid (200 LB) to the tip of each finger. Make sure not to twist them on the way through. When passing the bolts of hinges, one rod has to be over and one has to be under. Add on each bolt a ring2 in the hinge. Set your servo in to max position suposedly with straight flat fingers with the horn set to full pull out. Secure the rods at the tip of fingers by making two knots + a drop of cyanocrylate glue. Rods have to be tight fit between the horn and tip of finger. Once all fingers are wired through, glue the tips of fingers with acetone. Mount the "lefttopsurface" on the back of the hand with 3mmx2cm bolts. Glue the leftcoverfinger on top of fingers. Make sure movement is free with hinges. Update 15/03/12: Big Cover and finger cover for the left hand ready and uploaded, servos and Arduino arrived and almost installed. Added little cable holders to glue, and an Arduino support (thanks to Jestin and pchretien) Update 21/03/12 I redesigned leftrobpart2 to leftrobpart2V2 due to missing piece of bracket( Thanks Wulfnor) Update 28/03/12 you can download the scripts for Arduino to either do the pattern motion shown in the last video or use your keyboard to control the servos. http://www.thingiverse.com/thing:17773 (you need to install serialterm for keyboard control. Thanks to Crazy Jaw) Update 01/04/12 of leftWristsmall1 to LeftWristsmallV2 avoids the motion from closing too much the hand. Also added holes for positionning topsurface4. Update 02/04/12 of leftWriarge1 to LeftWriargeV2, added holes for positionning topsurface4 and two cages for nuts at end of 8mm bolts. Update 18/05/12 printable bolts, changed "leftrobpart4" to "leftrobpart4V2" for to receive the arm piston. see blog Update 16/06/12 I have uploaded the rotational wrist. see: http://www.thingiverse.com/thing:25149 Update 22/06/12 I have uploaded the new brackets and modified "leftrobparts" mentionned on my blog. see: http://www.thingiverse.com/thing:25465 Update 22/03/12 Uploaded "leftrobcap3V1" for to close the elbow of the forarm. Update 23/06/12 Modified all the fingers2 to version3 for easy mounting, also modified leftwristlargeV2, leftwristsmallV2 to V3 version. All holes are ready, and the hinges are ready to be assembled. Rings are already set in the hinges. Update 16/07/12 Modified leftthumb4 to leftthumb5, oddly it wouldn't fit into wristlargeV2 anymore. added the hole for attaching the cover. Update 17/09/12 I have uploaded the bicep parts. see: http://www.thingiverse.com/thing:30654 Update 03/01/13 I have uploaded the shoulder parts. see: http://www.thingiverse.com/thing:40040 Update 20/01/13you can now download the torso parts athttps://cubehero.com/physibles/hairygael/Torso_for_Robot_InMoov Update 27/02/13 you can now downoload the neck with mechanismhttps://cubehero.com/physibles/hairygael/Neck_Mechanism_For_InMoov/print Update 12/12/13 simple servo bed is now the default mount system for the servos. Lefrobparts are now changed to LefrobpartV3 to simplify the comprehension. LeftWristLargeV3 is changed to LeftWristLargeV4, the linings inside for the rods is more simple and will not get mixed during pathing. Rotawrist replaces robpart1. Update 21/10/14 EntretoiseBolt6 to EntretoiseBolt7 Still working on instructions text...
With this file you will be able to print Left Hand robot InMoov with your 3D printer. Click on the button and save the file on your computer to work, edit or customize your design. You can also find more 3D designs for printers on Left Hand robot InMoov.