Lego Duplo Train Bridge
thingiverse
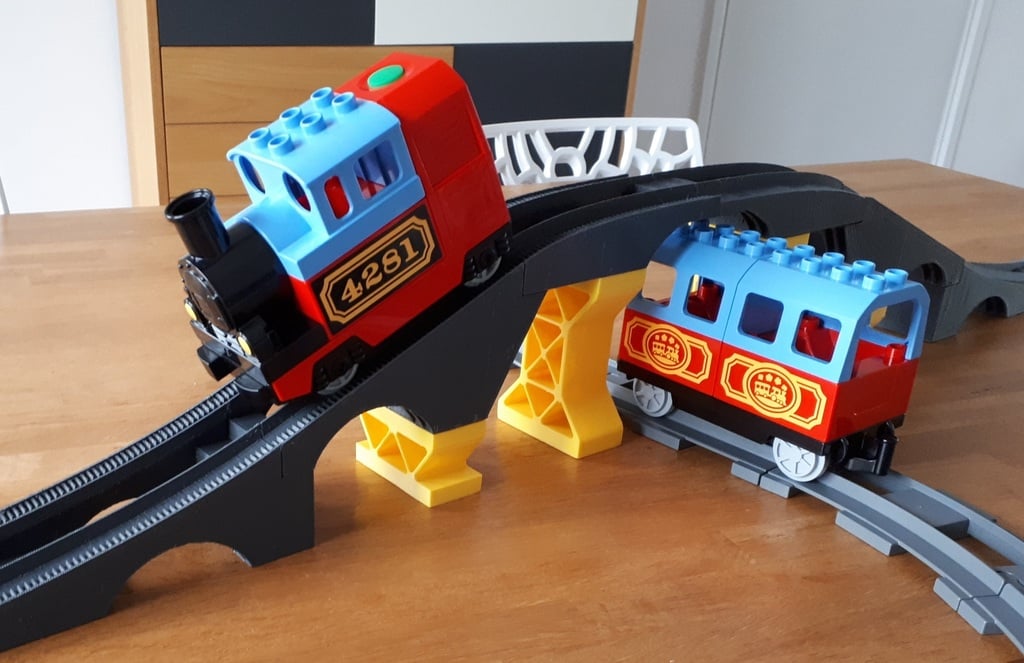
Liked the duplo bridge from [pjotrx](https://www.thingiverse.com/thing:122268). From my point of view it has only one flaw, when printed with only one middle section, it's not high enough to pass a train underneath. Although not really planned, just remodeled the whole bridge again: * In the middle, the bridge should be 6 bricks high, so the train fits underneath. * Using pjotrx straight element section (8 nopes length, 3 bricks high), enabling endless high bridges, nice :) * Using pjotrx interfaces, so it's fully compatible. * Straight sections with only one pillar. * Also the old duplo cars fits the track. (Not the case with the original duplo bridge version.) * Longer initial ramp, so no problems with specific train/wagons combinations. (As recommended by [basestring](https://www.thingiverse.com/thing:2546186)) * Total bridge length is 7 standard straight track lengths. * Added some additional pillars (2,3,4,5 or 6 bricks height). Testing: Also experiment a little with the triangle nops on the side of the track. Both sides are working in both directions, although with nops (V1) are just better for climbing, then without (V0). When going downwards, the driving train wheels slip over these triangle nops. (Should be improved when printing with 0.4 nozzle & 0.1 layer height, but I didn't...) (V2 is working even better.) The most critical situation is having 2 wagons, with something on top. With this longer bottom section of the bridge, the top of these wagons do not collide, nice! The other critical part, is at the top section. The length of the hooks of the wagons allow a little angle between two wagons. The front wheels of the wagon is coming a bit lose from the track (over ~2cm), but are still guided by the rims in the middle. So no worry for derailing. See here the [running train](https://youtu.be/4Mb3ah9ILuU). Printed using these settings: -All bridge parts: PLA Iron Grey; 0.8 nozzle; 0.2 mm layer height * Bottom part: no support; ~7 hours * Middle part: no support; ~6 hours * Top part: with support; ~4 hours -Pillars: PLA traffic yellow; 0.4 nozzle; 0.15 mm layer height * Pillar 5: no support; ~6 hours * Pillar 2 (2x): no support; ~6 hours. Update 20180615 - V2: I just finished a [curved duplo bridge](https://www.thingiverse.com/thing:2921971), with slightly different rectangular nobs for more traction. Parts are printed with 0.4 nozzle & 0.1 layer height. These seem to work better. So this model is updated too. Update 20181103 - V3 (do to comments from bartcerneels): Updated tolerances on interface start & end. Lowered inner rim height of top part. Update 20181227 - V4 Again checking the inner rims, so they are lowered again (see picture). Somehow it's still not perfect, but with fresh batteries, the train will climb the track. Update 20190903 - V5 Updated bottom part, since it was not fitting a duplo block underneath. Tnxs tlactar for the remark. Also finally understand, why the top part of the bridge has sometimes some issues. It's not the rim, which is too high. When the locomotive start to run horizontal again, the wagon behind has still a *big* angle in respect to the loc. This is creating some friction between both connection interfaces, so the wagon is tilting the rear wheels of locomotive a bit, which results in loss of traction. This might be solved by creating either a longer top part (I'm not doing that) or reducing the friction of that interface a little..
With this file you will be able to print Lego Duplo Train Bridge with your 3D printer. Click on the button and save the file on your computer to work, edit or customize your design. You can also find more 3D designs for printers on Lego Duplo Train Bridge.