Lenovo Legion y700 + Gamesir X2 Pro Gamestreamer - Version 3
thingiverse
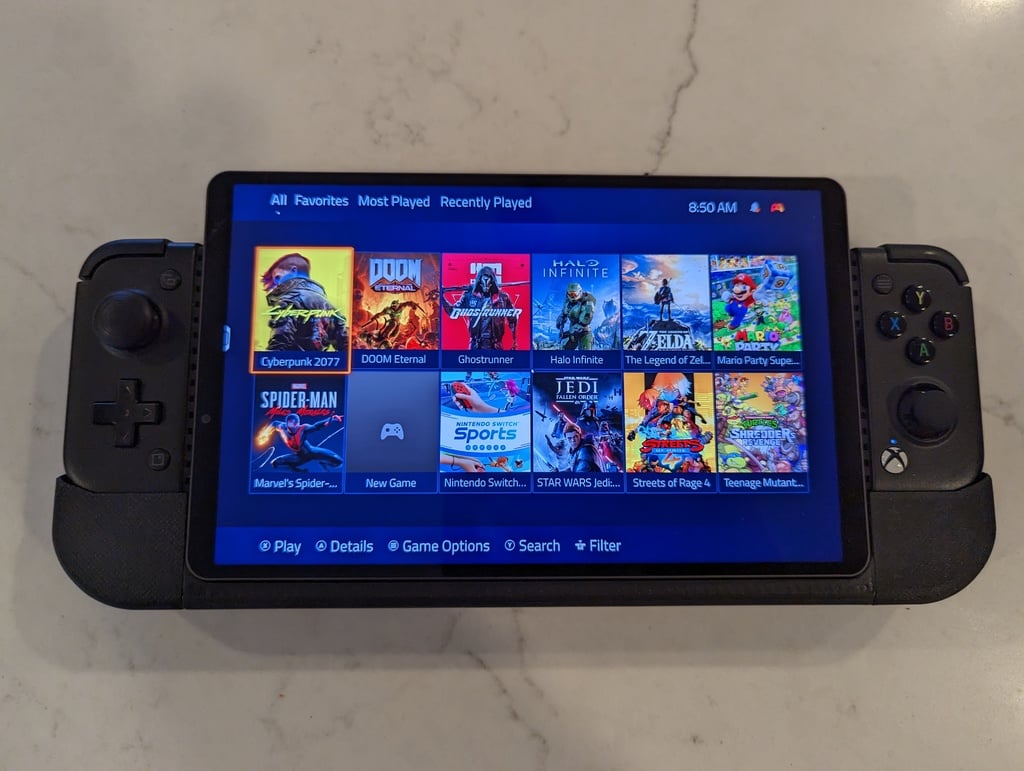
Original Post on Reddit that got flagged as "spam" for some reason... # Reddit Post For anyone who want to try this themselves, I created my own "Cloud Streaming Console" by taking a few components I had, modded the plastic on a Gamesir X2 Pro controller, modeled and 3D printed a basic "shell" with some handles and put it all together. It turned out really well! I wanted to share with the world so you can create one too. If there are questions as to why I did this when there are off-the-shelf items in the marketplace that are really good? I did actually purchased a few of them, tested them out, and returned them all. Here is a back story: I am a PC gamer. I have used streaming to an NVIDIA Shield in the past, and was pretty satisfied with it. I have also used Moonlight on an iPad and it was pretty good too. So... I purchased a Gamersir X2 Pro in Mid 2022 (whenever it was released) to try with my phone, a Pixel 6 Pro. I didn't have high expectations for it going into it, but I was proven wrong. I used the Gamesir controller with my Pixel 6 Pro, and streamed Moonlight through my PC (Custom PC built with RTX 3080 at the time) and I was shocked at how good the experience was! The Pixel 6 Pro has really good specs, almost ideal for this use case. PIXEL 6 PRO DISPLAY & WIFI SPECS: - Resolution: 3120x1440 - Screen Type: AMOLED - Screen Size: ~6.7in - Refresh Rate: 120hz - Contrast: HDR10 - WiFi: WiFi 6 I was getting 60-120 fps in HDR for streaming from my PC. Good setup right! The biggest issues were, it was my phone and gaming would get interrupted, my battery would drain when I was done if I didn't plug in the Gamesir attached to it, I had to take the case off each time I wanted to fit the phone in the controller, and the screen was "kinda" small. The resolution/aspect ratio when streaming was also tricky to get to work correctly with my PC to remove "black bars" on the top and bottom of the screen and to fill the screen without having to use the "stretch" setting in Moonlight, which would caused blur and warped images on the screen. So sometimes I had to wrestle with my PC to get the stream resolution perfect for the phone in HDR without stretching, but I eventually got it to work perfectly every time. For Christmas 2022, we got the kids a Nintendo Switch OLED, as this was their first gaming console now that they are old enough to understand the mechanics of a controller. I started to play the Switch as well, as Nintendo's "gaming world" was new to me too. I absolutely loved the big OLED 7in screen, how much bigger the controller feel was for an adult and that it was a separate device over my phone. The problem was... no streaming of PC "adult-based/AAA" games on Switch at the same graphics as my phone, no streaming from the Switch to my PC (on a non-jail-broken Switch), the refresh rate was not that great, and the kids always had it, which its theirs so rightfully so. I needed my own device and I knew there were lots of options in the market. I started shopping around for a dedicated handheld to stream my PC with, but they need to meet or exceed the screen standards and streaming capability of my Pixel 6 Pro with a Gamesir Controller that I was acustomed too now. I also was looking for something with a screen size of the Switch. I began my quest with REQUIREMENTS... REQUIREMENTS: 1. Under $400 overall 2. Screen resolution & refresh rate had to match or be better than the Pixel 6 Pro 3. Connection for streaming needed to be solid over Wifi 4. Use as a separate dedicated device 5. Had to support Moonlight/SUnshine, Steam Link 6. Experience had to EXCEED the Pixel 6 Pro with Gamesir attachment to justify the cost of spending more money outside of using a $70 Gamesir controller with a device I already owned. MODDING THE NINTENDO SWITCH...Looked into modding the Nintendo Switch for streaming... After some discovery, I wasn't about to potentially ruin a perfectly good, brand new Nintendo Switch that my kids now use all the time, and has been a blessing for me after school for them, when its cold out. Even if I could mod it, it didn't have a high refresh rate, and Wifi could have been an issue. NINTENDO SWITCH DISPLAY & WIFI SPECS: - Resolution: 1280x720 - Screen Type: OLED - Screen Size: 7.0in - Refresh Rate: 120hz - Contrast: HDR10 - Touchscreen: Yes - WiFi: WiFi 5 LOGITECH G CLOUD...Purchased one from Amazon. Was very comfortable to hold, much more comfortable than the Switch or my phone with Gamesir attached to it. The UI was decent, it had a large HD/1080p display and the specs were okay. Also, my PC can switch resolutions to 1920x1080p as a native non-custom resolution. LOGITECH G CLOUD DISPLAY & WIFI SPECS: - Resolution: 1920x1080 - Screen Size: ~7in - Screen Type: IPS - Refresh Rate: 60hz - Contrast: No HDR - Touchscreen: Yes - WiFi: WiFi 5 ...problems, Wifi 5 would cause connection issues... A LOT! I also feel it could have been due to the CPU processing on the device as well as it often felt slower/unresponsive at times when it shouldn't have been. But when it had a solid connection, it was pretty good. It did NOT hold a 60fps framerate and would more often than not, drop down to 30 or so, plus, the limit on 60hz refresh rate made this much more noticeable. It was also expensive for kind of feeling a little "slower" than my phone or my kids 2015 iPad. Returned it, but the form-factor/feel and looks were good, just not a fast enough connection and the screen lacked in most area compared to my Pixel 6 Pro, except for the size. I think this device is perfect for those who have not experienced devices with a better connection and HDR. Overall good, but still lacking. RAZER EDGE...Purchased one of these during the pre-release in January 2023. It was a very good experience overall. Had a high refresh rate, AMOLED screen, high resolution, great connection for streaming with Wifi 6... specs... RAZER EDGE DISPLAY & WIFI SPECS: - Resolution: 2440x1080 - Screen Size: ~6.8in - Screen Type: AMOLED - Refresh Rate: 144hz - Contrast: HDR Capable - Touchscreen: Yes - WiFi: WiFi 6 ...problem, was almost an identical experience to my Pixel 6 Pro with a Gamesir controller. Both OLED, both Wifi6, both almost identical screen size at ~6.8in. It was overall a good experience, but I could not justify spending $400 on something that was almost the exact same a my Pixel 6 Pro... its like buying 2 of the exact same cars. Even the form-factors of Pixel 6 Pro and the Razer Edge "tablet" where almost identical. I also didn't like how the Razer Edge looked worse than my phone with a controller wrapped around it, there wasn't much design thought there, and the Razer tablet screen had really bizarre, large bezels. The Kishi controller was better than the Gamesir controller, but not enough to justify the cost. Returned it. STEAM DECK... (I may get blasted here) I have never owned a Steam Deck, never even tried one. I know they are great devices with a lot of praise. I though the device was a little expensive with what kind of screen came with it. I won't being playing native games or emulating (yet). The Steam Deck IMO may need a refresh soon or a Steam Deck "2" as I felt the tech specs are aging a bit now in 2023. STEAM DECK DISPLAY & WIFI SPECS: - Resolution: 1280x800 - Screen Size: 7in - Screen Type: IPS - Refresh Rate: 60hz - Contrast: No HDR - Touchscreen: Yes - WiFi: WiFi 5 AYANEO 2, ODIN PRO, ONEXPLAYER, UPCOMING ABXYLUTE... I thought all these devices were either way too expensive (like $1000+), overkill or the screen refresh rate, contrast or sizes were sub-par compared to even the Nintendo Switch OLED. Some are cheaper than $400. I didn't need a dedicated OneXPlayer type of Windows machine, as I already had my PC. Odin Pro looked good, but smaller screen than my phone. That left me with my Frankenstein creation... a Lenovo Legion y700 8.8in tablet, with a Gamesir X2 Pro controller. I have though about this for a while. There is no one that makes a "Tablet" controller for an 8in tablet or iPad Mini that is any good. Also, there aren't a lot of 7-8in tablets that have a good refresh rate and resolution... I also got some inspiration from this article who did the same thing, with a slightly different controller. https://m.blog.naver.com/cchkill/222874594491 LENOVO LEGION 8 + GAMESIR X2 PRO... After reading the article above, I was pumped to try it. I found a site (https://www.giztop.com/lenovo-legion-y700.html) that could ship a "Global Version" of the Legion Tablet to the US, as its not available here in the US. Ordered the tablet, and it arrived. It had a Chinese-based ROM called ZUI, which is a flavor of Android 12 built for an overseas market, installed on the tablet. However there was no Google Play store! After reading some other articles and having some experience with flashing Android phones/tablets in the past, I knew I could go on to APKMirror and download a English version of all the Google Apps, Google Services, etc, I needed to get access to Google Play Apps I needed, like Moonlight. APKMirror downloads worked like a charm. Installed Moonlight, paired up with my PC (through Sunshine) and tested the streaming. WORKED PERFECTLY! 120hz, HDR10, absolutely NO connection issues and all on a BIG 8in, 2k, HDR10 screen! I was so excited for this. Then, started opening up the Gamesir X2 Pro controller. Based on the blog article above, the person that wrote it had a slightly different product, but same family. I loosely followed the blog's instructions, and my controller was slightly different, but not much. Took an Xacto knife to 2 small tabs to remove the "stretching" limitations of the Gamesir X2 Pro, and BOOM! I could now stretch the Gamesir controller around the Lenovo Tablet, and plug directly into the USB port. The crazy thing is, Gamesir uses the springs in the device to send the signal to the 2 different sides of the controller and to keep the controller clamped to the device. In theory, youcould replace the springs with normal wire... its a simple design that is very effective. I tested all the controls, with Moonlight, and instantly this became a match made in heaven! Now I had the following specs: LENOVO LEGION Y700 + Gamesir X2 Pro SPECS: - Resolution: 2560x1600 (Aspect Ratio 16:10) - Screen Size: ~8.8in - Screen Type: IPS - Refresh Rate: 120hz - Contrast: HDR10 - Touchscreen: Yes - WiFi: WiFi 6 Now... I have a screen that is larger than all the devices I mentioned above, a higher refresh rate than all of the devices except the Razer Edge (but barely lower), 2k-ish resolution that is also supported as a "native compatible" non-custom resolution of my RTX graphics card, Wifi6 for solid/fast connections like the Razer Edge, HDR10 contrast, and a hard-wired controller for no lag. The length of the device is shorter than a Steam Deck and overall lighter from what I have weighed it out to be. The battery life is good. The only compromise I have is no OLED like the Switch or Razer Edge. But the IPS display on the Lenovo is rated with a high-nit contrast ratio and its HDR10, which I can stream through Moonlight, just like my phone had. Small price to pay for no OLED. All in, the cost of this would be slightly over $400. The next step was to design and 3D print a "Back" to protect the overall new "expanding" section to cover the exposed springs, and some handles and a screen wrapper to make it look more like a handheld and feel much more comfortable. It took a few rounds of 3D printing and design to get the shape/mold of the Gamesir Controller correct, and I am still making version 3 which will push the controllers to the top edge of the tablet to give it a more "Steam Deck" look, and will also cover/protect the top-back of the tablet. But this version 2 (version 1 was much simplier) works/fits extremely well! I even have a "hole" with a USB male to female adapter on the bottom right to charge the tablet through the default Gamesir port that works perfectly. I will post the .stl files on Thingiverse for those that want to try themselves so they can also have a "Dream Streaming Console". I love it, and have used it everyday since I finished it about 3 weeks ago. # Assembly: These are files for a "chin", "back-cover" and "handles" for a "homemade" gamestreaming device I put together from a Gamesir X2 Pro, a Lenovo Legion y700 8.8in tablet, and some modifications to the Gamesir X2 Pro controller. No soldering, no cutting of wires. A little bit of assembly for the pieces and some hardware for screws and a 25mm USB-C extension. # Addtional Hardware Needed: - 4-40 Thread Size Screws (https://www.amazon.com/gp/product/B00GDZEM9Q/) - USB-C Extender (https://www.amazon.com/gp/product/B0BPSNZVQ2/) # Devices Needed: - Gamesir X2 Pro (https://www.amazon.com/gp/product/B0B97FR5D5/) - Lenovo Legion y700 Tablet (https://www.giztop.com/lenovo-legion-y700.html) # Tools Needed: - Razorblade/box cutter or Xacto knife. Xacto knife is easiest. - Philips Screwdriver # Printing ## Print all pieces as you see fit. I also included models for the Gamesir controller (right side) and Lenovo tablet in case anyone wants to remix it. The way I printed mine was as follows, and not how thingiverse rendered it. - Handles: Print the side that will be facing you after assembly facing down towards the bed, so the curve for the back where your fingers rest is facing up during the print. - Center Connector: Print the "inside" facing down towards the bed, so the part your fingers touch is facing up after the print is done. Also, if you have a 230x230 bed like me, print as 1 whole piece, diagonally on the bed to fit it. Printing this as one whole piece keeps the entire device very sturdy and supported after assembly. - Screen Support: Print back of it facing down towards the bed. I have uploaded a "full" size which prints on a 230x230 print bed with skirts. I also split into 2 part (like you see in the photo of the device) in case your print bed is not large enough horizontally. # Gamesir X2 Pro Modification 1. Take apart the Gamesir controller with a small philips-head screwdriver on the back of the device. Then slightly peal back the rubber in the middle of the device to reveal more screws. You don't have to remove the rubber mat completely, just enough to get to the screws. Once this is done, you can use a credit card, screen-pry or I have even seen some use a pizza cutter to gently pop-open the plastic case on the game sir. 2. Once the Gamesir controller is open, you should be able to completley seperate the right-hand side back of the controller (see images). There will be 2 rectangle "notches" on the back. Take your razorblade and cut these off. Removing these notches removes the overall "limit" the Gamesir controller can expand. Be carefull not to stretch the device too far once this is done. # Parts Assembly 1. Use 4 4-40 screws to attach the "Center Connector" to the left & right handles in the back, 2 screws each. 2. After the Center Connector and handles are screwed together, flip the connected pieces over (in the position you would hold the device when playing) and line up the bottom of the "Screen Support" to the bottom of the "Center Connector". You will see 6 screws that will sit behind the screen once the screen is put in place. Then connect the screen support to the center connector. Screw and screws all in all the way in as these holes are recessed so none of them will scratch or touch the back of the tablet once its assembled. 3. Insert the USB-C Extender into the right handle hole. You should not have to glue it as its a tight fit, and should line up with the Gamesir charge port. You may have to push the USB-C extender in slightly after the Gamesir controller is clamped around everything. # Device Assembly 1. Take the modded Gamesir controller and stretch it enough to fit the "Spacer" in-between the new widened space. This "spacer" gives the device support, protects the springs and signal from being lost to keep the springs from grounding themselves unintentionally on the tablet back, and keeps the tablet expansion of the controller just slightly under the width of the tablet once inserted. The "spacers" has 2 sides that wraps around the middle section. The longer sides goes around the "top" of the controller, and the shorter the bottom. 2. Take the Gamesir controller with the "spacer" installed and stretch it a little further around the assembled parts just above the right side "USB-C" cutout. The USB-C port on the Gamesir device swivels up and down, so you should be able to swivel up and down enough to where you have room to do this. Don't push the Gamesir controller down into the handles yet, you will need this slight bit of room to insert the tablet in-between the spaces. 3. Insert the tablet and line it up with the USB-C port on the Gamesir controller just as you would with a phone. Should fit in perfectly. 4. Slide/push the controller and inserted tablet into place. Watch the USB-C extension as it may need a little bit of wobbling to get it into place, but once it feels that it is in, it will charge the controller with tablet as you would expect. That's it. If you didn't want to print all these parts, in theory, you could just print the "space" and keep the controller wrapped around the tablet. It would look as good or clean, and for adult hands, feels a little cramped. I will have version 4 soon that will move the controllers all the way to the top of the tablet and extend the handles length. It will require the creation of a custom USB-C cable and a little more involvement with opening the Gamesir X2 Pro, but will still NOT require and major modification like soldering or cutting.
With this file you will be able to print Lenovo Legion y700 + Gamesir X2 Pro Gamestreamer - Version 3 with your 3D printer. Click on the button and save the file on your computer to work, edit or customize your design. You can also find more 3D designs for printers on Lenovo Legion y700 + Gamesir X2 Pro Gamestreamer - Version 3.