Leveling Honeycomb Table for Laser Cutter
thingiverse
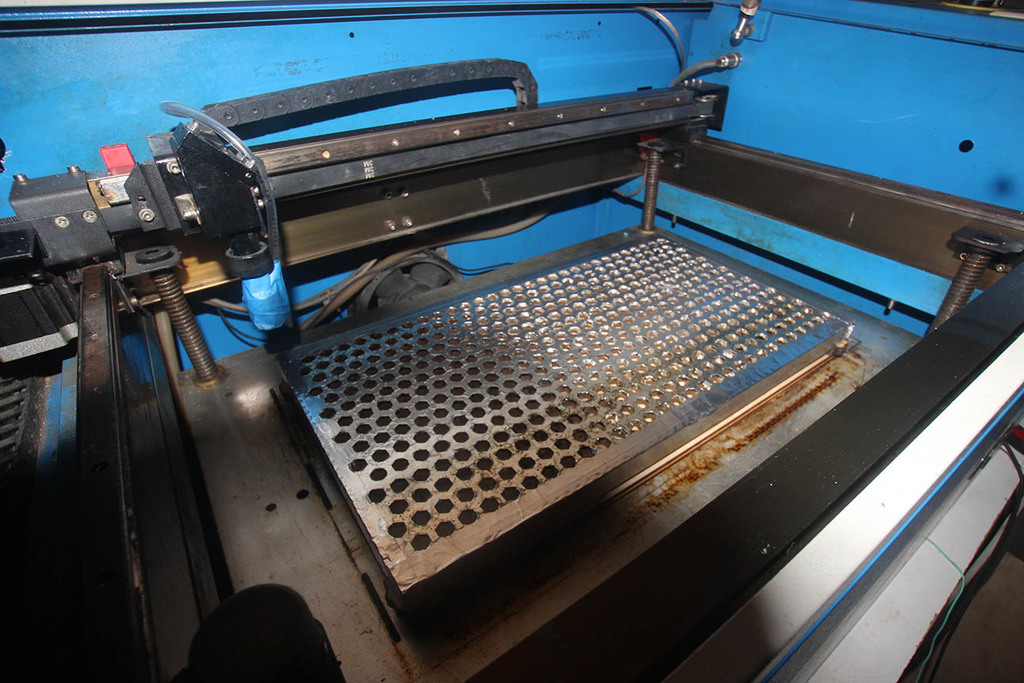
Because I have a 3D printer I'm very used to leveling the bed using thumb screws, so I thought to make a similar setup for my laser. The z-level on my Shenhui G350 is adjustable, but the bed itself is often out-of-level. Taking the belt off the z-height adjustment tensioner pulley and spinning each rod individually lets me get it close, but it's a pain to do so. I finally got around to making this so I could etch a crystal obelisk for a friend; because the obelisk tapers I would have had to prop it up with a wedge to get the etching surface level. This table made this task much easier, the work was more stable, and I was able to be more precise. I made this leveling honeycomb table with scrap parts I already had sitting around. The nuts and bolts can be whatever you have, just change the size of the holes to fit. If you are buying nuts and bolts specifically for this project and don't want to fuss with changing the drawings, my bolts are 1 1/4" long, the bolt heads fit a 9/16" socket, and the nuts fit an 11/16" socket. I used a little epoxy to keep the nuts and bolts in place. The plywood is 2.7mm thick. The cutting area on my laser is 300mm x 500mm, and while I could have made this full size I decided to scale it down a little to 250mm x 450mm to make reaching the thumb screws easier. Material can hang off the sides after the level is set, so the smaller size isn't a limiting factor. To protect the honeycomb table from being consumed by the laser, I brushed on some glue and stuck down a sheet of aluminum foil. After the glue dried I cut out all the honeycomb holes (I slashed an x in each hole with a utility knife and then used my fingertip to press the remaining foil in). I then wrapped the edges with metal foil tape. To level the honeycomb table, center the laser head over the honeycomb and raise the table z-level until the lens carrier nearly collides with the surface. Then move the laser head to each corner, adjusting the thumbscrews as required to keep the lens carrier almost in direct contact with the honeycomb table. If you're working with a tapered piece, first place the piece on the honeycomb table and then set the level with the thumbscrews so the piece is coplanar with the lens carrier. Once you've got the level set accurately you may drop the z-level and focus as usual.
With this file you will be able to print Leveling Honeycomb Table for Laser Cutter with your 3D printer. Click on the button and save the file on your computer to work, edit or customize your design. You can also find more 3D designs for printers on Leveling Honeycomb Table for Laser Cutter.