Levitator
thingiverse
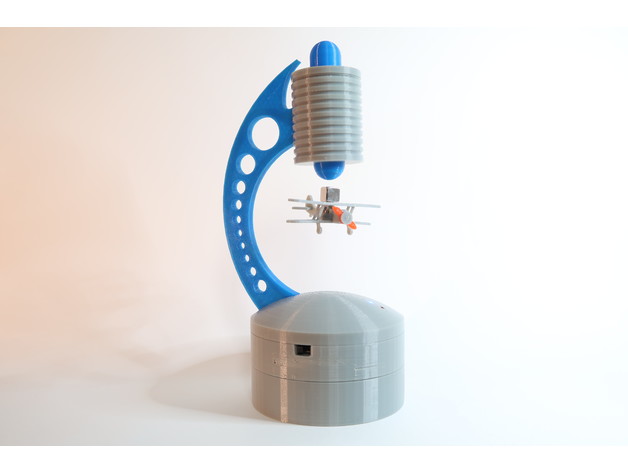
Coming soon: An arduino Uno + proto shield version !! EDIT 2018/03/04 Added V2 board and schematics with optional DC-DC 5V converter for a much better stability EDIT 2018/03/01 Added more picture Added new video Added power-bank add-on Released Levitator firmware 1.1 Released LevitatorHost 1.5 EDIT 2018/02/21: Improved Arm and Coil Cylinder fixation. Updated base for USB mini connection. Added an Assembly and User's manual EDIT 2016/12/15: Added link to the LevitatorHost project EDIT 2016/12/19 Added some PDF files for the board creation. EDIT 2016/12/14: Added more pictures Added board schematics and gerber file. Added Arduino Levitator project link. Added Some build instructions Added Levitator-Bottom-NoBTswitch part This is my remix version of the great Gravitator. My father was a scientist in the magnetic field and I've always been fascinated by his work. When I saw the Gravitator, I decided to dive into magnetic levitation and build a unique Christmas present for him. Looking on the web at some similar projects using an arduino to control the levitation, I came up with an interrupt based PID controller that can be configured and controlled over USB or bluetooth. I've also developped the host controller that allows to fine tune the levitation. As I wanted the levitating magnet to go up and down in a controlled way, I've also implemented a simple sine wave generator that interpolate between 2 predefined position. Here are some small videos showing theBeating Heartcontrolled levitation You'll find the arduino project here: Levitator You'll find the Levitator Host application here: LevitatorHost Some add-ons you might like:Levitating BiplaneLevitating Biplane - smallerLevitating Xmas TreeLevitating HeartLevitating Easter Egg12.6V Power-Bank Let me kown when you build one and post pictures !!! Enjoy ;-) Overview and Background Magnetic Fields and PID Control loop This project let's you explore the magic of magnetic field with a fun and ready to use arduino projet. A few printed parts. Some simple electronic components. An Arduino Nano. and you're all set for some magic. You're looking for a fun presentation of magnetif field generation ? This project is for you. You're looking for a practical implementation of a PID control loop ? This project is for you. You're looking for an "advance" Arduino programming project ? This project is for you. You just want to show your beloved one, how your heart if flying and pulsing when you think at her/him ? This project is for you :-) Lesson Plan and Activity Print Print all the parts as explained in the Assembly And User's Manual. Build the control board Get all the electronic components and build the control board as explained in the Assembly And User's Manual. Assembly Follow the assembly procedure as explained in the Assembly And User's Manual Program the Arduino Nano Download the Arduino project and flash the Arduino Nano as explained in the Assembly And User's Manual Launch the LevitatorHost application Download and launch the LevitatorHost application as explained int the Assembly And User's Manual Have fun Levitating objects You can now start experimenting levitation as explained in the Assembly And User's Manual Share your experience If you build this project please share pictures and comments Have Fun Instructions Printed parts I've printed all parts at 0.25mm, 25% infill. 1 x Base-Bottom : support doesn't matter or 1 x Base-Bottom-NoBTswitch: (if you don't want bluetooth or don't intend to turn it off) 1 x Base-Top : support >45° overhang 1 x Side : no support !!! (otherwise you'll have difficulties to clean up the conduits. 1 x Sensor Holder : support >60° overhang (so you don't have to clean the thread path) 1 x Sensor Cap : support >60° overhang (so you don't have to clean the thread path) 1 x Cylinder Body : support >45° overhang 1 x Cylinder Top : support doesn't matter 1 x Cylinder Cap : support >60° 1 x Coil A : support doesn't matter 1 x Coil B :support doesn't matter Note: If you plan to add the bluetooth module, consider using a switch to turn it off. Otherwise, you won't be able to flash the arduino nano via USB without opening the base and unpluging the bluetooth module. Both USB and BT modules are wired to the same RX/TX pins and the BT will interfere with the arduino bootloader when flashing the board. Hardware 1 x Hexagon socket head cap screw M6x40 mm 1 x M6 nut 5 x Self tapping screw 2.9x13mm 2-4 x M2.5x5mm screw (to fix the board in the Levitator base) Electronic parts For the Board 1 x 12V 800mA power supply. 1 x Arduino nano nano board 2 x 15 pin female single row straight header (2.54mm pitch) 1 x DC power jack 5.5-2.1mm, 8mm Diameter: power jack 2 x 3mm LED, the color of your choice. 2 x 330ohms 1/4W resistance. 1 x 470uF polarized capacitor 1 x 10-100nF capacitor 1 x IRL540 mosfet transistor or equivalent (need to be TTL "compatible"). 1 x 1N4148 diode or equivalent 3 x 2 pin JST male header 2mm pitch 3 x 2 pin JST female header 2mm pitch + crimps 2 x 2 pin JST male header 2.54mm pitch 2 x s pin JST female header 2.54mm pitch 1 x 3 pin JST male header 2.54mm pitch 1 x 3 pin JST female header 2.54mmpitch + crimps For the Coil/Sensor: 1 x SS495A Radiometric linear hall effect sensor (or equivalent) ~140m CU wire Ø 0.28mm 5 x ~40cm 24-26 AWG wires to connect the coil and sensor to the board. For the Levitating object: Some very strong neodyme permanent magnet (N30 N42 N50) You'll need one or more for the levitating object and you need one or more to put on top of the coil To Add bluetooth capability: 1 x HC06 or compatible bluetooth module HC06 module 1 x 4 pin female single row straight header (2.54mm pitch) 1 x Mini slide switch SS12F15G Note: Be careful, not all chinese Arduino Nano clone are born equals !!! Some are very poorly manufactured and thus very sensitive to noise or interferences. A Nano board is extremly sensitive to shorts!! Be carreful when working with a bread board and wire al around. I've burn a couple :-( The whole system is quite sensitive to the stability of the power source. I've tried several power supply and I still get some 50Hz oscillations that can destabilize the system. Assembly And User's Manual Please refer to the Assembly And User's Manual
With this file you will be able to print Levitator with your 3D printer. Click on the button and save the file on your computer to work, edit or customize your design. You can also find more 3D designs for printers on Levitator.