Ligero69 Camera Body for Mamiya Press lens & M-mount roll/cut film back
prusaprinters
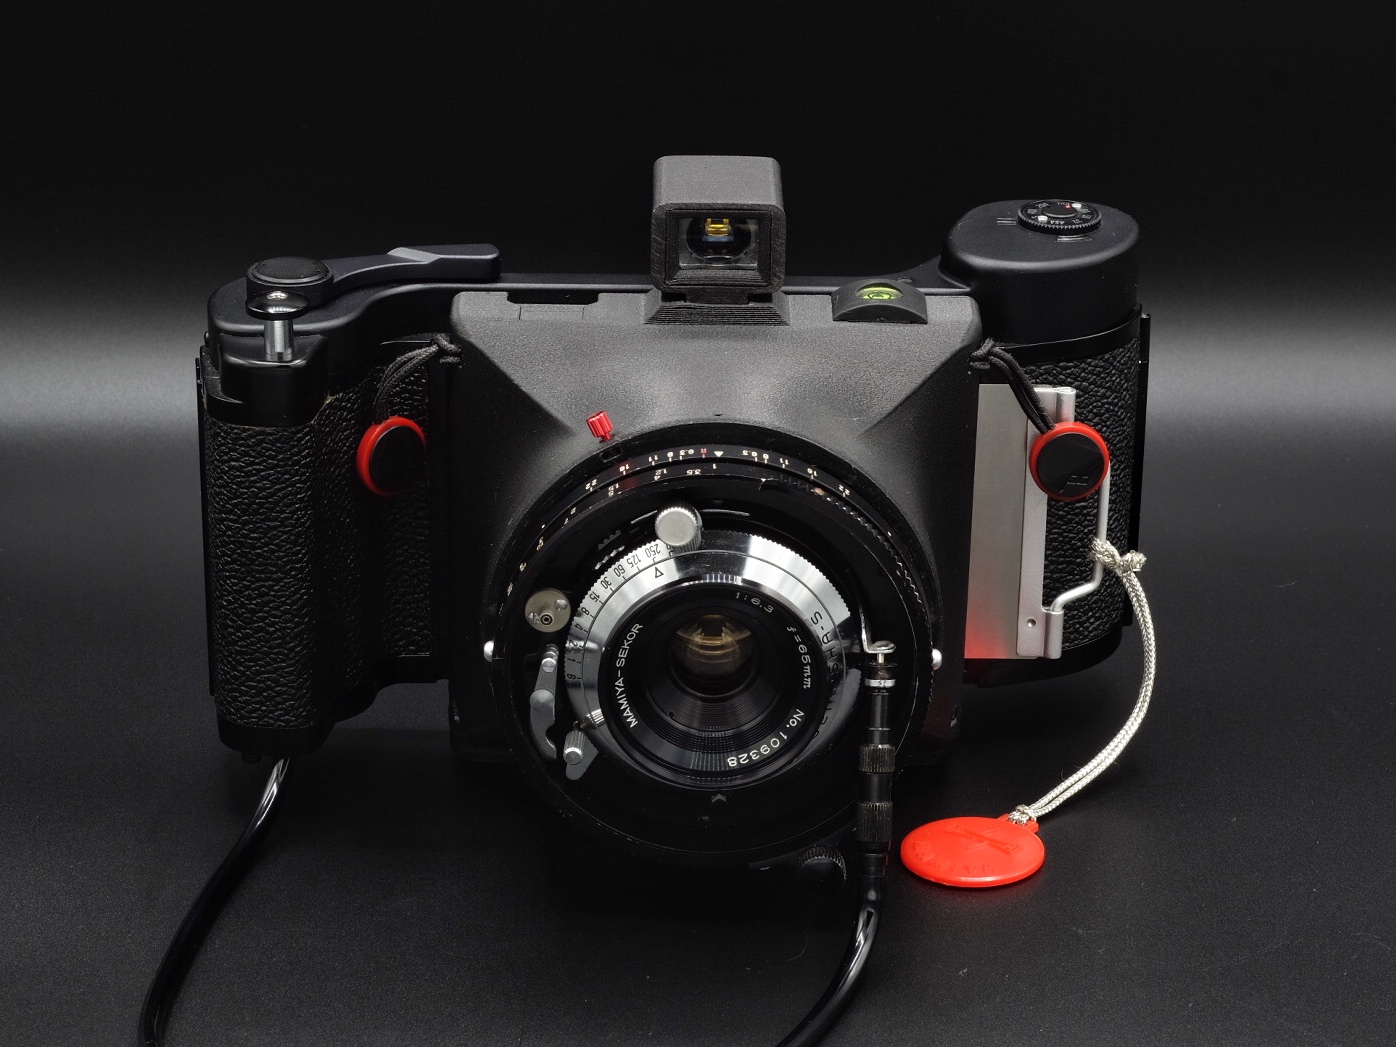
<p>Thank you all for the kind messages! Can't wait to see your images, please tag them in social media #ligero69 where possible. Much love!</p><p>………</p><p>Update Nov 15, 2021: Revision E is uploaded and D nuked. New revision has a much improved lens mount, and some minor tweaks:</p><ul><li>Further adjusted the lens opening. With CFPC every single lens I have installed on this revision has not needed any adjustment, they will all feel snug. I added a small raised area that gives more friction without making things too tight.</li><li>The set screw has moved off center so that it no longer needs to bite the lens to hold it in place. Now it just blocks the lens from turning out.. no need to tighten. </li><li>Added a stop so the lens will center correctly when you turn it. It won't keep turning. </li><li>The seat area for the tripod has been increased for better support.</li><li>The rear has been moved lower to accommodate larger knurled thumb screws (see images). This also means the back lock bar increased in height. </li><li>Slightly tweaked the cold shoe heights but you should adjust those according to your accessories.. some people end up with loose ones and other with tight ones. The material you use impacts this greatly as well as with the openings for the nuts/screws.</li><li>Added lanyard mount points to all four corners, works great with Peak Design anchor locks. I tested the hell out of this with CFPC material, but PLA/PETG do your own safe stress testing just in case.</li></ul><p>Enjoy!</p><p>..........</p><p>Update Feb 23, 2021: Revision D is now the latest. Minor adjustments made to produce a tighter fit on the film backs. Also increased the face of the lens mount due to complaints that the lenses are too loose. If you end up with a tighter lens mount than desired, just sand the entire lens mount face until desired looseness is reached.</p><p>..........</p><p>Update Jan 22, 2021: No model update, just wanted to recommend printing lens down, and supports from build plate only. This seems to make the best mix of removable supports and cleaner print overall. Change the contact Z distance if your supports are too hard to remove, or not good enough.</p><p>..........</p><p>Update Jan 14, 2021: Rev C is the latest, and optimized for ironing on all top layers. With CF PC you can get away with 0.2mm, 3 perimeters, 10% infill. Dial it up higher for weaker materials. The overall height in PrusaSlicer is 64.29mm, and you will want your print to measure between 64.20-64.30mm in height to ensure as accurate infinity focus as possible.</p><p>..........</p><p>Light & compact camera body, replaces Mamiya Press bodies + M-mount. See the diagram in the gallery for the compatible backs. Not on there is the Model 3 back that goes great with this body. Takes all Mamiya Press, Super 23, Universal Press compatible lenses.</p><p>The assembly is 3 pieces, consisting of Body + top mounting lip + sliding back lock bar. Download the grip cable release clip in my designs.</p><p>Lens mount is designed to fit the tightest fitting lens I have, so most others will be looser. Use (1) M2x8 knurled hex screw & M2 nut as needed for the set screw.</p><p>Back lock requires (2) M3 knurled screws & (2) M3 nuts, M3x16 is ideal. Top lip requires (3) M2x8 countersunk screws & (3) M2 nuts. Upon test fitment of your completed assembly, leave the (3) M2 screws for the top lip slightly loose and adjust based on how much pressure is put on that lip.</p><p>I designed this for Priline CFPC, which has better dimensional accuracy compared to other materials. Infinity focus may be an issue, but the body has resting pads that can be sanded down or removed as necessary if your print is oversized. To go in the other direction just add felt tape on top. A combination of both may be required.</p><p>Ideal distance from the first lip of the lens mount (where the lens tabs rest), to the film back's pressure plate should be 61.35mm, no more than 61.5mm, and no less than 61.25mm.</p><h3>Print instructions</h3><p>0.16mm or 0.2mm layer height, 3-4 walls, 20-30% gyroid infill (though 10-15% may work for strong materials like CFPC but just on the body, stick to something stiffer on the lip and lock bars). Print with lens mount facing down. Make sure your supports aren't too dense or too sparse for the lens mount channels. I print 12% in CPFC and in the .3mf file I've added some infill modifiers in certain spots a few layers before flat areas so those will print better due to the poor CFPC bridging.</p><p>Supports from build plate only. This seems to make the best mix of removable supports and cleaner print overall. Change the contact Z distance if your supports are too hard to remove, or not good enough.</p>
With this file you will be able to print Ligero69 Camera Body for Mamiya Press lens & M-mount roll/cut film back with your 3D printer. Click on the button and save the file on your computer to work, edit or customize your design. You can also find more 3D designs for printers on Ligero69 Camera Body for Mamiya Press lens & M-mount roll/cut film back.