Light-up Rose with Stem (pluggable)
thingiverse
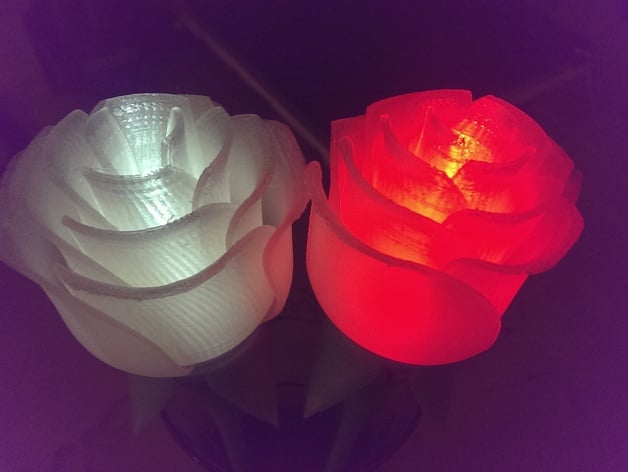
This is not really a mashup. I simply added an element that makes assembly simpler. Parts needed: some wire, red and black preferred some heat-shrink tubing red/blue/white LEDs, at least 14000mCd resistors, depending on the LEDs, I used 100Ohms for red, blue wouldn't even need resistors micro sliding switches (e.g. these: http://www.ebay.com/itm/S09-10-Stk-Mini-Schalter-Miniatur-Schiebeschalter-8-5x3-5x10-5-mm-/311585219557) CR2032 battery holders Circle shaped part This piece of plastic needs to be glued to the bottom of the flower, with the protruding ring facing down and -of course- the large round surface super-glued to the base of the rose. Test print it so you can find the right amount of friction. The rose must stick firmly to the stem, but should also be removable, perhaps with a bit of twisting required. This allows for easier battery changes in the future - no glue breakups required. Assembly: Well, print the stem, rose and circle part. super glue the circle part to the rose (see 2nd pic) solder together as shown in the other pics glue switch into the stem, it's a bit tricky not to get super glue stuck in the switch and make it non-functioning. Maybe use high-viscosity super glue. Guide LED into the hole in the rose (no gluing required) Plug rose onto stem. Easy, right? Enjoy. Print Settings: Printer: Prusa i3 Custom Rafts: No Supports: Yes Resolution: 0.2 Infill: 30%, rectlinear Notes: Other print settings: Material: PLA (I even used glow in the dark green) Minimum layer time: 12s Supports: only on build plate Speed: 70mm/s
With this file you will be able to print Light-up Rose with Stem (pluggable) with your 3D printer. Click on the button and save the file on your computer to work, edit or customize your design. You can also find more 3D designs for printers on Light-up Rose with Stem (pluggable).