Light Vision (Raspberry Pi LED Matrix)
prusaprinters
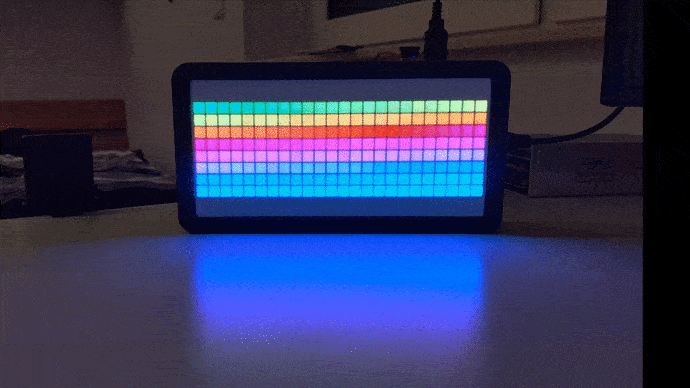
<p><strong>The Rough Plan:</strong></p><p>A matrix display with a Raspberry Pi that we can control over Wi-Fi with our own C# program.</p><p> </p><p><strong>Accurate execution:</strong></p><p> </p><p><strong>First Versions:</strong></p><p>The big problem with this project was that we had completely miscalculated how to do the implementation with the lighting in the beginning. We thought it would be good if we took individual LED strips and then connect them to a large display. The idea is okay, but we have planned the space very small, so I have tried several weeks to place the LEDs to the millimeter. The cables were pretty thick and always broke of the soldering pat. After a desperate weekend where almost all LED strips broke, I decided to use PCBs and after one day everything works.</p><p><img class="image_resized" style="width:40%%;" src="https://cdn2.myminifactory.com/assets/images/post/d347a37b-threed-designer-11102021_resize.jpg"> </p><p> </p><p><img class="image_resized" style="width:40%%;" src="https://cdn2.myminifactory.com/assets/images/post/1ba8f9b3-threed-designer-11102021_resize.jpg"> <img class="image_resized" style="width:40%%;" src="https://cdn2.myminifactory.com/assets/images/post/7407dc10-threed-designer-11102021_resize.jpg"> <img class="image_resized" style="width:40%%;" src="https://cdn2.myminifactory.com/assets/images/post/703d9118-threed-designer-11102021_resize.jpg"> </p><p><strong>The Program:</strong></p><figure class="image"><img src="https://github.com/18Markus1984/LightVision/raw/master/images/editor.PNG"></figure><figure class="image"><img src="https://github.com/18Markus1984/LightVision/raw/master/images/animator.PNG"></figure><figure class="image"><img src="https://github.com/18Markus1984/LightVision/raw/master/images/templates.PNG"></figure><figure class="image"><img src="https://github.com/18Markus1984/LightVision/raw/master/images/dashboard1.PNG"></figure><figure class="image"><img src="https://github.com/18Markus1984/LightVision/raw/master/images/dashboard2.PNG"></figure><p>We have developed a program based on C# and using Visual Studio to control the matrix display. Before we even started programming, we thought about a short list of requirements for the program, which must be definitely fulfilled. There was then also an extension list, if we still have time.</p><p><strong>Requirements:</strong></p><ul><li>Connect to server on RaspPi</li><li>Converting input in the fields to LED control</li><li>Create own pixel art - images and animations</li><li>Display messages or text</li><li>Add</li><li>Control the program on RaspPi (set time, delay between tiles etc.)</li><li>Predefined tiles</li></ul><p><strong>Add-ons for later</strong></p><ul><li>more tiles e.g. stonks, weather or time</li><li>Embedding of animations and images from the Internet community</li><li>add GIFs/PNG/JPEG</li></ul><p>Functions that the user has at the end go through page by page.</p><ol><li>The first image shows the default editor. Here you can click on each pixel and give it a color, use the filler tool, erase, click on a color on the screen and then transfer it to the selected color box, change the name of the image and the display time of the image, insert a PNG/JPEG, which will be scaled down. You can also select existing images and then edit them.</li><li>The Animator is an advanced version of the Editor. Here you have the same drawing functions as in the editor, but you can draw your own animations. When you create an animation, you select the length of the animation, and it is shown by the green dots at the top. Additionally, you can insert GIFs which will be converted without drawing. A special feature is that you do not have to draw frame by frame, but can also adjust the display duration of the individual images.</li><li>The template page shows the prefabricated special fields, which we could finish at the end. First, the display of the time with the clock and the value of the GameStop stock.</li><li>The dashboard then shows all the straight active images and animations. The animations are all animated as well, so you can tell the difference. By dragging and dropping, you can move the tiles and change the display order. With a double click on a tile, you get to the respective editor for animations or images.</li><li>In the settings, you can then change the color of the program and switch off that the tiles in the dashboard are animated, because this has caused a slight confusion for some people.</li></ol><h3>Connection:</h3><p><img class="image_resized" style="width:40%%;" src="https://cdn2.myminifactory.com/assets/images/post/ba946727-threed-designer-11102021_resize.jpg">After each save of the user, the Program sends all the data that the Program has stored locally to the root server. The images are stored in the form of bitmaps, i.e. an array of pixels with color values. Saving is made easier by the fact that we only store images and animations consist of images, and then these are simply reassembled as an animation when they are sent back. Every 15 minutes, the Raspberry Pi asks the server for data. And then gets all the data transferred.</p><h3>What you need:</h3><ul><li>Raspbery Pi</li><li>thick Cables</li><li>Power Supply</li><li>3D Printer</li><li><a href="https://www.amazon.de/Aukru-Schaltbarem-Ladekabel-Blackberry-Smartphones/dp/B01F52E5GC/ref=sr_1_5?__mk_de_DE=%C3%85M%C3%85%C5%BD%C3%95%C3%91&crid=3E9TKXPB72C3Z&dchild=1&keywords=micro+usb+kabel+mit+schalter&qid=1633870652&qsid=262-6154268-6466168&sprefix=micro+usb+kabel+mit+sch%2Caps%2C165&sr=8-5&sres=B01DPPSYJU%2CB0198PQK6K%2CB01F52E5GC%2CB01M58O9M9%2CB07VN1Q8L5%2CB071YSWYF2%2CB07XLLBY4W%2CB01HEXFQTU%2CB01H66816U%2CB07CP7W42C%2CB08DQZY834%2CB08M3SML22%2CB01J1NB8KW%2CB093RSR2RL%2CB07K9KVG6W%2CB078567K85&srpt=ELECTRONIC_CABLE">Power cable with switch</a></li><li>Some M3 nuts</li><li><a href="https://www.amazon.de/GeeekPi-Raspberry-Brushless-K%C3%BChlk%C3%B6rper-retroflag/dp/B07FVQG926/ref=sr_1_12?__mk_de_DE=%C3%85M%C3%85%C5%BD%C3%95%C3%91&dchild=1&keywords=5v%2Bfan&qid=1633900793&qsid=262-6154268-6466168&s=computers&sr=1-12&sres=B07J5C16B9%2CB07X93XGBD%2CB0915JCLFT%2CB00NEMGCIA%2CB071W6JZV8%2CB06XCTHQG3%2CB07LBDL3W3%2CB07G12CXLN%2CB07FVQG926%2CB07DXLV5Z6%2CB08DRH5HQS%2CB07F1HFGH2%2CB07DXDQKZM%2CB07FZZXMJ5%2CB095WGK3R6%2CB092ZF995F%2CB07ZBRGC5K%2CB07X37NXGX%2CB08RDJJ99B%2CB07FZZQJ2W&srpt=ELECTRONIC_COMPONENT_FAN&th=1">cooling Fans</a></li><li>3* <a href="https://www.amazon.de/gp/product/B07Z7R39HX/ref=ppx_yo_dt_b_asin_title_o01_s00?ie=UTF8&psc=1">LED Panel</a></li><li><a href="https://github.com/18Markus1984/LightVision">The program</a></li><li>A root Server where you let the Server run. you can use a Raspberry Pi. We rented a server at <a href="https://www.hetzner.com/de/">Hetzner</a></li></ul><p><img class="image_resized" style="width:40%%;" src="https://cdn2.myminifactory.com/assets/images/post/5a86f230-threed-designer-11102021_resize.jpg"><img class="image_resized" style="width:40%%;" src="https://cdn2.myminifactory.com/assets/images/post/60f494aa-threed-designer-11102021_resize.jpg"> <img class="image_resized" style="width:40%%;" src="https://cdn2.myminifactory.com/assets/images/post/6ba12095-threed-designer-11102021_resize.jpg"> </p><h3>3D print:</h3><p>I would recommend to print most of the components in black. I had printed the front panel in white myself, but this caused massive ghosting, with the LEDs illuminating the adjacent chamber of the other LEDs. To fix this problem, I printed the front panel with a color change, where only the first layer is printed in white and the rest in black. The other components should print without problems with support. I would also recommend Cura for this, as their support is better than PrusaSlicer. You only need every part once.</p><p><img class="image_resized" style="width:40%%;" src="https://cdn2.myminifactory.com/assets/images/post/9260fab1-threed-designer-11102021_resize.jpg"> <img class="image_resized" style="width:40%%;" src="https://cdn2.myminifactory.com/assets/images/post/2445b00d-threed-designer-11102021_resize.jpg"></p><h3>Soldering:</h3><p>Now that you have printed all the parts, take the front plate and place the 3 PCBs on it. Next, take a strip of tape to securely connect the PCBs as you solder them. Now take the backplate(Puscher) with the large openings and screw the front panel and the pusher together. Be careful not to move the boards between the pusher and the front panel while screwing them together. Now all you have to do is solder the PCBs so that each pin is connected to the other pin so that the LEDs are all connected to each other as if in a long row.</p><p><img class="image_resized" style="width:40%%;" src="https://cdn2.myminifactory.com/assets/images/post/2ce641f2-threed-designer-11102021_resize.jpg"></p><h3>Connection to the Raspberry:</h3><ul><li>Now you can take the lid and screw the Raspberry Pi to it. I would recommend using the Raspberry Pi heat sink. Don't be confused by the different backplates. The first one is only the V1.</li><li>You now need a 2 pin header to connect Ground and Din to the Raspberry Pi. You also only have to connect one end of the boards to the Raspberry Pi. Not only that, but you can connect the fans to the 5V pins in red and the GND pins in black.</li><li>Furthermore, you should also glue two small fans, as the back of the LED boards can heat up very strongly. It even got so hot that the plastic deformed.</li><li>You can get the code for the Raspberry Pi on my GitHub page.</li></ul><p><img class="image_resized" style="width:40%%;" src="https://cdn2.myminifactory.com/assets/images/post/32e5fdfc-threed-designer-11102021_resize.jpg"> <img class="image_resized" style="width:40%%;" src="https://cdn2.myminifactory.com/assets/images/post/39b33179-threed-designer-11102021_resize.jpg"></p><p><img class="image_resized" style="width:40%%;" src="https://cdn2.myminifactory.com/assets/images/post/b15b1da8-threed-designer-11102021_resize.jpg"></p><p><img class="image_resized" style="width:40%%;" src="https://cdn2.myminifactory.com/assets/images/post/a965447b-threed-designer-11102021_resize.jpg"><img class="image_resized" style="width:40%%;" src="https://cdn2.myminifactory.com/assets/images/post/0adafacf-threed-designer-11102021_resize.jpg"></p><h3>Power:</h3><p>For the power, we use a power supply, because the LEDs consume more energy than the Raspberry Pi can provide. In addition, care should be taken with thin cables. If thin cables are used, you should take extra care that they do not burn through. A good test is if you try it briefly with the cable, but have your hand on the power switch to turn it off in case the cables are getting hot. We used two cables to be on the safe side, because in the first test I created a little glowing cable, which melted the isolation in one second.</p><p><strong>But if you have never worked with high voltage, you should rather do so with someone who is familiar with something like this!!!</strong></p><p><img class="image_resized" style="width:40%%;" src="https://cdn2.myminifactory.com/assets/images/post/a257000c-threed-designer-11102021_resize.jpg"> </p><h3>Srewing the Backplate:</h3><p>Now you only have to screw the lid, you should be careful not to tighten the screws too much.</p><p><img class="image_resized" style="width:40%%;" src="https://cdn2.myminifactory.com/assets/images/post/9b1ba0f8-threed-designer-11102021_resize.jpg"> <img class="image_resized" style="width:40%%;" src="https://cdn2.myminifactory.com/assets/images/post/4b523d6b-threed-designer-11102021_resize.jpg"> </p><h3>Conclusion:</h3><figure class="media"><oembed url="https://www.youtube.com/watch?v=3QI4w06QXg0"></oembed></figure><p><img class="image_resized" style="width:40%%;" src="https://cdn2.myminifactory.com/assets/images/post/5d38ff5d-threed-designer-11102021_resize.jpg"> <img class="image_resized" style="width:40%%;" src="https://cdn2.myminifactory.com/assets/images/post/54541d7d-threed-designer-11102021_resize.jpg"> <img class="image_resized" style="width:40%%;" src="https://cdn2.myminifactory.com/assets/images/post/107ee5b7-threed-designer-11102021_resize.jpg"> <img class="image_resized" style="width:40%%;" src="https://cdn2.myminifactory.com/assets/images/post/6bf79a82-threed-designer-11102021_resize.jpg">I really liked the project and had a lot of fun developing and building it. I put a lot of time into the development and also had some misprints, as you can see in the last picture on the high stack of prints. I would rather recommend everyone if you do such a project to develop it yourself, because you also learn so much more than if you follow a guide or maybe someone is motivated to take my project and revise it. There are even minor issues like overheating, which we solved through the fans, but it would be more elegant to get it running without active cooling. I really liked this project. I hope you enjoyed this Instractable and have fun to build it. Let me know in the comments what you think or if you have any questions? Thank you for reading.</p><p> </p><p><strong>If you like to, check out </strong><a href="https://www.prusaprinters.org/social/194698-max-siebenschlafer/prints?o=liked"><strong>my other designs</strong></a><strong> too!</strong></p>
With this file you will be able to print Light Vision (Raspberry Pi LED Matrix) with your 3D printer. Click on the button and save the file on your computer to work, edit or customize your design. You can also find more 3D designs for printers on Light Vision (Raspberry Pi LED Matrix).