Lighted Death Star Christmas Tree Topper
thingiverse
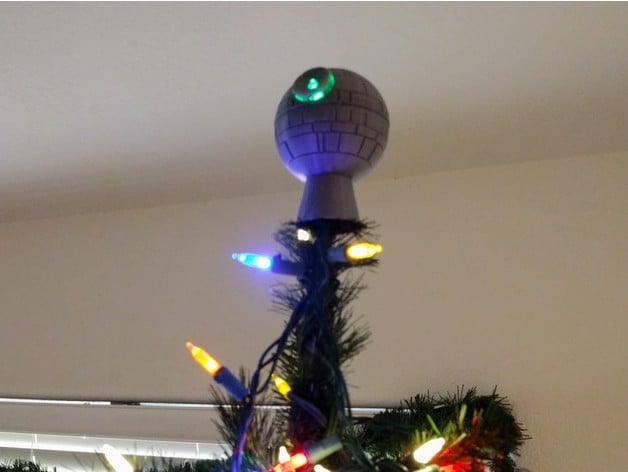
My wife wanted a star for the top of the tree. My 1.5 year old son likes balls. I like Star Wars. Everyone wins. This can be created in a few ways. The top of the Death Star has the emitter array cut away into its own part. If you want a DS with the array in place and a light in the middle, print the one with the hole and glue it in. If you want the array coming into position, Rogue One trailer style, print either the solid or hole version, print a pin, and assemble. If for some reason you want a solid and lightless DS, print the top of the Death Star Screw Ball by hendo420, and screw it onto the bottom part I modified. My model tree has lights that are larger than the ones I had to test with. If you too have lights that are larger than 5mm, let me know and I'll help you out with a hole that will match. Or you can do what I do; load the solid array in 3D Builder, scale it proportionally to how large you are going to make the rest of the topper, then make a cylinder of the size of your bulb +.1 or so mm for slop, and subtract it from the array. The bottom part may work without the cone, but the cone will make it easy. If you want to make something else a tree-topper with the cone, I've also included the collar I used. I merged the collar to the bottom of the topper, then slightly scaled up the cone in x and y but not z to cut the hole for the cone. Works best on a hollow object. Print Settings Printer: Folger Tech Kossel revB Rafts: Doesn't Matter Supports: Yes Resolution: 0.2mm Infill: Doesn't Matter Notes: Don't print it smaller than it is. If you scale it down, the threads will end up even tighter than they are, and you may not be able to screw it on. Plus you will lose detail. It sits about 100mm/3.9 inches tall with the cone installed and the DS is about 74mm in diameter, so it's not a massive object. If you wanted to scale it up, all of the parts will scale up fine except for the emitter with light hole - you probably aren't scaling up your lights, so if you have a 5mm bulb you will still want a 5mm hole. To that end I've added a 200% size array with a hole for a 5mm light. If you want to scale it to some other arbitrary amount or you have tree lights that aren't 5mm in diameter, leave a comment and I'll make you a bespoke emitter. If, on the other hand, you want to use the 200% array, just scale up the cone/base/top/pin 200% and you are good to go with an almost 6" diameter tree topping technological terror. I printed everything as it loads, and it looks pretty good (picture on tree is of a 100% version). The emitter array requires a lot of support, and so is pretty ugly on the underside. This isn't terrible because it's not going to be outward facing, but unless you use supports with 0 separation, it's going to be ugly. The hole for the pin mount is also basically gone - you will almost certainly need to glue it into the array if you want the under construction look. The space for the pin printed fine, but the outside retaining edge was worthless. Removing the emitter array from the top almost certainly means you will need some supports to make up for that. Further cutting the center of the dome out of the bottom to allow for the hole for lights and the cone means that you have to rely on extremely good overhangs or supports to make it look good since you can't rely on bridging to support the middle parts. Either of the two pins should do the trick. They are both scaled down slightly to make it easier to fit (1.95mm diameter for 2mm diameter holes). The horizontal one is designed to lay flat, and will be stronger at the expense of a .25mm slice off the bottom to allow a support free print of the pin. Alternatively you can use the vertical one and either print it vertically or horizontally and you want. Just use your judgement. I used the horizontal one. It required some scaling down and filing because my printer is overextruding a little, but good news is it prints in about 30 seconds, so if you need to try a few sizes it's not a very difficult process. Infill for these parts is not particularly important. You could probably make them as low as 10% infill with 3 or 4 top/bottom/perimeter layers and it will be strong enough. The ball itself is going to be almost solid with 4 perimeters due to all of the trenches on the surface. I wouldn't go below 10% though because even though it's almost solid, you would be sad if you got through 3 hours of printing but you have a couple bad layers and suddenly you have an inner quarter and an outer quarter of a Death Star. Higher resolution should work and may improve the look and screw operations, but I wouldn't go below 0.2mm in order to preserve the fine detail. And the screw operation is quite good - the tree topper part got a little tight a couple turns before the end, but that's more of a feature than a bug. Print the bottom/top/emitter in grey and the cone in green to make it look like it's floating. Or print the emitter (and pin) in a translucent plastic to let more light through. Or print the cone in black and paint on some stars so it looks like the DS is in space. Or the Death Star in translucent red, the emitter in translucent green, the pin and the cone in translucent colorless, and suddenly you have a very festive DS floating on your tree with the addition of a white lightbulb or two. ABS or PETG or another high temp plastic if you are going to use old school incandescent lights in your star, especially if you are using the emitter hole for a bulb and making the completed version. PLA should be fine for LED lights and possibly for the Rogue One version, so long as the incandescent bulbs don't touch the plastic. This is not expert fire or melty plastic advice, I just don't want to hear about someone's tree topper going all Proton-Torpedo-in-the-Exhaust-Port or turning your house into an Alderaan reenactment, so keep on eye out for it going as well as a hold full of Glitterstim under the guns of an Interdictor. Nerd cred aside - don't set your house on fire, Christmas tree fires are scary. How I Designed This 1 - Wife wants a Christmas Tree, I want something funny. Cut a little hole in the bottom of a theaded Death Star ball to make it fit on the top of the tree my wife buys. Realize it could be so much cooler. Think about how it could be better. 2 - Death Star Plans Consider options for making the topper the most fun for lighting up. It's not quite big enough to allow for light to shine in all of the trenches and I don't want to scale it up to make 100 tiny holes worth trying to print. Thought about just doing the equatorial trench, but it would look best printed solid just with translucent plastic, and it would be quite fiddly to try to make the trench its own part without the original solid files. Settle on the array being the logical choice. 3 - Design the Cone Spend a few hours playing with Fusion 360 to design a cone with a threaded top that will allow for a large variety of tree tops, as well as lights to fit into the center of the topper. Create a matching collar that the threads could slice into to make it so the topper will have enough support. Export as STL. 4 - Make the Bottom I used 3D Builder to fiddle with the original part. First I merged the collar into the bottom of the part. Then I scaled up the threaded cone by a little (x and y dimensions, not z) aligned it so cone fits properly, then used the slightly enlarged cone to remove material from the bottom/collar. 5 - Remove the Array To make my changes to the Array I first needed to remove it. After doing a lot of slight adjustments and moving around, it seemed like a 24.5mm sphere did a respectable job of cutting the emitter out without removing too much or too little material. It's not quite the right number, but It's close enough for what we need. I did an intersect with the sphere and the top to get just the array, and I subtracted the sphere from the top to get a perfectly matching Top with a hole in it for an array. 6 - Rogue One positioning Loading the two parts of the array together, I created a pin 2mm in diameter and 10mm in length, then aligned the array and the top how I wanted them. Align the pin so it goes some distance into both the array and the top, then use the pin to cut from both the array and top leaving 2mm wide holes. Create a 1.95mm diameter pin 10mm long to be the printed pin. I also rotated it flat and sliced the bottom .25mm off to make a flat printable pin without supports. 7 - LED hole I measured the two kinds of little LED lights I have; the light of one is 4.8mm in diameter, and the other is 5mm. So I created a 5mm hole, removing the middle of the emitter with a 5mm diameter cylinder. Luckily the hole for the Rogue One pin wasn't deep enough to interfere. I'd say I designed it that way on purpose, but clearly the force was guiding me. I am one with the force, the force is with me.
With this file you will be able to print Lighted Death Star Christmas Tree Topper with your 3D printer. Click on the button and save the file on your computer to work, edit or customize your design. You can also find more 3D designs for printers on Lighted Death Star Christmas Tree Topper.