Lightsaber with internal LED's --- INSTRUCTIONS IN DESC.
thingiverse
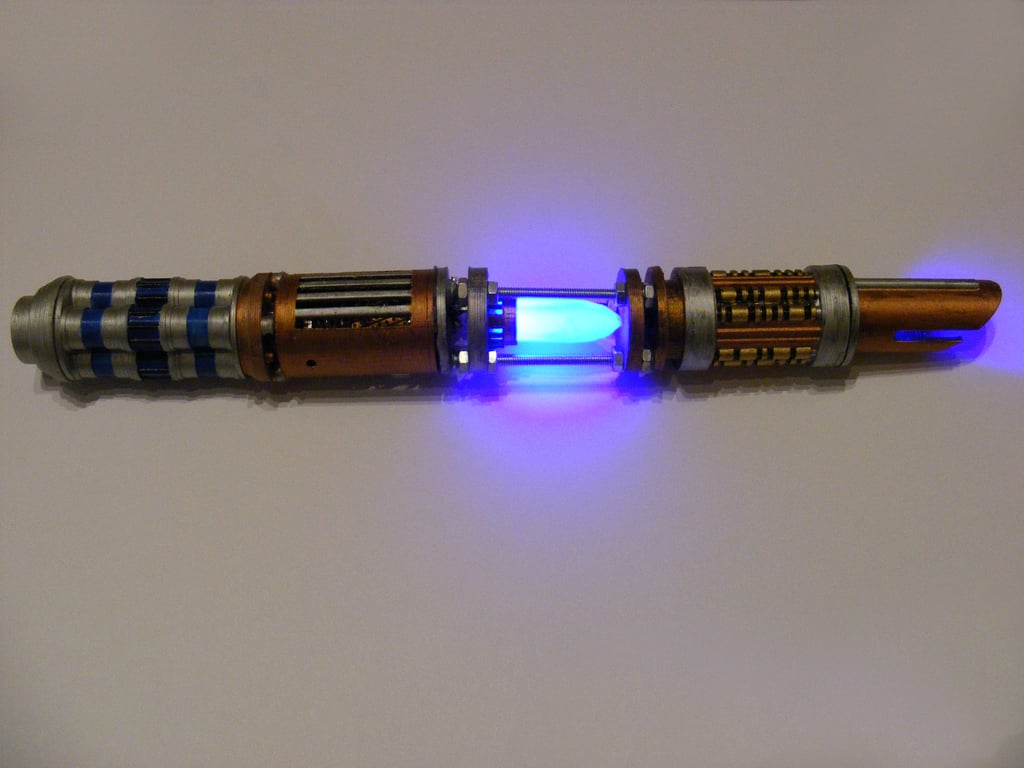
This is a decorative lightsaber with space for working LED's. I didn't model all parts. The simpler models (5,6,8&9) are mine to accommodate the crystal. The rest belongs to the creators of the respective pieces. --- Building instructions: *Please read the instructions carefully before printing. Please ask if there are questions.* Required parts: For the Model: - White / Transparent Filament for the crystal and the diffuser - Black Filament for parts 10,12 and 6 so that light can't shine through - Paint (If you like to) - A nail file (If some parts don't fit exactly) - Hot glue or Glue to connect the parts - 3 screws, 12 nuts and 6 washers to connect the upper and lower crystal chamber For the internal LED's: - 2 LED's of any color (duh) - A DC power source - Resistors (Values are calculated below) - Wire - A soldering iron - Patience (not required, but it will make things easier) --- Step 1: *All parts should be printable laying down and without supports.* Print all parts from 1-12 with a common diameter (e.g: 40mm, Adjust the height of a piece if necessary). Attention: - Don't print part 7 & 11, you will first need to measure the parts they fit into - Print the Crystal (Part 7) so that its bottom is open (Bottom Thickness = 0) and only its walls are printed Step 2: Measure the diameter of the Crystal holder opening, and print the crystal so that it fits inside. Measure the inner diameter of the Beam Chamber End and print the diffuser accordingly. Now you should have all the parts laying in front of you. Paint them now if you want to. Step 3, Preparation of the LED's: Insert the LED's into the diffuser and the crystal holder (the legs of the LED go into one hole each). Glue them so they don't fall out. Now insert and glue the Crystal into the holder. Then, solder wires onto the legs of both of the LED's. Use the screws nuts and washers to assemble the crystal holder (use the photos for orientation). The wires of the diffusor LED should run internally to the screws. You need to solder/attach a wire to a screw (remember where positive and negative is) and solder wires onto the opposite side of the screws. Step 4, the power supply: Calculate your needed resistor here: http://ledcalc.com/ Feed the power supply wire through the side hole in the Circuitry Container and solder the resistors and power supply wires accordingly. Step 5: Glue everything together and plug your lightsaber in.
With this file you will be able to print Lightsaber with internal LED's --- INSTRUCTIONS IN DESC. with your 3D printer. Click on the button and save the file on your computer to work, edit or customize your design. You can also find more 3D designs for printers on Lightsaber with internal LED's --- INSTRUCTIONS IN DESC..