Linear actuator / Linear servo / Linny Choocher
thingiverse
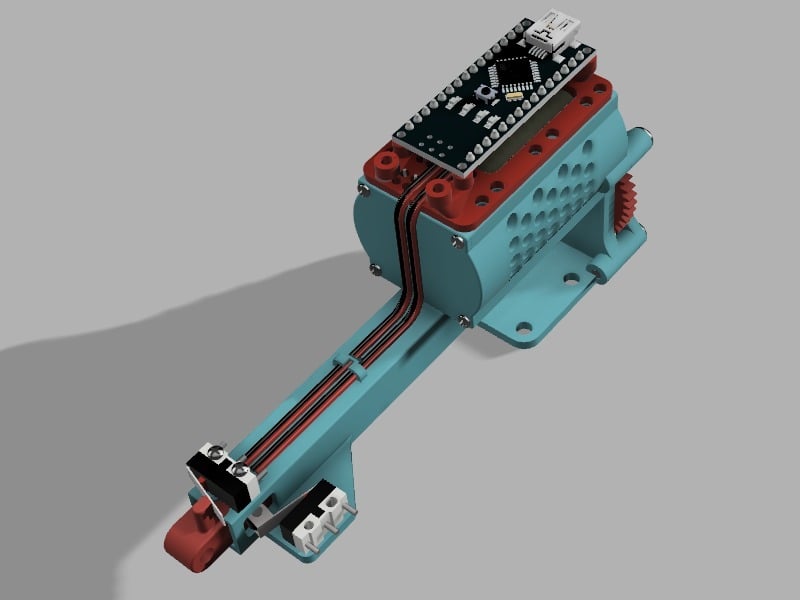
Linear actuator/linear servo with roughly 100mm stroke, home/extended limits, and quad optical encoder. Arduino Nano and motor driver mounting plate, reference Arduino sketch with PI control and serial interface. Working fairly well, but testing/improvements planned (see below), so left as WIP. Not a trivial build, you may need to adjust Arduino PI control for your application. Thanks for the CAD models: * Arduino Nano by Andrew Whitham / Addison Carter * KW10 limit switch by LCS * DC motor by Matthew Kelley BOM + Motor driver board "L9110S 2 Channels" [1USD, low power], see image OR L298 board [2USD] + Arduino Nano/Uno, 328P version (168P has insufficient memory) + RS-360SH (or 280/365/380/385 ?) DC motor, bi-axial/dual shaft (~28mm max diameter, ~40mm max body length, M2.5 mtg holes, 14-16mm hole centers, 2.3mm shaft diameter) ... honor the driver board's electrical specs. + Limit switches, one roller arm, one flat arm, 6.5mm hole centers (KW10/MS-118, 12x6x6mm) + ITR-9606 optical interrupters, qty 2 + TH resistors, wires, power supply for the motor + M4 threaded rod X 120mm long + M2, M2.5, M3 screws Build Instructions * Print the body, slide arm, back plate, four spacers, both gears, an "axlebrim" motor cover, and nano or L298 mounting plate. * Cut M4 (x0.7mm) threaded rod to 120mm long. Thread the rod into the large gear. Thread the "axlebrim" part onto the rod and glue to the rod/gear flush to the end of the rod. Thread the rod into the slide arm; it should basically self-tap. Remove the slide arm. * Install the rod/big gear into the body and thread in the slide arm into the body. Install the rear spacers and back plate (M3 x 12). * Press the encoder disc onto the back of the motor (drill for a good press-fit if needed). Grind a small flat into the front-side motor shaft. Bolt in the motor with M2.5 X 5 screws. Slide on the pinion with glue. * Cut any nubs off the bottom of the optical interrupters. Put the optical interrupters into the mounting plate. Solder on wires and TH resistors and bend the leads over. I didn't glue these, but might be a good idea. (See schematic sketch.) * Wire the interrupters to the Nano board (pins 2/3) and +5V/GND. Wire the extended limit (two outer pins) to the Nano (pins 5/GND). Wire home limit (two left pins) to the Nano (pins 4/GND). Wire the driver board A1/A2 to the Nano board (pins 9/10). Wire the motor driver board's power/GND to an independent battery/power supply. * Install the Nano mounting plate with M2.5 X 5 screws. Install the limit switches with M2 screws (I cut them to length). * Open the Arduino IDE, install a USB cable to the Uno/Nano, "upload" the "sketch". * Open a real serial monitor (TeraTerm, etc), set it up for BAUD 115200, and send CR+LF. * Send '?' for a command list/help. Send 's', return. You should see information about the limit switches and encoder position. Press the home limit and check that the state changes (to 0). Turn the gear and check that the location/position updates. At the end of the arm's travel, the extended value should change (1->0). Send L# to go to a new location. Send 't', return, to exit switch monitor mode. WIP ... to (possibly) do list * Test encoder (missed counts, repeatability, etc), use higher res. disc, check phasing * Test with a nano board (video is with an Uno) * Address potential for binding at home position (probably move to optical limits) * Higher force, lower speed version * Use in real applications * Add servo mode (pulse width control) * Print and test L298 mounting plate and operation with L298 * Motor cover for long motors https://youtu.be/PnemnBP9Yog
With this file you will be able to print Linear actuator / Linear servo / Linny Choocher with your 3D printer. Click on the button and save the file on your computer to work, edit or customize your design. You can also find more 3D designs for printers on Linear actuator / Linear servo / Linny Choocher.