Linear Ball Bearing Stepper Side v2
thingiverse
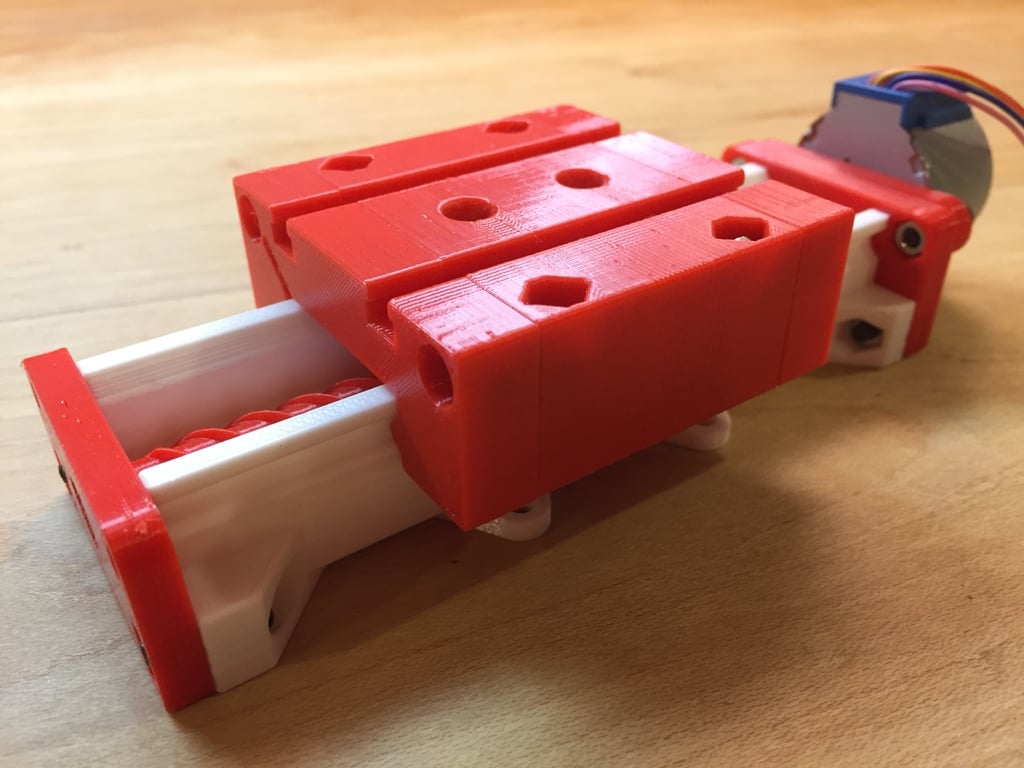
##28BYJ-48 Mechanical Actuator #6 I wanted to see what kind of mechanical actuators we could make using the 28BYJ-48 stepper motor and mostly 3D printed parts. The 28BYJ-48 is a 5v dc motor with a max rpm of 15 and can deliver around 4 oz force/in of torque. You can get these motors with the driver for around $2 each. ##Linear Ball Bearing Stepper Slide This is a remix of the Linear Bearing Stepper Slide I made earlier. The bearing carriage on this version has a solid design similar to an actual linear bearing, with end caps for the bearing return. Since the print orientation was different, I could use Gothic bearing grooves typical to the type found on an actual linear bearing instead of a “V” groove. I hoped for a smoother transition of the balls to reduce noise and vibration but think both designs perform very similarly. The first design is actually easier to assemble. ===================================================================== This is a linear bearing slide driven by a 28BYJ-48 stepper motor. The linear bearing uses standard .177 (4.5mm) caliber steel BB’s and has adjustment screws for setting the preload. The trapezoidal drive screw utilizes an integral ball bearing also made with BB’s to handle the thrust loads of the slide. I included two different lead screws; a twin lead screw with a 1/2” pitch and a quadruple lead screw with a 1” pitch. Given the max rpm of the stepper motor is 15 rpm, the twin lead screw will result in the carriage traveling at 7-1/2 in per/min and the quadruple lead screw will travel at 15 in per/min. The linear bearing works very well, and the BB’s recirculate just as they are supposed to! There is some noise and vibration as the BB’s are not caged, and I think they meet a little resistance as they recirculate back into the bearing. On the next version, I’m going to split the housing like an actual linear bearing to see if it improves on the vibrations. This slide will actually move over 25 lbs with the twin lead screw! If you have seen the previous Dovetail Stepper Slide, it could move around 7lbs so this version has a 4x’s the load capacity due to its reduced friction. However, the load is not as stable as it is on the dovetail slide. I believe the dovetail slide can handle more load; it's just the stepper motor is not strong enough to push it. The mounting holes on the base, carriage, and endplate all match up so multiple slide assemblies can be bolted together to make a two or three-axis cartesian system. ===================================================================== ##Required Components - M3 Nut (14x) - M3 SHCS x 10mm lg. (12x) - M3 SHCS x 20mm lg. (2x) - .177 BB’s (8x) for Thrust Bearing - .177 BB’s (8x) for Linear Bearing - 28BYJ-48 Stepper Motor Here is my Amazon affiliate link to a set of five of these stepper motors and drivers: https://amzn.to/2KJI6yz. They are a little more expensive on Amazon, but you will get them a lot quicker. ##Assembly To start assembly, the first thing you need to do is install the two M3 x 20mm screws and nuts into the carriage for the preload adjustment. Don’t tighten the screws up at this point. Then use the M3 x 10mm screws to install one endcap and slide the bearing onto the rail. Next, fill the bearing up with BB’s; it should take 34. Next, put the remaining 6 BB’s in the other end cap. Here is the hard part: you have to move the carriage to the end of the rail and carefully tip the end cap with the 6 BB’s onto the carriage without dropping any of them. It may take one or two tries. Once the bearing is packed with BB's, adjust the screws to get the desired preload. Once you have the linear bearing properly set, you can build the thrust bearing flange. Note: Using grease on the thrust bearing, drive screw, and nut will improve the load capacity and lifecycle greatly as well as reduce noise and vibration. I would not put any lube on the ball bearings; it could cause issues with the balls recycling. If you are having trouble with the BB’s recycling, you can also try taking out one of the BB’s on each side. https://youtu.be/Yq39Y9Z1tzk https://youtu.be/WCNtUWE9mQ0
With this file you will be able to print Linear Ball Bearing Stepper Side v2 with your 3D printer. Click on the button and save the file on your computer to work, edit or customize your design. You can also find more 3D designs for printers on Linear Ball Bearing Stepper Side v2.