Linear Guide Rail Conversion
thingiverse
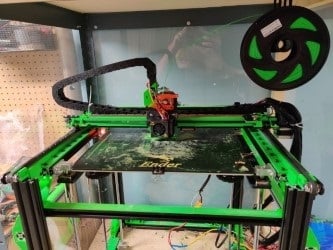
Video of the machine running with the Y axis conversion: https://youtu.be/lHonLs0RPUk Running X and Y axis: https://youtu.be/32rStIxPqfw These pieces are to be paired with MGN12H linear guide rails to replace the Y axis rollers. You will need to replace the 2040 extrusion with a 2020 extrusion. These printed parts sit on top of the new extrusion to make the linear guide rails sit at the same height as the original equipment so that you can reuse the original belts, pulleys, and brackets. I would suggest printing them in ABS so that they can withstand the temps of an enclosure without warping. Another benefit of Printing the parts in ABS is that you can glue them together with ABS slurry for a strong bond without changing the length of the parts. Printing the Mid section vertically eliminates the need for supports. Printing the Front and Rear sections side by side, oriented vertically, will allow you to complete the print with only 1 Tree support. The horizontal mounts are used in conjunction with a 550mm section of 2020 extrusion to hold the proper spacing of your frame while replacing the 2040 extrusion. This will help keep your machine square and prevent the moving parts from binding when you put it back together. 2/23/2021 - so far only the mid section has been tested and it appears to fit/function very well. I will post updates as I get my tests done. 3/4/2021 - I added files for the mid section to be printed in 2 pieces instead of 1 5/14/2021 - added corner brackets, 2020 clamps to be paired with the horizontal mounts. X axis rail conversion. a drill guide to locate the holes for the guide blocks, 5/24/2021 - Lengthened the X Rail by 3.8mm, there now should only be a 0.2mm gap at most between the two halves, which is to be filled with ABS slurry. Added an X-axis end stop mount. Added an adapter to mount an Enomaker direct drive plate to the X-axis linear guide block (requires 1 hole to be drilled). 5/27/2021 - X rails have been modified for better function and are now side specific. the carriage adapter has been modified for better fitment. I added another version of the endstop. "x endstop" is designed to be mounted onto the top of the x rail, "endstop" is designed to sit on the front left bolt of the x rail mount (this is my preferred location) 6/10/2021 - i noticed that there is a little wobble in the carriage during higher print speeds with my direct drive setup. i am assuming this is because of the weight of the motor and extruder at the top of the carriage. to counter this i added files to make a double linear rail on the X axis. 7/23/21 - updated the double x rails and changed a couple dimensions. the current models were just installed on my machine today but from the way it looks I will not need to update them again. I am printing the double rail enomaker adapter now and will be printing the double direct drive mount soon. Added a belt tension for the x axis and y axis (2 needed). they are set up to use M4 bolts. the tensioners have not been tested yet.
With this file you will be able to print Linear Guide Rail Conversion with your 3D printer. Click on the button and save the file on your computer to work, edit or customize your design. You can also find more 3D designs for printers on Linear Guide Rail Conversion.