Linear Rail Actuator V2
thingiverse
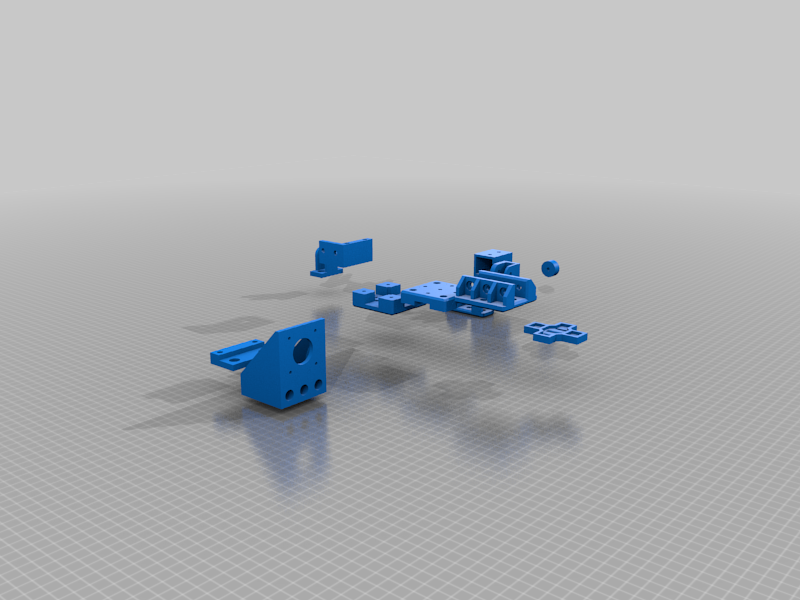
# 标准化廉价直线模组 V2 ## 基于2020铝型材,Mgn12H滑块,Nema17电机 ## V2 我想做个MB结构(cartesian)的大型打印机,原来的直线模组没有考虑到双Y轴并联的问题。使用了两个KP08带座轴承来固定8mm光轴作为同步轴。 并且改良了同步带的固定方式,之前使用扎带会导致同步带变形,而且无法二次调整。用压力和同步带本身的齿作为固定,兼容6mm GT2和10mm GT2。 X轴的利用率很低,当长度40cm时,仅有10cm的有效行程。 Y轴长度为45cm时将有25cm左右的有效行程。 这个是为了我后面的举行MB结构打印机设计的,我可能会先做一个打印面积50cm X 50cm的来验证,外尺寸大约80cm X 70cm 最终尺寸可能更大,主要用来做COSPLAY相关的工作。 对于小型机器,这并不是一个好的选择,只适用于巨型机器。面积越大,利用率越高。可以随意的扩展到1米,2米甚至更长,不用担心Corexy皮带弹性的问题,光轴的变形。也不会像I3结构的打印机,面积越大利用率越低。我曾有一个Anycubic的Chiron,它的平台是40cm X 40cm但是Y轴长度超过了80cm。 I want to make a MakeBot like(Cartesian) printer, the original linear module did not take into account the double Y-axis parallel problem. Two KP08 seat bearings were used to fix the 8mm optical shaft as the synchronous shaft. And improved the fixed way of the synchronous belt, the previous use of tie belt will lead to the deformation of the synchronous belt, and can not be adjusted again. Use pressure and the timing belt's own teeth as fixed, compatible with 6mm GT2 and 10mm GT2. X-axis utilization is very low, with only 10cm effective stroke at 40cm length. When the Y-axis length is 45cm, there will be an effective stroke of about 25cm. This is for my later MB structure printer design, I may first make a printing area of 50cm X 50cm to verify, the external size is about 80cm X 70cm, the final size may be larger, mainly for COSPLAY related work. This is not a good choice for small machines, only for giant machines. The larger the area, the higher the utilization rate. It can be expanded to 1 meter, 2 meters or even longer without worrying about the elasticity of Corexy belt and the deformation of optical axis. Unlike I3 printers, the larger the area, the lower the utilization rate. I used to have an Anycubic Chiron with a platform of 40cm X 40cm but a Y axis length of more than 80cm. ## V1 我很喜欢Openbuilds的一些模组,像是V-slot Nema17。 但是这些V轮让我不太满意,会有轻微的晃动。 而且往往使用32齿的同步轮,打印机往往使用16齿或者20齿的GT同步轮。 做了一些打印机以后,我有有一些剩余的mgn12导轨,但是搜索不到模块化的导轨设计。 未来可能做一些1m或者更长的打印机,我需要模块化的方案进行快速设计。 所以我设计了这个方案,采用了10mm宽的2GT同步带。当然可以很简单的切换成6mm宽的同步带。 包含了一个简单的皮带张紧器,整个运动部分都在铝型材的同一侧,可以方便的安装到任何框架的表面。 并且设计了和滑块配套的铝材固定装置,便于多个模块叠加使用。 NEMA 17 motor ACTUATOR based on 2020 aluminum and MGN12H linear rail I really liked the OpenBuilds modules, such as V-slot Nema17. But I'm not too happy with these V-wheels, they wobble slightly. In addition, 32-tooth synchronization wheels are often used, and printers often use 16-tooth or 20-tooth GT synchronization wheels. After making some printers, I have some leftover MGN12 guides, but I can't find the modular guide design. In the future, I may make some 1M or longer printers, so I need a modular solution for rapid design. So I designed this scheme, using a 10mm wide 2GT timing belt.Of course, you can easily switch to a 6mm wide sync belt. Contains a simple belt tensioner with the entire moving section on the same side of the aluminum profile for easy mounting to any surface of the frame. And the design and the sliding block matching aluminum fixed device, easy to use multiple modules superposition. 螺丝: M5x25(惰轮) M5x8(铝材固定) M4x10(滑块和铝材支撑固定) M4x20 (滑块上下两部分固定) M3x8(mgn12h固定) Screw: M5x25 (idler wheel) M5x8 (aluminum fixed) M4x10 (slider and aluminum support fixed) M4x20 (upper and lower parts of the slider are fixed) M3x8 (MGN12H fixed) Printing: 随便了,取决于你想要的强度。 如果是写字机,打印机刚性要求不高的,2mm壁厚足矣。 It doesn't matter. It depends on the intensity you want. If it is a writing machine, the printer rigid requirements are not high, 2mm wall thickness is enough. Infill:18% Walls/top/bottom : At least 1.2mm
With this file you will be able to print Linear Rail Actuator V2 with your 3D printer. Click on the button and save the file on your computer to work, edit or customize your design. You can also find more 3D designs for printers on Linear Rail Actuator V2.