LinearXY Pro - The X5SA Pro Carbon Fiber Gantry Mod
thingiverse
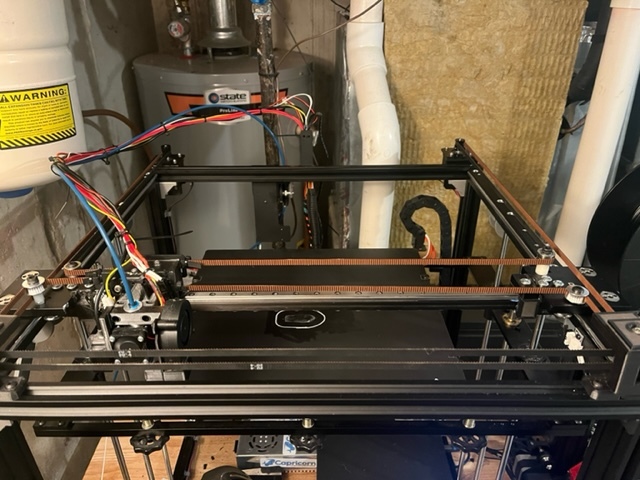
So this has been a fun short project to work up. A major issue I've had with the TronXY X5SA Pro has been the ringing due to the fairly high moving mass traveling along the Y-Axis (the gantry and carriages). This modification is about as lightweight as I could go, and results in a 1/4 weight reduction overall when combined with a lighter hotend assembly. It fits the stock Y-axis carriage plates with no modification. Hardware: M4x35mm (socket or button is fine)- 8 M4 nylon lock nuts - 8 M3x30mm machine screws (socket or button is fine) - 4 M3x15mm socket head machine screws - 20 M3 lock washers - 20 M3 nylon lock nuts - 20 M5x50mm machine screws - 2 M5x50mm nylon lock nuts - 2 2x500mm Carbon Fiber Square tubing (hollow), 10mmx10mm OD, 8.5mmx8.5mm ID (8mm ID will work, but you may need to scale down the inserts to fit) 1x400mm MGN9H linear rail and carriage assembly 1 small tube of Krytox GPL204 (Y'all, this stuff rocks.) 1 small tube of quick set gel epoxy (the strongest stuff you can find) 1x Carriage Block Assembly 1x Mount End (Left) 1x Mount End (Right) 2x 8mmx8mmx30mm insert STLs (4 total) 1x Squaring Ends/Endstop Nut STL (2 squaring ends, 1 endstop nut, one of the squaring ends is shorter to allow the endstop to clear) Linear Rail Prep: Most rails come in a bag full of machine oil to prevent rust. You have to fully remove this oil using isopropyl alcohol and a microfiber cloth. Flip the rail upside down and carefully/slowly remove the carriage (careful not to lose any ball bearings). Apply a small amount of Krytox GPL204 to each line of bearings, and carefully slide the bearings through the carriage to advance the unlubricated bearings out. Repeat this process until all of the bearings are lubricated on both sides. Carefully slide the carriage assembly back onto the rod, and slide it up and down the rail a couple dozen times or so. Wipe the excess lubricant off the rod using a clean microfiber cloth. Poorly-written instructions: 1.) Cut the tubes from 500mm to a length of 484mm each using a Dremel with a cutting disk (wear a mask, this stuff makes fine particles). 2.) Find the way each length of tubing bows (they usually bow in the same direction), and place them side by side in such a way that the tubes bow outward at the ends. 3.) Apply CA glue to the insides of each tube and clamp the two ends together. (This way, the rod is relatively straight when dry.) 4.) Once dried, apply some CA glue to the four rectangular inserts, two at a time, and put them into either end of each tube. Let Dry. 5.) Center the rail on one of the tubes (not the middle) and apply a few dabs of CA glue around the rod to hold in place for the next step. 6.) On a drill press (or carefully, with a drill), drill the appropriate 3mm (or slightly oversized with the nearest imperial bit) holes, using the screw holes of the rail as guides. Go all the way through, but drill with light pressure at a high speed to prevent cracking/chipping. There should be 20 in total. Insert a M3x15mm screw into each hole, and the corresponding washer and nylon lock nut behind each. Tighten with the appropriate tools. 7.) Remove the tape from the ends, and slide the gantry mount ends onto each side such that they touch the ends of the rail. (note: triangular holes should have an "A" shape, not a "V" shape, when oriented correctly, to match with the corresponding holes on the L/R Y-axis carriage plates)). Secure them in place with small dabs of CA glue. 8.) Using the holes in the end mounts as guides, drill through them into the CF tubing, and out the other side. Once again, low pressure, high speed. 9.) Using the squaring ends as guides, drill a hole centered on the inner rectangular portion of each end through the mount and out the other side.(the bit *without* the three holes, also keep in mind the left squaring end will be short on one end to allow the X-endstop to function) 10.) Attach the rail assembly to the Y-axes carriages in the stock locations using the M4 screws, lock washers, and nylon lock nuts. (The inserts provide additional strength to the ends.) Slide the whole assembly to the back to square it up prior to tightening. Put a small dab of CA glue on each side to hold the assembly temporarily. 11.)Mix 2-part gel epoxy and apply to the surface below where each squaring end will sit, bolt up the squaring end and press it up against the side of the Y-axis carriage. Clamp and let cure. 12.) Assemble the hotend carriage without the thick aluminum plate or steel spacers. Use the M5 bolts/nylon lock nuts to secure the stock stamped steel plates to either end. 13.) Attach whatever hotend assembly you like.
With this file you will be able to print LinearXY Pro - The X5SA Pro Carbon Fiber Gantry Mod with your 3D printer. Click on the button and save the file on your computer to work, edit or customize your design. You can also find more 3D designs for printers on LinearXY Pro - The X5SA Pro Carbon Fiber Gantry Mod.