LithoLamp 5V USB Box
thingiverse
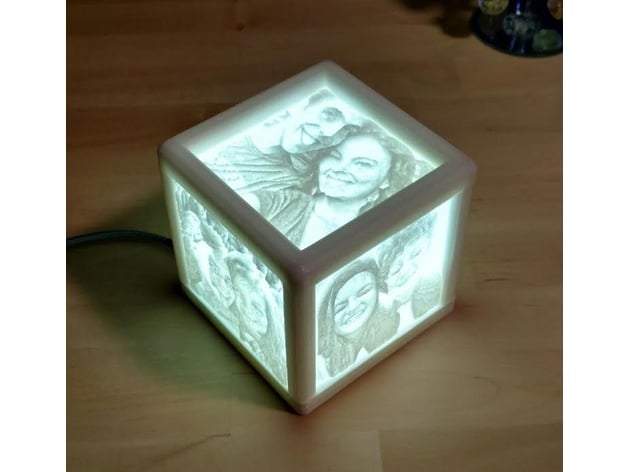
Human: 5 Pane LithoLamp powered via USB Print Settings Printer: Monoprice Mini Rafts: No Supports: Yes Resolution: .21875 Infill: 70 for parts 100 for lithophanes Notes: This is my first design! It works very well and figured I'd share. Just be sure to follow along and not skip steps as I usually do! There are a few things I purchased for this project: 1x USB Cable(s) I got a multi-pack to make more boxes! - https://amzn.to/2IeqyMZ 1x Phone Charger (not necessary if you'll be plugging it into a computer) - https://amzn.to/2KktTGL 1x Micro Push Button Switch - https://amzn.to/2GeEcK7 1x 5V LED Strip (non-waterproof for easier soldering)https://amzn.to/2rH6WpP 1x 1Kg Spool of Hatchbox White PLA - https://amzn.to/2Q0LgPv (non translucent) for all the parts. Used just over half a spool for three boxes. You'll also need just a small amount of wiring (or clip your usb cable 2 inches shorter and use that) to connect the switch to the LED Strip. Solder and flux as well to complete the wiring. Print the bottom with supports set to everywhere to ensure the wire holes are also supported. Print four posts at a 45 degree angle with supports. See picture above for reference. The slots should be facing upwards. I had the best results this way. Print the diffuser cylinder with the slot at the top. The top does not need supports but should be printed upside down with the holes and slots facing upwards. I've included a PNG image titled "LithoFrame" to overlay onto your images. Alternatively you can snatch it up over on Imgur. http://i.imgur.com/fjpHDgc.png It is 80mm x 80mm. Simply overlay the frame onto your image and crop it exactly around the white frame. You'll need to do this with 5 images for a total of 5 lithophanes. Import the cropped and "framed" image into Cura (or your preferred slicer). Ensure the size (80x80) is correct in your slicer and make sure you set "Darker is Higher" to allow the frame PNG to create small lip around your image. Lighter is higher will not work for this project. Set the height to 5mm and the base to 1mm. Disable smoothing as well. After you've printed and cleaned all the parts push the switch into the recess on the base ensuring the pins line up with the slots. Picture included for reference. Insert your usb cable through the outside hole on the base leaving around 8 inches or so of excess. Tie a knot in the usb cable and tuck it into the strain relief square making sure to insert the cable through the second hole. This is to prevent the cable from being pulled out of the build. Picture included for reference. See pictures above for help. The strip I purchased is able to be cut on the copper contacts at every third LED. Cut mine on the 9th contact for a total of 27 LED's. Spiral the strip into the diffuser cylinder ensuring the LED's face outwards. If your LED strip only has a + and - on the contacts simply solder the black wire to the - and the red wire (or yellow) to the +. If your LED strip has RGB and + solder the red wire (or yellow) to the + and connect your black wire to all three of the R, G, and B channels. Install diffuser light assembly to base. Install top lithophane, insert all four posts to secure it into its place. Slide the other four lithophanes into the sides. Install top assembly onto base. You're all set! Connect to USB power, push the switch and enjoy your new LithoLamp! TROUBLESHOOTING: One light per set lights up: Make sure the connection on each of the RGB channels is properly connected. I had this issue even though they seem connected. Just re-solder and it should work. No light: Ensure your power and ground wires aren't touching inside the diffuser. Use tape or heat shrink on each connection to prevent this. Thanks for reading till the end of this build! If you enjoyed this build leave a comment! -Mike
With this file you will be able to print LithoLamp 5V USB Box with your 3D printer. Click on the button and save the file on your computer to work, edit or customize your design. You can also find more 3D designs for printers on LithoLamp 5V USB Box.