Lithophane Display USB and rounded center column (Scale 111,11%)
thingiverse
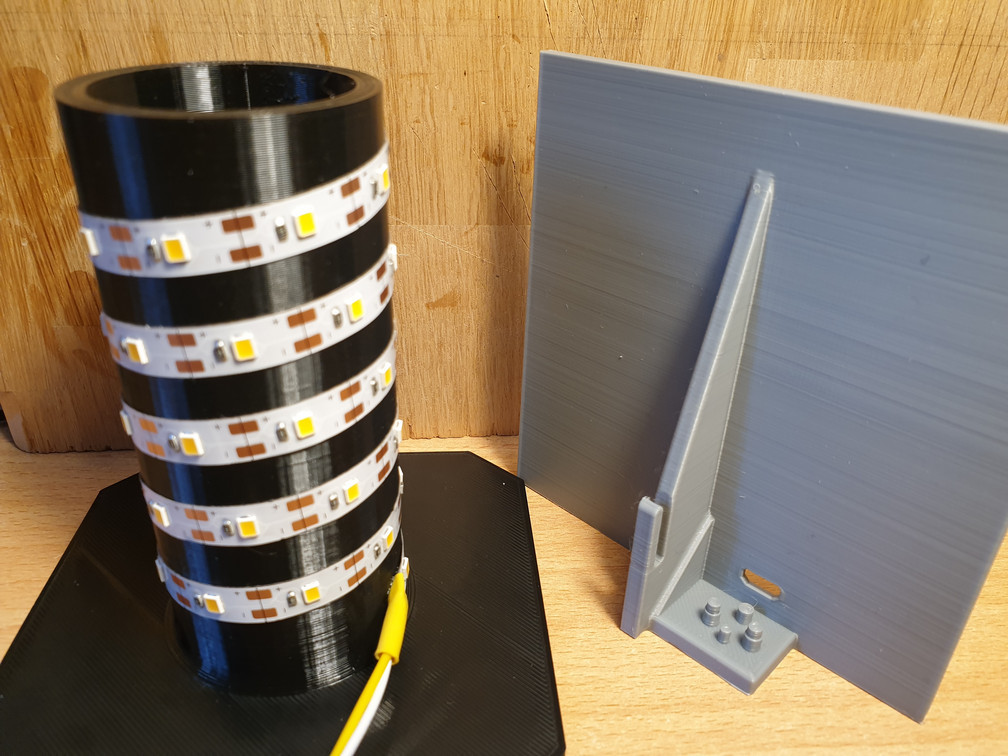
Backplate with USB connector and a rounded center column for the Litophane Display which was made by JRSly. https://www.thingiverse.com/thing:2809349 Thanks to JRSly for designing this very nice lithophane display. Important: I printed the original Lithophane Display base and top at 111,11% scale to accomodate 10x10cm lithophanes. The parts i created are already at this 111,11% scale as well. So print the original parts (base and top) at 111,11% and print my remixed parts at 100%, then they will be the same size. Then create your lithophanes at 100x100x3,6mm. You can't resize the remixed parts with the usb mount, as that will not fit the usb pcb anymore. What did i make: 1. Backplate with usb pcb mount. 2. Backplate with repositioned usb pcb mount and removed some unused parts. 3. Rounded center column for better adhesion and opened up the bottom part of the column to allow air cooling. The original column was getting too warm in my opinion, so i left the center of the column open at the bottom. Add some felt or rubber feet underneath the corners of the lithophane display to allow for some airflow. Parts used: 1. Ledstrip Non waterproof, warm white, 5V led strip, 60 leds per meter, Smd 2835, self adhesive. https://www.aliexpress.com/item/4000074675463.html 2. Micro-USB (female) connector to DIP: http://www.aliexpress.com/item/4000550118202.html 3. Electrical wire when not already in place on the ledstrip. 4. Superglue (or CA glue) and hot glue, soldering iron. How to make: 1. Print the original Lithophane Display base and top at 111,11%. 2. Print the preferred remixed USB-backplate at 100%. 3. Print the remixed rounded center column at 100%. (I used PETG for this because it handles higher temperatures). 4. Solder wires onto the positive and negative nodes of the ledstrip. Wires need to be long enough to slide the backplate into place from the top. 5. Solder the positive and negative wires to the correct pads on the USB connector pcb; triplecheck if plus and minus are correct. Test the ledstrip. 6. Put the usb connector into place on the usb backplate and secure with superglue and/or hotglue, be careful to not fill the connector with glue. Secure the wires with hotglue. 7. Wind the ledstrip onto the center column using the adhesive tape on the back of the strip, leave some space between each winding, otherwise it will get too hot. Cut the ledstrip to the desired length on one of the indicated positions on the ledstrip. Secure start and end of the ledstrip with a dot of superglue. 8. (May be combined with step 9) Glue the center column onto the lithophane display base using superglue. 9. (optional but recommended) Slide in the usb back plate and glue into place at the bottom. 10. Print your favorite pictures as lithophanes at 100 x 100 x 3.6 mm on https://itslitho.com/ 11. Post your make here. ;) Important * Make sure the used usb wall-plug or powerbank can handle the power the ledstrip needs. Mine are around 700mA, so a 1A adapter should be fine. * Lithophanes and top part are not glued.
With this file you will be able to print Lithophane Display USB and rounded center column (Scale 111,11%) with your 3D printer. Click on the button and save the file on your computer to work, edit or customize your design. You can also find more 3D designs for printers on Lithophane Display USB and rounded center column (Scale 111,11%).