Lithophane frame/column/lantern for 4 pictures
prusaprinters
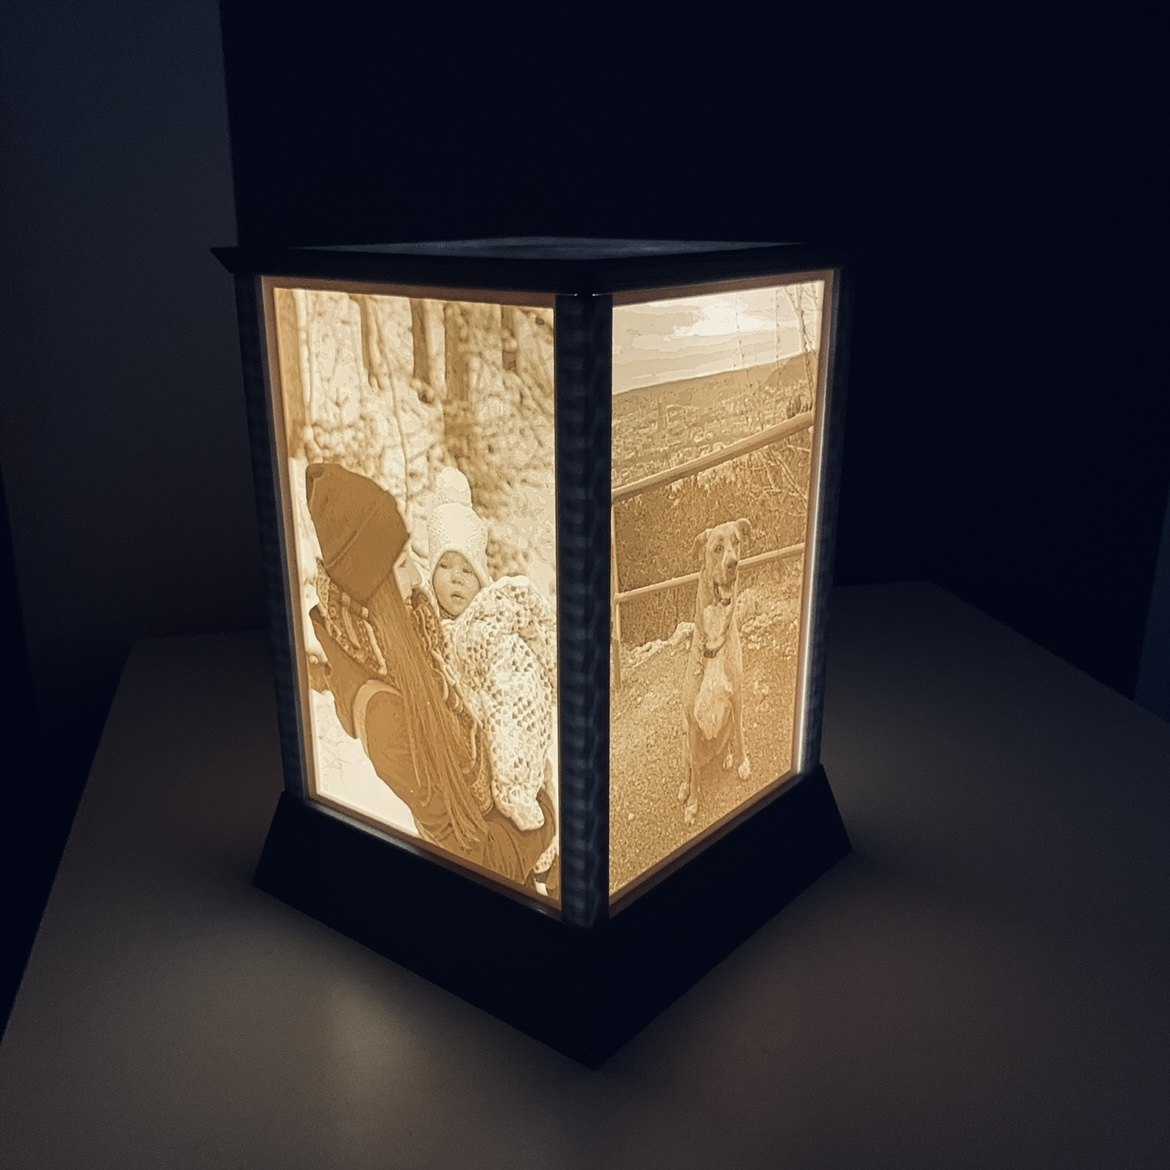
<p>You can use this frame to backlight 4 Litophane pictures at the same time. Choose suitable images, print them according to the instructions below. Then print the frame and you have a nice gift for your next birthday.</p><h3>Assembly</h3><figure class="image image-style-align-left image_resized" style="width:14.92%;"><img src="https://media.prusaprinters.org/media/prints/145142/rich_content/7aba8496-8eb9-4ad4-9621-d2f91656ca71/image.png#%7B%22uuid%22%3A%22be7cab78-73c4-45db-aa87-28f64122eef0%22%2C%22w%22%3A387%2C%22h%22%3A250%7D"></figure><p> </p><p>Such fairy lights are best suited. You can buy these pretty much anywhere. 2.5-3m are completely sufficient in length.</p><p> <a href="https://www.amazon.de/-/en/Battery-Operated-Fairy-Lights-Pack/dp/B08GKKN248/ref=sr_1_9?crid=2CI5O2FKKVIZT&keywords=led+lichterkette+Batterie&qid=1646655637&sprefix=led+lichterkette+batterie%2Caps%2C96&sr=8-9">https://www.amazon.de/-/en/Battery-Operated-Fairy-Lights-Pack/dp/B08GKKN248/ref=sr_1_9?crid=2CI5O2FKKVIZT&keywords=led+lichterkette+Batterie&qid=1646655637&sprefix=led+lichterkette+batterie%2Caps%2C96&sr=8-9</a></p><p> </p><figure class="image image-style-align-right image_resized" style="width:28.39%;"><img src="https://media.prusaprinters.org/media/prints/145142/rich_content/af4044cd-4cf0-4798-8504-2608e7dc9980/39e756d8-f2b5-43e1-891d-3606733e597f.jpeg#%7B%22uuid%22%3A%22f7eba47b-3055-46b9-8d49-ab05c24c4ca9%22%2C%22w%22%3A1205%2C%22h%22%3A1205%7D"></figure><p> </p><p>You need such a chain of lights. You guide the beginning of this chain of lights through the small hole on the bottom floor and then pull the entire cable through. Because you can now stow the battery box under the object in the cavity. Then you start to wrap the cable around the pillar in the middle. The more evenly you do this, the better the end result. At the end there should be a piece of cable left over which you can wrap around the rod at the top to attach the cable.</p><figure class="image"><img></figure><figure class="image image-style-align-left image_resized" style="width:17.65%;"><img src="https://media.prusaprinters.org/media/prints/145142/rich_content/271a2ed8-d51d-4752-84ea-3ef50c79e7e1/4e593ea9-45d9-467e-a89d-00a4a61d8a55.jpeg#%7B%22uuid%22%3A%22afcd8733-ba5c-4b22-a7a9-d2cdc48b69f4%22%2C%22w%22%3A1476%2C%22h%22%3A1476%7D"></figure><p> </p><p>Now you can start printing your litophane images or take your existing images and slide them into the guides provided. <br>Make sure that the image is completely in the guide. Small hooks ensure that the pictures do not fall over.</p><p> </p><figure class="image image-style-align-right image_resized" style="width:24%;"><img src="https://media.prusaprinters.org/media/prints/145142/rich_content/929fe896-b8c6-4049-8194-69eabba113e3/4b1a1342-caab-4d0d-9cce-647d2f930030.jpeg#%7B%22uuid%22%3A%22890a8f07-86a6-4c8a-9bd1-e1307c43850f%22%2C%22w%22%3A1667%2C%22h%22%3A1667%7D"></figure><p> </p><p>At the end you only have to put the lid on and your oil lamp is ready.<br>Now all you have to do is carefully lift the lamp and turn on the LED chain. Find a suitable place where everyone can admire your print and the great pictures</p><h3> </h3><h3>Pictures</h3><p><strong>Requirements for the lithophane images</strong>: 10x15mm and max. 2.5mm thick.</p><p>If you don't know where you can create such images, just use the following link and try something out. Actually, all you have to do is select a suitable photo and crop it to the appropriate format. Then you upload the picture to one of the two sides and adjust the thickness, length and height accordingly. (For the first link it is sufficient to set the longest side if you have previously brought the picture into the format 2:3). Then you can create and download your STL.</p><p>Explanation how it works:</p><p><a href="https://blog.prusaprinters.org/de/von-2d-zu-3d-wie-verwandelt-man-ein-bild-oder-ein-foto-in-ein-3d-modell_8882/">https://blog.prusaprinters.org/de/von-2d-zu-3d-wie-verwandelt-man-ein-bild-oder-ein-foto-in-ein-3d-modell_8882/</a></p><p>Something easier</p><p><a href="https://3dp.rocks/lithophane/">https://3dp.rocks/lithophane/</a></p><p>A little more complex:</p><p><a href="https://itslitho.com/">https://itslitho.com/</a></p><p> </p><h3><strong>Print description</strong></h3><p><strong>Filament: </strong>PLA is sufficient for this print. If the requirements for stability are higher, you can of course also use other materials such as PETG or PC-CF.</p><p><strong>Layer thickness / mode: </strong>0.2mm </p><p><strong>Infill: </strong>35% </p><p><strong>Contours:</strong> 3</p><p><strong>Buttom and Toplayers:</strong> 5-6</p><p> </p><h3><strong>Supports</strong></h3><figure class="image image-style-align-right image_resized" style="width:23.97%;"><img src="https://media.prusaprinters.org/media/prints/145142/rich_content/0a9ac116-546f-44a8-80b9-15b6cdc22325/image.png#%7B%22uuid%22%3A%22fd7b3ea2-b0da-4ef8-80b4-aaa0d74bddf6%22%2C%22w%22%3A767%2C%22h%22%3A459%7D"></figure><p> </p><p>I recommend the supports as specified by me in the following pictures. You may find better solutions.</p><p> </p><p> </p><p> </p><h3>I wish you a happy print and I am happy about your experiences!</h3>
With this file you will be able to print Lithophane frame/column/lantern for 4 pictures with your 3D printer. Click on the button and save the file on your computer to work, edit or customize your design. You can also find more 3D designs for printers on Lithophane frame/column/lantern for 4 pictures.