Lithophane Maker
thingiverse
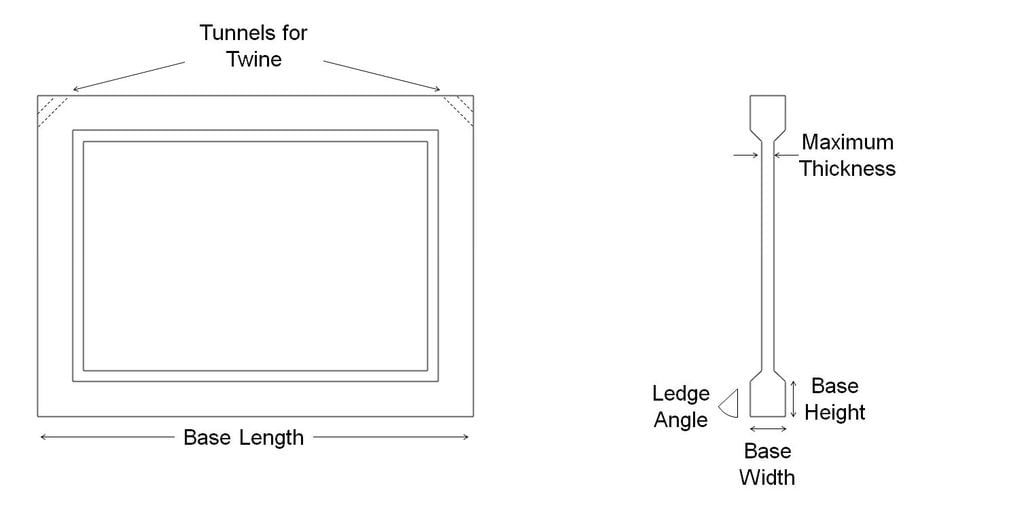
https://LithophaneMaker.com Watch an instructional video on how to use the website here: https://youtu.be/RNzZRBL3oT0 This channel is full of instructional videos on how to use each of the tools: https://www.youtube.com/channel/UCU13fzqAu4BTAhOSHJgHRqg Create a framed lithophane in seconds with the tools at https://LithophaneMaker.com. The frame surrounding the lithophane makes it easier to 3D print without wobbling during printing and falling over. This frame also enables the creation of tunnels that run diagonally through its top right and top left corners, allowing for easy hanging from suction cups or other objects using twine or thread. A variety of options are available for twine, thread, and hooks, but I've used twine and suction cups. What do you need to know to use the picture-to-lithophane STL designer? The size of the lithophane is determined by the base length that you enter, which is likely the side printed on the bed and limited by your printer. The height of the lithophane depends on the aspect ratio of your picture and the selected base height and ledge angle. The frame's size is controlled by the base height, base width, and ledge angle parameters. A schematic shows these variables clearly, allowing you to imagine both cross-sections of the hanging lithophane as the same. If you took a xy plane cut or an xz plane cut of the lithophane, you would see the same thing. Set the ledge angle to whatever angle you're comfortable printing for an overhang, as it will be an overhang where the top frame meets the lithophane image. The maximum thickness is the maximum thickness of the lithophane image, and the minimum thickness is its thinnest point. This is self-explanatory. Like in my other tools, the aspect ratio is for visualization purposes only and does not define the final lithophane's aspect ratio. The final lithophane's aspect ratio will be the same as the aspect ratio of the uploaded image. If you have any suggestions on how to improve this tool, please email me at support@lithophanemaker.com!
With this file you will be able to print Lithophane Maker with your 3D printer. Click on the button and save the file on your computer to work, edit or customize your design. You can also find more 3D designs for printers on Lithophane Maker.