Litter bot window ventilation kit
thingiverse
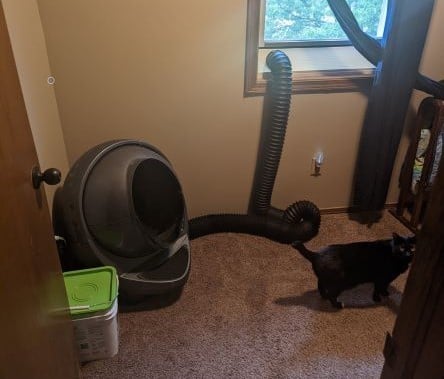
This is something I wanted to do for a while. A ventilation system to reduce odor from my litter bot. This does require a bit of modifications to the robot, however once the parts are made, it is a few steps to finish. This is a set of adapters to make a high powered ventilation system for your litter bot. Note that this is for the older model and not the newest model. My design is so the litter bot can vent out through the window with the provided window adapter. Yes these parts are large, however they will ensure proper ventilation for the bot. Below is a list of items to make/purchase in order to make your litter bot window ventilation system. Essential parts: ~3 In. adapter (100% Infill is a must) ~3 In. to 4 In. 90 degree angle ~4 In. window adapter (This item measures to 65 cm long and 3 cm thick. Please ensure that this part will fit before printing. May require some tweaking. Results will vary.) ~4 In. flap ~Flap joint Optional parts: ~4 In. coupler Things you will need to purchase: ~4 In. duct fan https://www.amazon.com/dp/B08LY4Q5GY?psc=1&linkCode=sl1&tag=bigdylangames-20&linkId=ce89eea18ca79bfee5eaa4023e55e8f6&language=en_US&ref_=as_li_ss_tl ~4 In. dryer hose https://www.amazon.com/dp/B08LY4Q5GY?psc=1&linkCode=sl1&tag=bigdylangames-20&linkId=ce89eea18ca79bfee5eaa4023e55e8f6&language=en_US&ref_=as_li_ss_tl ~Duct clamps https://www.amazon.com/dp/B08LY4Q5GY?psc=1&linkCode=sl1&tag=bigdylangames-20&linkId=ce89eea18ca79bfee5eaa4023e55e8f6&language=en_US&ref_=as_li_ss_tl ~Insulation tape https://www.amazon.com/dp/B08LY4Q5GY?psc=1&linkCode=sl1&tag=bigdylangames-20&linkId=ce89eea18ca79bfee5eaa4023e55e8f6&language=en_US&ref_=as_li_ss_tl Tools you will need: ~Box cutter ~pencil ~Hot glue ~Tape measure First thing is to install the 3 in. adapter to the litter bot. To do this, unplug the bot and remove the bonnet, dome and tray from it. Clean up the excess litter if needed. Next, take note of the wire connected to the weight sensor in the back. Take a bit of hot glue to keep it held down on the bottom of the bot, or unplug it and move out of the way. Take the bot and look on its back side. There is a small divot at the very bottom, that is where we will cut the hole to insert the adapter. Take the adapter and a pencil to trace the small outer end of the adapter to the bot. Then use the box cutter to remove the plastic. Start by slicing directly in the center to the outline you made with the pencil. Please ensure you do not cut the wire to the sensor in the process. Once you have cut the hole make sure that the adapters small end will fit into the hole. If it does not, carve out small sections of the hole until it does. Then we will install the adapter. From the inside of the bot, fit the adapters small end through the cut hole until the large part of the adapter rests on the inside of the bot. Fill the open areas around the hole with hot glue to ensure a good seal around the adapter. It should look like Image 1. Second step is to fit the 90 degree angle adapter to the duct fan. This step can vary depending on which type of fan you purchase and whether or not it creates a lot of vibrations. The simplest method is to fit the duct fan onto the larger end of the adapter (See Image 2.) This will cut out the need of extra hose and clamps. Alternatively, if vibration does become an issue, then use a small section of hose to connect the adapter and fan together (See Image 3.) Please ensure that the direction of the fan is in the correct direction. Air needs to be pulled away from the litter bot in order to work correctly. Third step is to assemble and install the window adapter. Place the adapter on an area to gain access to the flattest face of the adapter. Take the window flap and place it over the 4 inch hole. Ensure proper placement to prevent large gaps. Then take the flap joints and hot glue them over the arms of the flap. Allow enough space so the flap can move and not get stuck in place. Next take the insulation tape and wrap the outer edge of the adapter to ensure a snug fit into the window. Then place the adapter with the flap facing outside into the window and close window on top of the adapter, keeping it in place. Then attach the dryer hose to the adapter and clamp firmly (see Image 4.) Screens should not be a concern but do keep them in mind. Ensure that the flap has enough room to move and prevent return of outside airflow (See Image 5.) Now to connect everything together. Attach the dryer hose to the duct fan and ensure that it is clamped firmly. Attach the 90 degree to the back of the bot to the adapter. Then place the tray, dome and bonnet back in place. Plug the fan in and then the bot, and your done. If all has been done properly, the bot will have no issues with the ventilation and you can prevent smelly odors with the ventilation system. This has been an absolute joy to build and would love to see the results. Thank you! update: My first window adapter design might be too much for most printers to handle. So I have modified it so it is smaller and can be attached to either a piece of wood, or be bolted to something else. Go nuts!
With this file you will be able to print Litter bot window ventilation kit with your 3D printer. Click on the button and save the file on your computer to work, edit or customize your design. You can also find more 3D designs for printers on Litter bot window ventilation kit.