Little Mermaid Lithophane Pendant
thingiverse
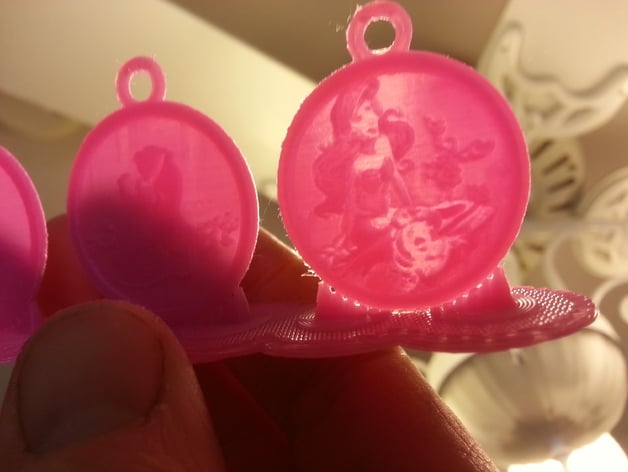
Update - 4/4/15 I have uploaded the new Little Mermaid pendant. I changed it so that lights are light and darks are dark. I also manually edited the picture for the lithophane to have enough contrast to carry through the details I wanted to show. This took a few iterations of editing, processing and printing. I think that it turned out great! My camera did not capture it very well though. I also decimated the image some so that it is easier to process for printing. There was much more detail there than was needed for this scale. Update - My daughter wore this to school the other day and when she came home, she asked if I could make a pendant for other princesses. When I said I could, she pulled out a handwritten list of all the girls in her class with the princesses and colors that each girl wants for their pendants. I had to laugh. So, now I have created one for Cinderella and am working on one for Belle. While working on test printing them, I realized that I have the polarity backwards on this one (lights are dark and darks are light) I also found that I could get better detail if I opened up the picture first and edited it some to create the definition needed for this small detail level. I will be posting an updated Little Mermaid later this week and others will follow and I will provide more detail on the steps I took to make them in case others want to try. End of update. My daughter wanted me to make her a Little Mermaid necklace, so I thought I would try making a tiny lithophane pendant. I used MakeALot's lithophane generator to create the lithophane: http://3dp.rocks/lithophane/ Then I imported it into Tinkercad to cut out the circle, put a round rim on it and a loop for hanging it. I also created some custom support to help hold it upright for printing. See the instructions for tips on printing. Instructions I found that it works best with a plastic that is mostly opaque. Transparent plastic does not have enough light resistance to define darks very well, but it does create an interesting look. On the other end, plastic that is too opaque requires a lot of light to see the picture. I included a picture with my white plastic which is quite opaque, pink in the middle and light blue transparent for an example. I printed this in a vertical orientation because you get a much better resolution than you can with printing lithophanes flat. If your bed moves on one of the axis, make sure that the model is oriented lengthwise along that axis. Mine moves along the Y axis which is why the model is oriented that way. use a raft to help secure it to the bed since it is so skinny, we want to make sure that it does not tip at all. I printed this at a slow speed of about 40mm/sec at .15mm layer height. I set the slicer to 8 perimeters. The reason for setting the perimeters so high is because you want it to print with all perimeters and little to no zig-zag infill. When you get a ways up in a skinny print like this, the quick zig-zag infill can shake the print loose a little, ruining the print. The support structure should break off cleanly and need very little cleanup.
With this file you will be able to print Little Mermaid Lithophane Pendant with your 3D printer. Click on the button and save the file on your computer to work, edit or customize your design. You can also find more 3D designs for printers on Little Mermaid Lithophane Pendant.