LM8UU Y Carriage Mount MendelMax 1.5
thingiverse
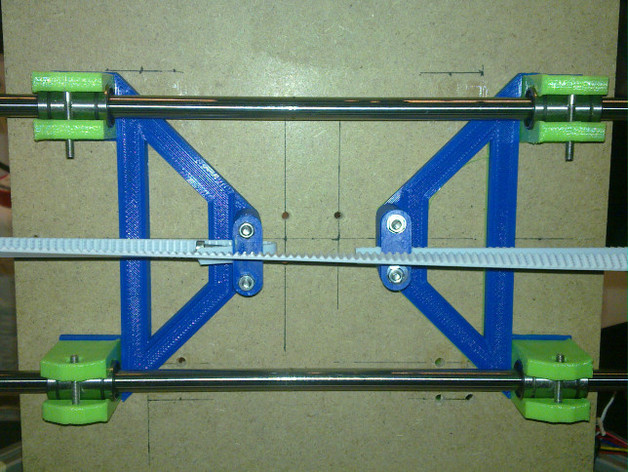
Warning the part and instructions are not done yet! Image is of the "Mount 2014-02-06" version. My MendelMax kit came with a y-carriage mounting system where the LM8UU holders where sandwiched between two pieces of particle board. The wood was under pressure and would change flexibility with temperature. This resulted in a print bed that had to be readjusted before printing anything and again after a few hours of use. This design is my attempt to make a low height Y-Carriage mount for LM8UU bearings using the following rod holders (10mm spacing) http://www.thingiverse.com/thing:24510 The goals of this design are slim design for 4mm particle board or 4mm Dibond use my LM8UU mount for PLA. This mount is printed on its side to increase part strength use screws that are common in German hardware stores (M3 flat head) solid print base that will stay level Please see "Instructions" for a list of required parts and how to assemble a complete unit. Ohh and print this one hot to fuse the layers! I use PLA at 205C with a fan (60-80mm/s). I will not grant Thingiverse an unconditional license to my source files so please go here for the Solidworks part file https://github.com/KaiserSoft/3D-Printing Instructions Print this one hotter to fuse the layers. This will make the part tougher and less flexible, which should improve the resolution of your printer. I print with PLA at 205C using a fan, 0,3mm layer height, at least 0.6 infill (Slic3r) and 50-80mm/s print speed. You need to purchase these items (still optimizing the part so the screws may change!): 8 x M3 x 12mm flat head screws (mount LM8UU) 8 x M3 nuts 4 x M3 x 40mm any head screws (mount belt holder) 1 x M3 x 25mm any head screws (belt tensioner) 1) Print the following parts 2 x Y-Carriage mount http://www.thingiverse.com/thing:242819 4x LM8UU Clamps http://www.thingiverse.com/thing:244229 1x Belt tensioner (testing it) 1x Belt mount tall (testing it) 2) Mark the center of your thick plate and find a distance for two mounts (triangular parts) to fit on your thick plate. The point of the triangle, the place where you will mount the belt mounts, should point towards the center on both sides. 3) The screw holes on the mounting plate are exactly 100mm apart. Mark two points on your thickplate spaced 50mm from the center line. 4) Align the mount with the markings from step 3. Your mount should be squared now. Use a pen to mark the rest of the screw holes 5) Drill all 12 holes with a 3mm drill
With this file you will be able to print LM8UU Y Carriage Mount MendelMax 1.5 with your 3D printer. Click on the button and save the file on your computer to work, edit or customize your design. You can also find more 3D designs for printers on LM8UU Y Carriage Mount MendelMax 1.5.