Logitech c270 Prusa I3 MK3S Motor Mount
prusaprinters
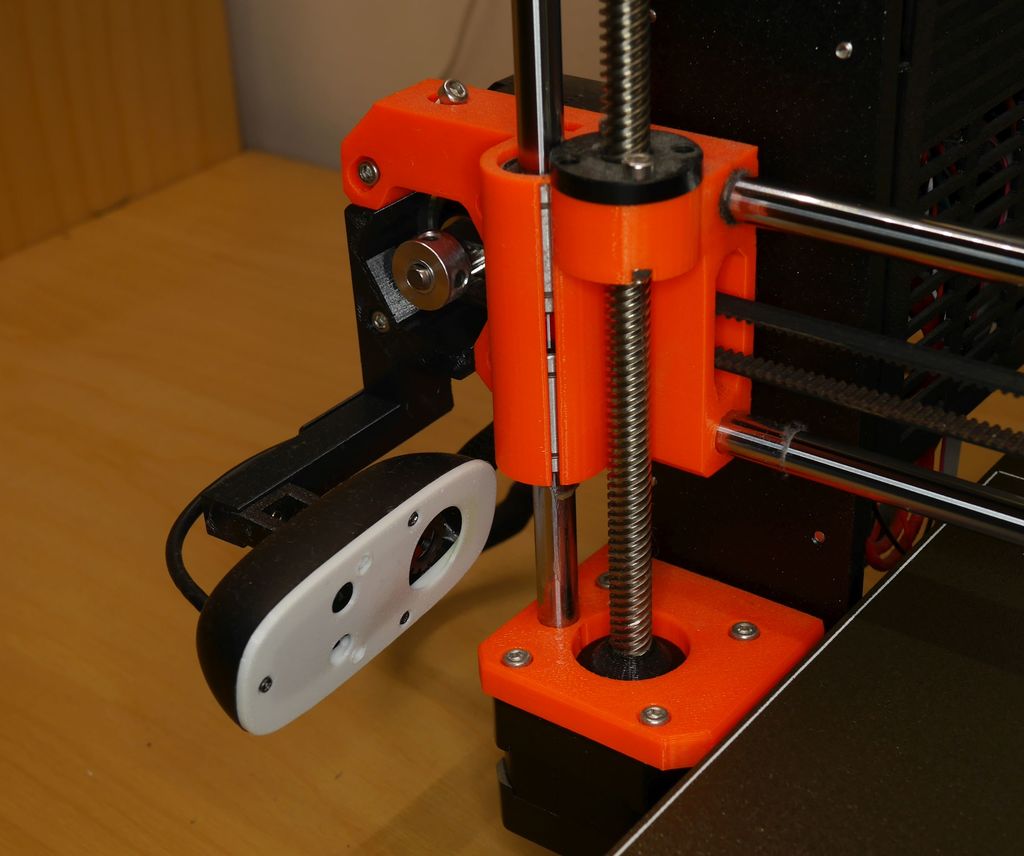
<p>I wanted to mount a Logitech c270 webcam on the Prusa x-axis motor to be able to run Octoprint remotely and have the nozzle under control.</p> <h3>First attempt</h3> <p>The first mount I tried was <a href="https://www.prusaprinters.org/prints/3991-logitech-c270-mount-prusa-i3-mk3">https://www.prusaprinters.org/prints/3991-logitech-c270-mount-prusa-i3-mk3</a>, but the angle of the camera didn't suit me. A lot of the time the nozzle is shown against the background of the black power supply. When printing with black filament and a nozzle that can possibly be slightly dirty, it's very hard to see anything.</p> <h3>A new design</h3> <p>So I set out to design a mount that places the webcam as close as possible to the left z-axis, so that the nozzle would be placed on a light background, but not close enough to capture the z-axis.</p> <p>I also wanted to occasionally do a timelapse, so I wanted to have the nozzle at the top of the frame. An example of such a timelapse is at <a href="https://youtu.be/qM9MQIxmZ4Y">https://youtu.be/qM9MQIxmZ4Y</a></p> <p>Be aware that you will need to hack your camera to manual focus and void the warranty, since the camera's focus is not properly set for close shots. Watch, e.g., <a href="https://www.youtube.com/watch?v=v-gYgBeiOVI">https://www.youtube.com/watch?v=v-gYgBeiOVI</a> to see what you need to do.</p> <p>The camera will be mounted upside-down, so the software will need to be setup accordingly.</p> <h3>Assembling the basic mount</h3> <p>For the basic mount you will need to print out motor_mount.stl and camera_holder.stl. Please read the complete assembly instructions before printing the parts. All of the STLs are in the proper orientation for printing without supports.</p> <h4>Additional parts</h4> <p>You will also need one piece of each of:</p> <ul> <li>M3x25 screw</li> <li>M3x18 screw</li> <li>M3x10 screw</li> <li>M3 locknut</li> <li>M3nS nut</li> </ul> <p>If you ordered a Prusa I3 MK3S (and possibly other models) in the kit form, you will find these in the spare parts bag.</p> <h4>Printing and mounting the camera holder</h4> <p>The nut is embedded in the camera holder, so you will need to pause the print to embed it.:</p> <ul> <li>When you have sliced the camera holder with 2mm layer height in PrusaSlicer, position the layer slider to 4mm, the first layer after the nut void.</li> <li>Right-click on the + to the right of the slider and choose Add pause print (M601)</li> <li>This will cause the print to pause before printing the closing layer at 4mm and allow you to place the M3nS nut in the void</li> <li>After you have done so, choose Resume print on the printer</li> <li>If you're using Octoprint to control the printer do not use the resume print of the Octoprint, as it will mess up the print.</li> </ul> <p>The original camera mount will need to be removed, as described in, e.g., <a href="https://www.youtube.com/watch?v=bWz1-wV8AU4">https://www.youtube.com/watch?v=bWz1-wV8AU4</a>. Once that is done, use the M3x25 screw and M3 locknut to mount the camera on the holder. Make sure that the cable exits the camera on the side where you have placed the screw.</p> <h4>Printing the motor mount</h4> <p>Is trivial.</p> <h4>Assembly</h4> <ul> <li>Screw the motor mount to the x-axis motor using the M3x18 screw</li> <li>Screw the camera holder to the motor mount with the M3x10 screw, making sure that the cable exit is towards the front of the printer. The camera is thus mounted upside down.</li> <li>Tighten the camera hinge screw until the camera is more or less fixed</li> <li>Tuck the cable in the cable guide on the motor mount</li> <li>Adjust the tilt of the camera to your liking</li> </ul> <h4>Software settings</h4> <p>The camera is mounted upside down, so you will need to setup the SW accordingly.</p> <ul> <li>In Octoprint choose Settings|Webcam & timelapse and check both Flip vertically and Flip horizontally checkboxes</li> <li>In Octolapse set the Rotate, Mirror, Flip or Transpose Snapshots of the Logitech c270 setup to Rotate 180 degrees</li> </ul> <h3>Tripod mount</h3> <p>You can use the printed tripod_mount.stl to mount the camera on any tripod that uses the standard 1/4" screw.</p> <p>Dismount the camera from the motor mount and use the same M3x10 to fix it to the tripod mount. The mount can then be fixed to the tripod.</p> <h3>Remixed models</h3> <p>The motor mount is derived from <a href="https://www.prusaprinters.org/prints/3991-logitech-c270-mount-prusa-i3-mk3">https://www.prusaprinters.org/prints/3991-logitech-c270-mount-prusa-i3-mk3</a>.</p> <p>The tripod mount is derived from <a href="https://www.thingiverse.com/thing:2501430">https://www.thingiverse.com/thing:2501430</a></p> <h3>Print Settings</h3> <p><strong>Printer Brand:</strong></p> <p>Prusa</p> <p><strong>Printer:</strong></p> <p>I3 MK3S</p> <p><strong>Rafts:</strong></p> <p>No</p> <p><strong>Supports:</strong></p> <p>No</p> <p><strong>Resolution:</strong></p> <p>0.2</p> <p><strong>Infill:</strong></p> <p>15%</p> <p><strong>Filament:</strong> Prusament PLA</p> <p>Galaxy Black</p> Category: 3D Printer Accessories
With this file you will be able to print Logitech c270 Prusa I3 MK3S Motor Mount with your 3D printer. Click on the button and save the file on your computer to work, edit or customize your design. You can also find more 3D designs for printers on Logitech c270 Prusa I3 MK3S Motor Mount.