Logitech G27 Pedal Hall Effect Modification
thingiverse
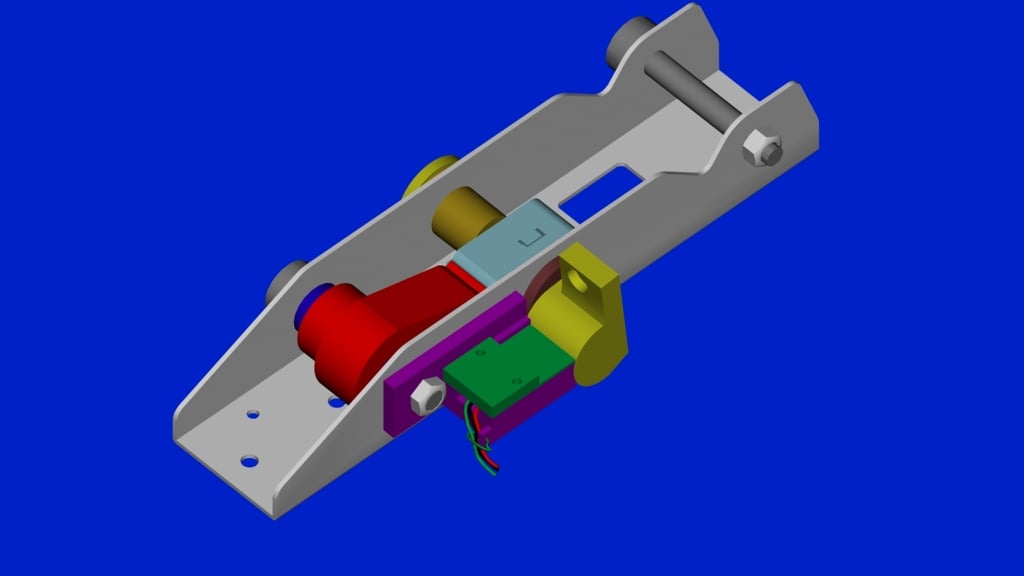
EDIT: I have been using this as a Throttle pedal with iRacing since I posted this on September 7, 2021 and It has been flawless. I spray some dry lube on it occasionally for peace of mind but otherwise I have had no wear or any issue at all. I did adjust the mag location with the included adjuster after install settled in, but other wise no issues. In iRacing I have differently gotten Faster for sure. G27 Hall Effect Mod V1 by James Burroughs (Video Links at bottom) Printing Instructions: (Print Layout is in Pictures) There is not much stress so I used 4 walls and 4 top and bottom and 10% infill seemed to do the job. Use 100% infill for the cap. 20 or 28 resolution will work fine. I only used structure for the Top_Gear_V7_04_F. Flip it so the little hole for the screw faces down. Installation Instructions: Ideally you want both poles of the magnet utilized to get a full voltage sweep, however it will work fine using the proximity method I have. Only drawback is you get a progressive range as the magnet gets closer to the sensor. With this said it still works mighty fine. You won’t need to save the old potentiometer so disassemble the pedal. I suggest using the clutch in case something goes bad you can still drive. Disassemble the parts since you need the mounting frame completely exposed. Press the Rotary_Insert_LS_V7_01 into the old potentiometer hole on what I will refer to as the left side of the metal base. Place the hook from the spring into the slot on the Rotary_Gear_V7_V2_01. Place the spring hole over the tab and wind the spring once, then press onto and over the Rotary_Insert_LS_V7_01 and the spring will then hold it in place. Now insert the Rotary_Insert_RS_V7_04 into the hole on the right side and press until it seats and will then almost be touching the Rotary_Gear_V7_V2_01. Now insert the Rotary_Shaft_V7_02 from the left side. Use your thump and hold the top of the Rotary_Gear_V7_V2_01 so it’s flat, this will help slide it through. Press until it moves through the Rotary_Gear_V7_V2_01, through the Rotary_Insert_RS_V7_04 and out the right side. Now place the Rotary_Gear_Lock_V7_01_F on the end of the shaft to secure the assembly. Parts will fit tight when warm so cool them before you start to easy installation. I kept tolerances close so you wouldn’t need hot glue or such. Now change out the stock gear for the Top_Gear_V7_04_F. Place the screw back in just as the stock used. I included the bushing in case you needed them. Now place the hinged assemble into the bottom mounting frame. Holding the springed gear perpendicular to the frame, slide the assembly towards the spinged gear until they mesh. The “Whistle” looking Rotary_Shaft_V7_02 should be facing same as gear. Now insert the bolt to hold in place. Place the Hall_Block_Gen2_12 onto the bottom frame so the adjustment tab fits into the square cutout on frame, and the hole aligns with the bolt head. Tighten bolt. Hall_Block_Gen2_12’s hole is made so the bolt with self-thread into it. Place the ny-lock nut on and gently tighten. This bolt does not need to be super tight just enough to secure the place. The tab allows for lateral adjustment. Place the hall sensor into the slot and use the Hall_Block_Cap_Long_Gen2_02 to hold in place. Press an 8mmx3mm magnet into the hole on the Rotary_Shaft_V7_02. Once you place the magnet in the hole it’s a bitch to get out so either bench test for the correct side or otherwise simple turn the hall sensor over. I was already using a Bonder dongle for the stand alone pedals, I just wired it back up and it work perfect first time. Please note that the polarity is very important. The Bonder interface is wired backwards so I had to simply change the Black and red wires polarity when hooking it up. I just used a 4.7K resistor as a dummy load for the old clutch pedal, don’t use a clutch anyways. Email me at jameseburroughs@gmail.com with any questions. https://www.youtube.com/watch?v=oUCj8599gbw https://www.youtube.com/watch?v=QNGZczhB1vI https://www.youtube.com/watch?v=Ry60tc4lN6c
With this file you will be able to print Logitech G27 Pedal Hall Effect Modification with your 3D printer. Click on the button and save the file on your computer to work, edit or customize your design. You can also find more 3D designs for printers on Logitech G27 Pedal Hall Effect Modification.