Logitech (Saitek) Throttle Quadrant Modifications
thingiverse
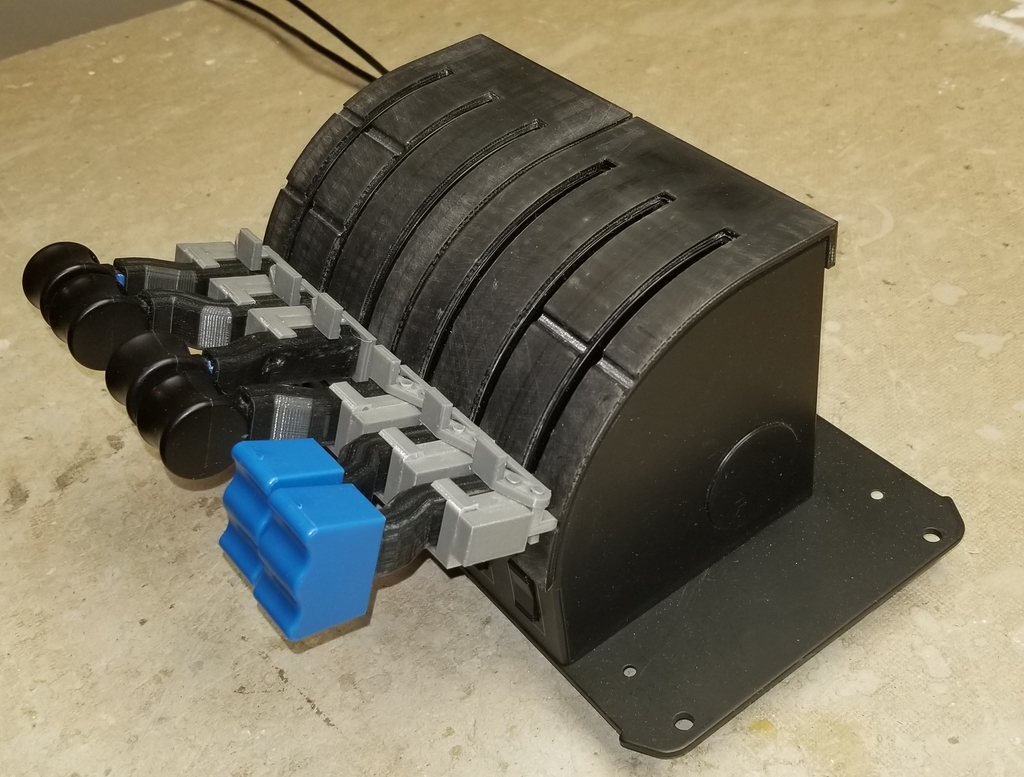
This project consists of two modifications to the Logitech (Saitek) Throttle Quadrant in use with the X-Plane flight simulator. The first is the addition of custom levers. The second is the addition of stops and releases for the lever travel arcs. I don't know that this project will be of use to many people, but, if nothing else, it might give someone ideas to work with. In my case, the throttle quadrants are located just under a keyboard tray, so the levers had to be kept short, or about the same as the unaltered quadrant. This meant that I had to cut back the existing levers by about 3/4" before sliding the custom levers over them. I also shaved down the ridges on the existing levers to allow the custom ones to slide on unhindered. If the new levers are loose when on the existing levers, or if the knobs are loose when on the new levers, you can use tape strips on the flat surfaces to make a tighter grip. If using two quadrants as I am, and numbering the levers from left to right as 1 to 6, levers 1, 3, 4 and 6 will use the files labeled "Lever01." Levers 2 and 5 will use the files labeled "Lever02." The second modification, if used, would require the custom levers above. This is my approach to adding stops along the lever arcs. First, each quadrant gets a shield with grooves added at the appropriate stop points. Each lever gets a stop and release mechanism. Levers 1, 2 and 3 and would use parts labeled "Body01a," Body01b," "Release01" and "Stop." Levers 4, 5 and 6 would use parts labeled "Body02a," "Body02b,"Release02" and "Stop." Refer to the attached images for placement. I used CA (hot glue, Crazy Glue) to combine the body parts. I probably could have printed the body as one piece, but I wanted a smooth finish for the stop and spring and didn't want to mess with the bridging material in such a small space. For the springs, I bought a pack of cheap ball point pens and cut the springs to be 3/4" long. I made the little axles on the body and stop a little long to allow for melting of the ends. I used a heat gun to heat up an Exacto knife blade and pressed that onto the axle ends. This holds the whole thing together. I designed this system around the AirFoil Labs King Air 350. At first I envisioned having custom shields for each aircraft, but that's a bit too much work. I think the shields with the current grooves can be used for other aircraft while using the control profiling feature within X-Plane to place desired control settings at the existing grooves. All of the stop and release parts were made with 100% fill. The custom levers and shields were made with 15-20% fill, although the shields are so thin (1/8") that they probably came close to 100% fill anyway. I did the design in Sketchup--the files are attached. One final note--I found the built-in stops at the bottom of the lever arcs on the throttle quadrants to be somewhat loose. I added my own stops to the shields to tighten this up. https://youtu.be/E3fKQiv7e9c
With this file you will be able to print Logitech (Saitek) Throttle Quadrant Modifications with your 3D printer. Click on the button and save the file on your computer to work, edit or customize your design. You can also find more 3D designs for printers on Logitech (Saitek) Throttle Quadrant Modifications.