Loki TVA TemPad
prusaprinters
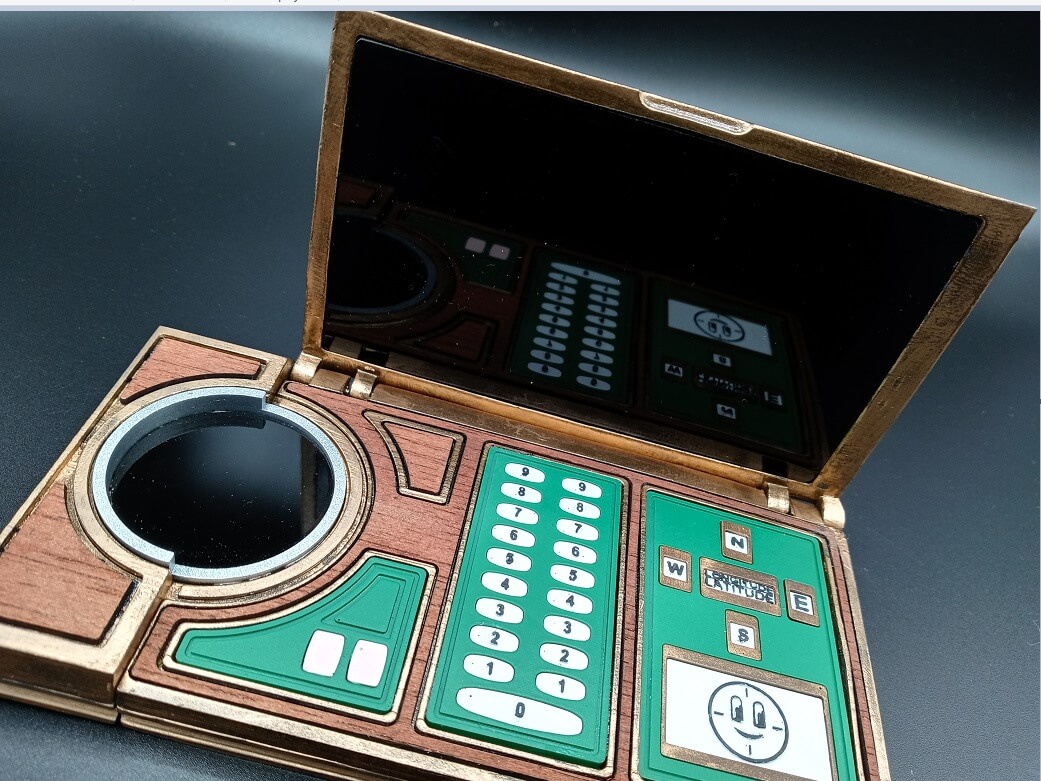
<p>More detail at : https://www.thingiverse.com/thing:4919791</p><p>As always, I will promote and REWARD the first few people to post quality makes (must enable tips on your profile for reward). A quality make is a successful, complete, hopefully decent looking print at 100% scale. Why I am making this: Loved this show it developed great characters, fun world building, and especially interesting props. This prop caught my eye, and I am working on machining one out of brass. I thought while I work on my “hero” versions, I thought I would share my files and research to this point. This is based off of a lot of research of the Tempad from what has been seen on and off screen.</p><p>How accurate is this? Please understand that there are few -clear, strait on, photos, and no good scale reference to base this on. Some sides are rarely seen and there are some discrepancies between the different versions of the prop used in the show so please understand this is my guess, it is a good guess based on everything I could find… but without more information I cannot guarantee this is 100% accurate. In the show there are several versions of this prop with subtle differences. This is based on the hero opening version that splits into two parts (the Temp Pad and Time Spinner used to control the restraint collars.</p><p>Theories and thoughts on the props construction and materials: Definitely done by someone awesome at their job as this is a brilliant design. The hero props appear to be cnc ’d from brass (likely 360 brass) you can tell this by the many rounded inside corners and sharper outside corners which is an artifact from it being very difficult to produce a sharp inside corner while machining. The wood panels look like actual wood not a vinyl sticker as in some angles you can see they have a good deal of thickness (estimate around 1mm). I am not a wood expert so ID-ing it is not my strong suit.. but after ordering 40 sample wood veneers for comparison my best guess is mahogany with some sort of stain of sealant to darken and protect it, I am guessing this because the grain is very strait and dense and mahogany is fairly common, cherry and the other “common “ wood veneers the color may be closer in their natural state but the wood grains don’t look right. The wood I think is a being used as a cleaver trick to hide fixturing points, threaded through holes and magnets as they line up very nicely with features on the opposite side. The green plastic is also machined (then possibly mold taken from the machined master to be reproduced in the resin). The numbered buttons look like a found item I have yet to figure out their source and they could be entirely fabricated but their very distinct shape makes me think they were found. The main brass body appears to be two pieces top and bottom with the seam hidden by a chamfer on the top part. You can see in photos what looks like a seam gap on one edge. Being made in two halves also makes sense with the bolts seen on the back as a means to hold the parts together.</p><p>Recommended hardware:<br/>It is intended for M2.5 socket head cap crew but for those not wanting to buy hardware you can use a piece of 1.75 filament and it should still work ok. For the assembled on cut to a sharp point on the inserted end and use a piece about 120mm long, for a Tempad printed in pieces you just need two pieces about 16mm long. If you want to use the hardware I intended this to use:<br/>Hinges Bolts- <a href="https://www.mcmaster.com/91292A018/">https://www.mcmaster.com/91292A018/</a> (you will need to thread inner most hinge)<br/>Hinge spacer- <a href="https://www.mcmaster.com/91755A311/">https://www.mcmaster.com/91755A311/</a> (you can see in the photos a little bit of white in the hinge, not a strictly necessary part<br/>Bolts to attach two halves of brass body together- <a href="https://www.mcmaster.com/97595A358/">https://www.mcmaster.com/97595A358/</a><br/>Black parts- if you have a laser/cnc should be made from 1/16th in black gloss acrylic<br/>Wood- if you have a laser/cnc- https://www.amazon.com/Mahogany-Veneer-Thick-Sq-Pack/dp/B01LG5WLF4/ref=sr\_1\_11?dchild=1&keywords=mahogany+veneer&qid=1627648500&sr=8-11 Magnets:<br/>X 2- <a href="https://www.kjmagnetics.com/proddetail.asp?prod=BY042-N52">https://www.kjmagnetics.com/proddetail.asp?prod=BY042-N52</a> (holds Time Spinner on, one in spinner one in TemPad edge) ps: I recommend gluing these in well as they are very strong)<br/>X 5- <a href="https://www.kjmagnetics.com/proddetail.asp?prod=BX021">https://www.kjmagnetics.com/proddetail.asp?prod=BX021</a> (one goes on brass lid under little wood strip, 4 get stacked and go in base between the two halves</p><p>Update Log: -7/31/21- I have corrected the recommended hinge bolt length from a 10mm to 16mm (link above)</p><p>-7/31/21- I increased the magnet recess length in brass parts (marked v2 updated "every part on one file", and originals deleted & ) a little to help with fitment</p><p>-8/1/21- Rotated Wood file 45 degrees to help alight "wood grain" in slicers bottom fill, you still need to double check you print preview depending on your set up</p><p>8/2/21- I decreased the diameter and height of the Silver parts a little to help with fitment (marked v2, and updated "every part on one file", and previous file versions deleted,)</p><p>8/2/21- Added assembly instructions</p><p>8/3/21- Added a "Resin-Mostly Assembled-Supported" it is pre-hollowed, with drain holes, and supported model of a complete TemPad that with a mono screen prints in under 3hrs! Picture shows it on my Anycubic Mono X. It is still split into a few parts so I could support things on non critical sides and so you can still add magnets. I do feel for ease of painting and the highest quality everything should be printed separately but if you just want a TemPad quick this is the way to go.</p><h3>Print Settings</h3><p><strong>Printer:</strong></p><p>Pancakebot</p><p><strong>Rafts:</strong></p><p>No</p><p><strong>Supports:</strong></p><p>No</p><p><strong>Resolution:</strong></p><p>.15mm or better</p><p><strong>Infill:</strong></p><p>15- Gyroid</p><p><strong>Filament:</strong> Many PLA, or PEtG, or resin, Black, White, Silver, Brass, Mint/pastel Green, Wood, Pale Pink/ Red,<br/><strong>Notes:</strong></p><p>Supports??-I’ve taken the time to optimize these files for 3d printing, This should mean no supports, with a few exceptions the brass top of the base has a little ledge on the right side that will need support, and the Lid will need supports around the magnet recess -possibly-and for sure the hinges.</p><p>I have tried to make this a fun time to print and assemble and put a lot of testing in this to get things right. A few file options have been made available including things split up by machine type, by color, even a few options with it preassembled if you don’t care to print the parts separately. This should work nicely if made with a half decently accurate machine, and material parts should slide together with minimal sanding, clean up or glue needed . If you have trouble let me know so I can make it changes to make this easier for everyone.</p><p>Keep in mind everybody’s machines and settings are different so I can’t make this work for everyone right off the bat without good feedback. I am still stress testing these files on different machines so if you have questions comments or concerns let me know what I can do to help make this work for your needs.</p><p>I have versions Meant for FFM (filament based 3d printing ) and resin printers. There are subtle changes between both files as both types of machines have their strengths and weaknesses.</p><p>The FFM Files should load pre-oriented for best results printing on a smooth surface (aka some parts print face down to take advantage of the smooth surface left by the bed side of a print. I am working on pre-oriented, drain holed, hollowed, and supported files for resin printing but I want to make sure I have tested each one before I share.</p><ul><li>FFM Tips:</li></ul><p>When printing the "White buttons with lettering" do the first 3 layers (at .2 layer height) in white than do a color change to black, save you the trouble of trying to paint this -When printing the "Brown- Wood" make sure to check your slicer preview so that the first layer is going in the correct direction to give a wood grain like effect. I recommend a very slow first layer (like 5mm a sec) and only one perimeter on a smooth bed.</p><p>The laser cut files,I have provided SVG files for those of you with a laser cutter to try to make the wood panels or 1/16in gloss black acrylic for the screens. You can also use the files with a vinyl cutter for the wood to cut out wood decals to shape, the size things should be is written in the description in case your software rescales things.</p><p>Category: Props</p>
With this file you will be able to print Loki TVA TemPad with your 3D printer. Click on the button and save the file on your computer to work, edit or customize your design. You can also find more 3D designs for printers on Loki TVA TemPad.