Look Ma, no hands!! Hands-free Refuse Chute operation (ver 1.0)
thingiverse
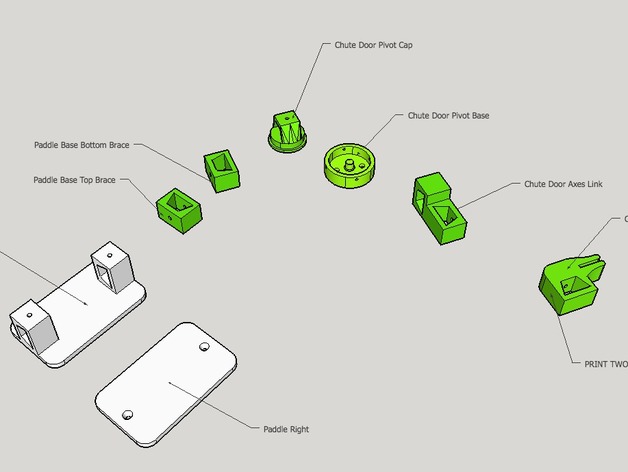
Many modern high-rise dwellings have built-in refuse/ rubbish chutes. If you pull the handle to open the chute with soiled hands, you usually wind up attracting cockroaches. The ick/ hygiene factor also means you should wash your hands properly after using the chute. Presenting: A hands-free solution, where a paddle allows you to operate the chute door with your foot. The printed parts are linked up with electrical wire trunking, minimising prints and leveraging on the strength and flex of the wire trunking. Video: http://youtu.be/Nf_lbvUD9_Y Instructions @@@ BOM: 9 x 1/2 inch screws (+2 optional for extra fastening of paddle) 2 x small screws (see note in Step 9) 1 x 1-1/2 inch bolt and nut 4 x M3 6mm screws (tighten up to 6mm if using longer ones, see Step 4) 1 x 608 bearing Metal drill bit 1 x length of 1/2 inch (wide) electrical wire trunking (trapezoid shaped) Print 1 x each STL, 2 x “Chute Handle Clippers”, 2 x “Paddle Door Brace” *** “Chute Handle Clippers” may need to be modified to fit your chute door handle. @@@ ASSEMBLY: Place “Chute Door Pivot Base” on the side and edge of chute body - where the chute door pivots (but avoid the door of course!). Mark and drill the two holes through the side of the aluminium chute body. Use a drill bit smaller than the screws to allow a tight fit. Add 608 bearing. Add “Chute Door Pivot Cap” and secure with the M3 screws. The top unit should roll freely on the base secured to the chute body. Switch focus to the chute handle: Attach 2 x “Chute Handle Clippers” to chute handle, link them with the electrical wire trunking. Add “Chute Door Axes Link” to the assembly. Link “Chute Door Axes Link” to “Chute Door Pivot Cap” - allow a few inches of excess trunking. Attach “Paddle Base Brace” with long bolt. Attach other “Paddle Base Brace” to the desired angle (with chute door closed). Add bolt and tighten. Note: For my prototype set up I drilled two pilot hole (on the bit of excess “ledge” on either face, to add small screws for further locking. Alternatively you can glue the two braces together. I may add a modified bottom brace with “headers” at set angles to avoid this extra step. Leave me a comment or message. Link another length of trunking (to desired length) to BOTH connectors of “Paddle Left”. Attach “Paddle Right” with last 2 screws.
With this file you will be able to print Look Ma, no hands!! Hands-free Refuse Chute operation (ver 1.0) with your 3D printer. Click on the button and save the file on your computer to work, edit or customize your design. You can also find more 3D designs for printers on Look Ma, no hands!! Hands-free Refuse Chute operation (ver 1.0).