Lords of Waterdeep - Game Upgrade
thingiverse
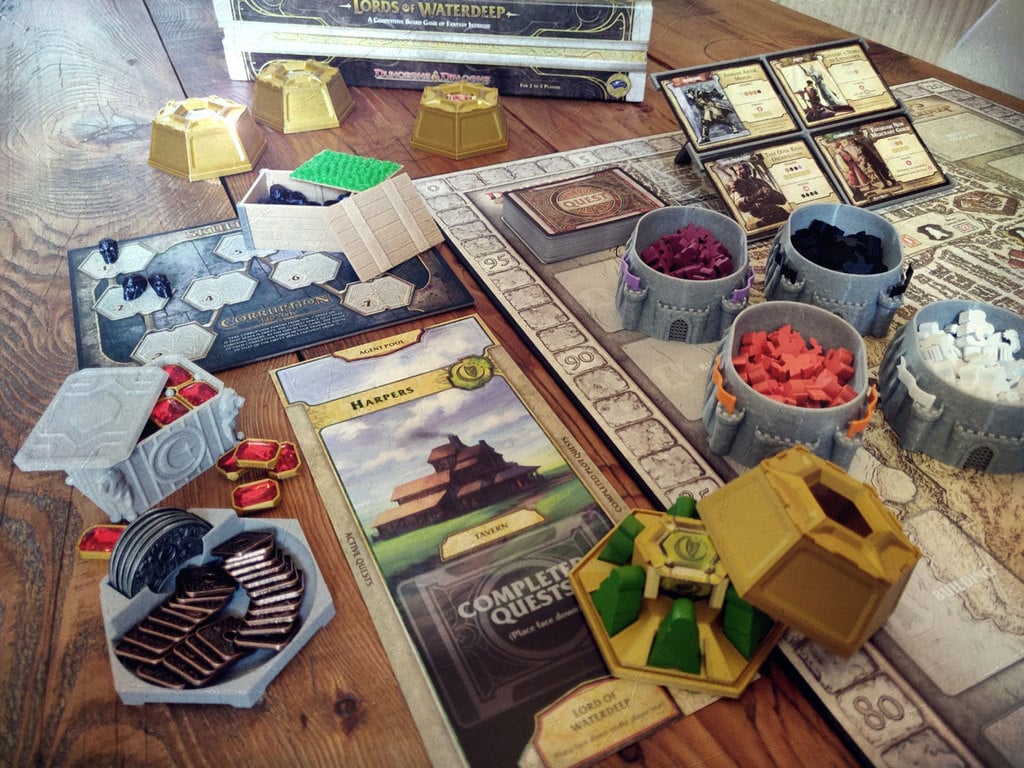
A combination of upgrades and inserts for <a href="https://dnd.wizards.com/products/lords-waterdeep-board-game">Lords of Waterdeep</a> that... - Allows for rapid set-up of the game - Integrates the expansion into the main box - Enhances a few elements - Brings a little extra D&D flava This project is modular, so you can print a few of the elements... or go the whole hog and build the entire set. <h3><b>ENHANCEMENTS</b></h3> This upgrade contains... - <b>Guildhalls</b>: also known as "Keeples"... these store the adventurer pieces and can be dropped straight on to the table. - <b>House Reliquaries</b>: one for each of the six houses, to store their agents, building markers, score token and 100VP gem; give each player one of these for a quick set-up. - <b>Quest Stand</b>: for easy viewing of the quests; can be placed at 2 different angles, depending on your preference. - <b>Coin Bank</b>: neatly stores all your coins (metal or cardboard), and splits into two trays with a flick of the wrist. - <b>Chest of Victory</b>: A decorative sarcophagus filled with 3D victory gems. - <b>Smuggler's Crate</b>: Just an old wooden crate full of apples... with skulls of corruption hidden beneath a false bottom. <h3><b>BOX INSERTS</b></h3> Along with the items listed above, there are a few components that can be used alongside some black foam board to create a set of layered inserts - <b>Card Holders</b>: trays to keep the cards neatly organised, with an easy to use ribbon release system. - <b>Inserts</b>: inserts for the Ambassador, Lieutenant and First Player pieces. - <b>Foam Board Blueprints</b>: blueprints for the foam board layers. - <b>Assembly Instructions</b>: a little clarification on how to put everything together. <h3><b>REQUIREMENTS</b></h3> This is a tricky build... along with the filament for the 3D printing, you'll need some specific material and tools to make it happen: <b>Materials</b> - A3 3mm Black Foam Board x 5 - A3 5mm Black Foam Board x 5 - A3 Black Card x 5 - Glues: Hot Glue, <a href="https://www.uhu.com/en/product-page/the-all-purpose-adhesive/63661">UHU</a> & <a href="https://www.revell.com/products/colors-accessories/glue/contacta-professional.html">Revell Contacta Professional</a>, <a href="https://uk.gorillaglue.com/gorilla-glue-clear/">Gorilla Glue Clear</a> - 15mm "Satin" Ribbon: I used a roll of gold and a roll of black - 13mm x 18mm Red Emerald Shape <a href="https://www.decocraftstore.com/13mm-x-18mm-red-emerald-shape-acrylic-gem-embellishments-2969-p.asp?v=0&variantid=2970">Acrylic Gems</a> x 40 <b>Tools</b> - A sharp craft knife - A hot glue gun - A <a href="https://www.wolfcraft.com/products/wolfcraft/en/EUR/Products/Hand-Tools/Knives/Miscellaneous-Knives/Circle-Cutter/p/P_4151">cricle cutter</a> - A foam board <a href="https://www.logangraphic.com/products/foam-cutters/wd-8011-hole-drill_p_85.php">hole drill</a> - A foam board <a href="https://www.logangraphic.com/products/foam-cutters/wc-4010-rabbet-cutter_p_81.php">rabbet cutter</a> (optional) <h3><b>BROKEN TOKEN UPGRADES</b></h3> The components in this build have been designed to work with upgrades from The Broken Token, but should also work fine with the original game parts. - <a href="https://thebrokentoken.com/waterdeeples">Waterdeeples</a> - <a href="https://thebrokentoken.com/deepwater-metal-coins-60">Deepwater Metal Coins</a> <h3><b>BUILD TIPS</b></h3> - Some of the elements include variations for folks who have larger printers, don't want so much detail, or aren't fussed about the expansion. - A few of the parts are made to fit together tightly... depending on your printer's tolerances, you may need to adjust the parts slightly, and/or experiment with your print settings. - Most parts were printed on max detail for precise dimensions and minimal layering (and the Smuggler's Crate lid prints best using a high detail nozzle) but some parts (like the Card Holders) can be accelerated with speedier, less accurate settings. - Certain parts print better with a raft or brim, but most won't need them. - Use the right glue for the job! UHU sets fast... but melts foam board. Hot Glue is also fast and strong... but will burn your fingers. Revell Contacta can be used for ultra-neat, precision assembly. Gorilla Clear takes a while to fully set, which means you have time to adjust the positioning of your parts... but then you need to clamp and leave it overnight. - Building the entire kit is an epic quest... good luck!!! <h3><b>FILAMENT</b></h3> I used the following filament for this project... - <a href="https://www.3djake.uk/spectrum/pla-special-stone-age-dark?sai=4028">Spectrum PLA Special - Stone Age Dark</a> for the Chest of Victory and Guildhalls. - <a href="https://www.3djake.uk/3djake/ecopla-ultra-satin-gold?sai=10312">3DJake ecoPla Ultra-Satin Gold</a> for the reliquaries and Coin Bank elements. - <a href="https://www.3djake.uk/fiberlogy/easy-pla-inox-steel?sai=4617">Fiberlogy Easy PLA Inox Steel</a> for the Quest Stand, Smuggler's Crate corners and Guildhall portcullises. - <a href="https://www.3djake.uk/fillamentum/pla-extrafill-wizards-voodoo?sai=5114">Fillamentum PLA Extrafill Wizard's Voodoo</a> for the Skulls of Corruption - <a href="https://www.3djake.uk/3djake/ecopla-matt-black">3DJAKE ecoPLA Matt Black</a> for the insert components, to blend nicely with the foam board. - <a href="https://www.3djake.uk/fillamentum/pla-extrafill-mukha?sai=6105">Fillamentum PLA Extrafill Mukha</a> for the Smuggler's Crate. - Basic PLA in various colors (orange, white, black, purple and green) for the Guildhall flags and Smuggler's Crate apples. <h3><b>DESIGN STORY</b></h3> This project started, as I'm sure many others have, with a question... <i>"Can I save space on my shelf by storing expansions in the main game box?" </i> ...unfortunately (depending on how you look at it) I got somewhat carried away, and things just ballooned from there! The original inserts for Lords of Waterdeep have been really nicely designed, so I felt that any "upgrade" would need to be approached with the appropriate respect for the original. My objectives on this design were... - Save space by incorporating the expansion into the main box - Allow for easy placement of the game pieces when packing away - Allow for speedy set-up when starting - Play to D&D theme of the game All the parts were modeled in 3DS Max, and the end product is the result of many, many, many prototypes and refinements over the course of several months. This project was inspired by the excellent work of <a href="https://www.thingiverse.com/mrfufu/designs">Randall Dunigan</a> and <a href="https://www.thingiverse.com/fuchsr/designs">Rainer Fuchs</a>, and uses the same <a href="https://sketchfab.com/3d-models/low-poly-skull-7dc37b0f8edf4e89843b28db268fc973">Low Poly Skull</a> model found in my <a href="https://www.thingiverse.com/thing:5140140">Fortune and Glory Trays</a>. I had a tonne of fun designing and building this upgrade, learning a boat load of new techniques and tricks along the way... hopefully you will too!
With this file you will be able to print Lords of Waterdeep - Game Upgrade with your 3D printer. Click on the button and save the file on your computer to work, edit or customize your design. You can also find more 3D designs for printers on Lords of Waterdeep - Game Upgrade.