Lost Wax Mold (Lion Protome)
thingiverse
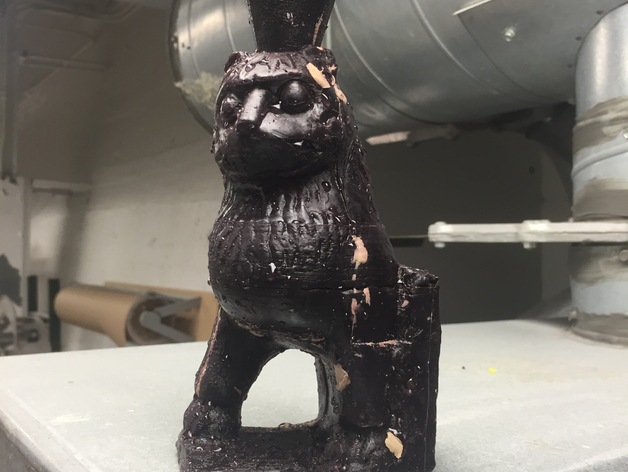
In the summer I began an experiment to determine if 3D printed PLA molds could be used to create wax positive for lost wax casting. My early experiments with simply cylindrical forms were fairly successful. Four part molds, 3d printed with support material, sanded slightly and a healthy does of mold release did well. Two part molds and rough plastic were not so successful. With this in mind I wanted to see if a complex 3D scanned part would also produce a respectable, lifelike wax reproduction for possible casting later on. This to me would be the magic bullet where we could short circuit the mold making process for foundry outcomes. I chose my 3D scan of the Lion Protome in the collection of the Art Institute of Chicago. I have adopted this lion as my goto model for 3D printing / 3D scanning demos and workshops. It's a great object to scan - and comes out really well in Recap and 123D Catch with 50 or more photos. It's also a good object to print as it is just steep enough to merit support material but often prints just fine without it. I think there's a lot 3D print designers can learn from ancient sculpture where the artisans of the day had to do a LOT with very little. Especially when it comes to unsupported overhangs and other details. Despite being very dynamic in form - there are no right angles here at all. For more info: http://tomburtonwood.com/2015/10/3d-printed-mold-making-pt-4/ Print Settings Rafts: No Supports: Yes Resolution: As low as you want to go. Any lines will be read by the wax and will be in the final object. Infill: 10 - 15% should do it. more the merrier of course. Notes: Sand the rough parts from the support material. Fill in any holes in the floor or sides with soft material prior to casting process. How I Designed This Rhino does not like meshes. And Recap / 123D Catch does not export NURBS / Solids. So what to do? Well it's not perfect but the workflow goes something like this. Locate mesh / 3d scan inside a number of volumes, leaving ample margins top and bottom. Shape these volumes to minimize the eventual amount of plastic used up in printing process without weakening the part too much. Determine location of parting lines and use WireCut tool to split the solids into their respective parts. Try to imagine whether the mold part will separate cleanly from the model and whether there will be a lot of friction or not. Create keys using nested spheres or similar volumes. Place as needed to lock pieces together when they are printed individually. Use Solid > Union and Difference to add and subtract as needed. Basically attach the smaller sphere to one face and subtract the larger from the other. Save everything to a backup layer + lock it and hide it. Run the Mesh > From NURBS Object command on each of the mold parts. Run Mesh > Boolean Difference on each mold part, subtracting the model from it until each mold part reads with it's respective portion of the model. Make sure not to delete input with each difference command. Check the part, hide mold sections - does it look like it will work? IF not add more parting lines, keys etc ( this is where backing up the first version to a new layer is super useful ). Export each mold section individually as your file format of choice. Print with support material (if needed). Remove said supports and sand down any burrs. Fill any holes with oil clay or another sturdy malleable material.
With this file you will be able to print Lost Wax Mold (Lion Protome) with your 3D printer. Click on the button and save the file on your computer to work, edit or customize your design. You can also find more 3D designs for printers on Lost Wax Mold (Lion Protome).