Low Profile Adjustable Belt Tightener
thingiverse
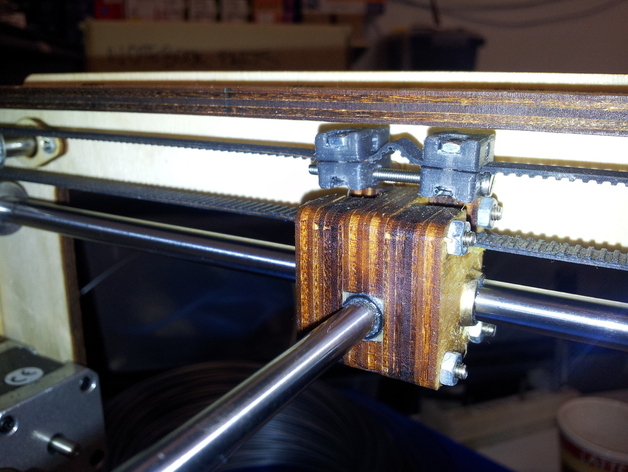
Adjustable belt tension with a screw. Low profile, suitable for Ultimaker etc. Instructions Update: These won't fit on the 'Y' belts on newer UM's. See Notes and Picture in the comments below. Main picture here shows a clamp on the 'Y' belt of an older UM. Parts required per belt 4 - M2.5 X 8mm small head screws. - http://www.ebay.com.au/itm/300521403792?ssPageName=STRK:MEWNX:IT&_trksid=p3984.m1497.l2649 1 - M2.5 X 30+mm screw. (35mm used here) - http://www.ebay.com.au/itm/370568422906?ssPageName=STRK:MEWNX:IT&_trksid=p3984.m1497.l2649 5 - M2.5 thin nuts - http://www.ebay.com.au/itm/120894813183?ssPageName=STRK:MEWNX:IT&_trksid=p3984.m1497.l2649 Instructions Print 2 X Nut Side and 2 X Screw Side clamps for each belt (in there current orientation) and clean out with a 2.5 mm drill. Work out where the outside pair will clamp to the belt and move the spot to the centre. Twist the belt to assist in putting the clamp on. Push through the adjusting screw all the way through the bottom clamp. Place the other bottom clamp on the adjusting screw. Put the nut on the adjusting screw a few turns and slide the free clamp up against it. Clamp the top clamp onto the bottom clamp. Tighten the adjusting screw and twist the clamps so they are horizontal. Test tightness and adjust. Hint Over tightening makes it harder to move the extruder so test it still moves freely after tightening.
With this file you will be able to print Low Profile Adjustable Belt Tightener with your 3D printer. Click on the button and save the file on your computer to work, edit or customize your design. You can also find more 3D designs for printers on Low Profile Adjustable Belt Tightener.