LowRider 3 CNC - control box case for BTT SKR Pro 1.2 board and a BTT TFT35 E3 touchscreen (v1.1)
prusaprinters
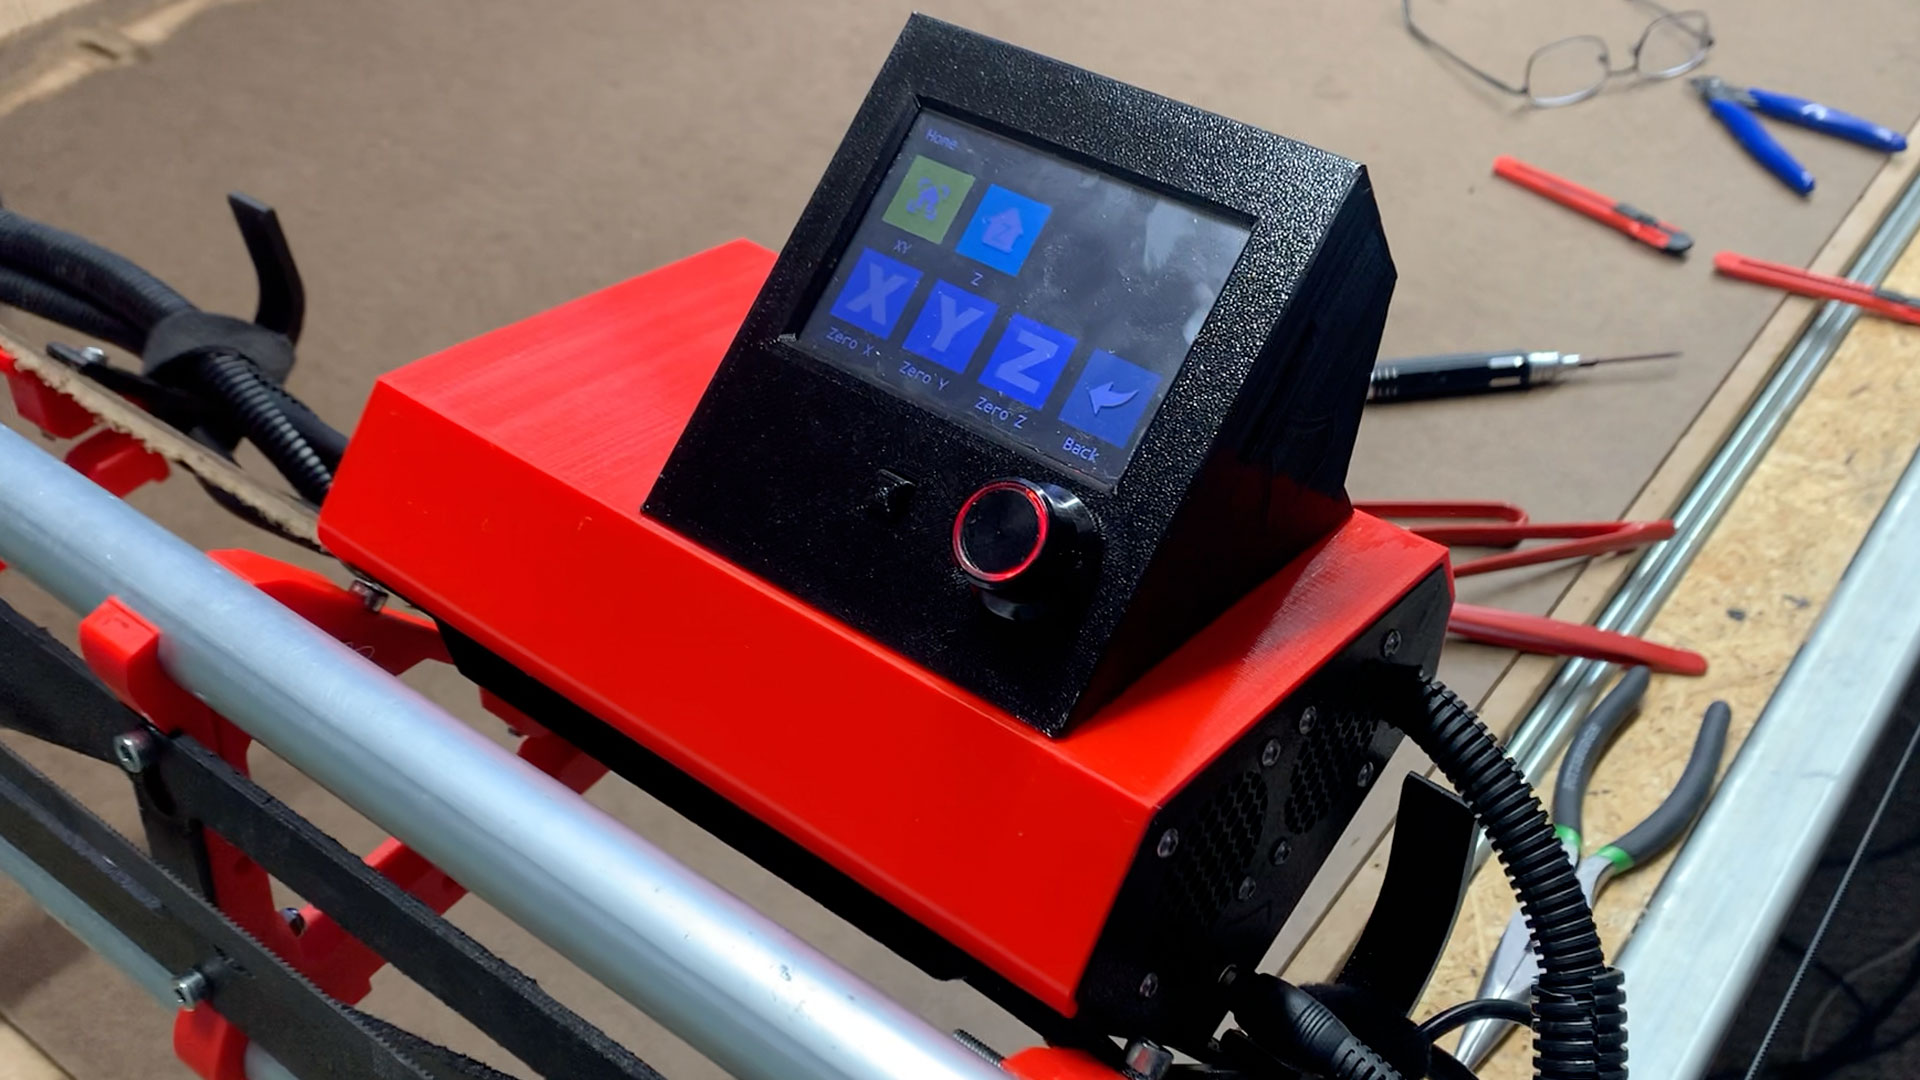
<h5><strong>Quick heads up: </strong></h5><p>These remix designs were somewhat “intended” for the case being positioned on the X-max end (right side) of the LR3 gantry. If you are planning for placing it on the X-min (left side), then the only concern with simply sliding the case to the other side is that positions the cooling fan intake holes toward where the cuts happen instead of facing outward. <i>Perhaps the easiest work around is to flip the fans so they pull air out of the case instead of pushing air into the case.</i> Previously I had mistakenly suggested simply mirroring the printer parts, but I had not actually done it, and when someone tried, they pointed out that mirroring does not handle reorienting the openings on the lid for the ports on the PCB(s). Sorry for any confusion.</p><p><strong>Note:</strong><i> there are now two revised editions of this, one which can have the TFT (E3 style) face either way (toward X or Y), without reprinting any part or printing any additional parts, and another that accommodates non-E3 TFTs (but only looks right while facing toward the X axis). Here are links to the new revisions: </i></p><p><a href="https://www.printables.com/model/229885-lowrider-3-cnc-control-box-case-for-btt-skr-pro-12"><strong>LowRider 3 CNC - control box case for BTT SKR Pro 1.2 board and a BTT TFT35 E3 touchscreen (v1.2)</strong></a></p><p><a href="https://www.printables.com/model/235351-lowrider-3-cnc-control-box-case-for-btt-skr-pro-12"><strong>LowRider 3 CNC - control box case for BTT SKR Pro 1.2 board and a BTT TFT35 (NON-E3) touchscreen (v1.3.1)</strong></a></p><h5> </h5><h5><strong>UPDATE July 7, 2022 - “Low Fat” Base option</strong></h5><p>What’s this “Low Fat” thing? This is my version of a brainchild of <a href="https://forum.v1engineering.com/u/aaronse">aaron GitHub</a> on the V1 Engineering forum. It’s a more efficient version of the base with some “fat” trimmed off. It maintains thickness and strength where needed, but saves 33% of the plastic and shaves 25% off the print time. It also has a new version of hanging bracket, inspired by the work of <a href="https://forum.v1engineering.com/u/supraguy/summary">Dan @SupraGuy</a> on the V1 Engineering forum. This hanging bracket is split in two so it can accommodate your temporary struts while you’re starting out with your LowRider v3, and then graduate to your permanent struts once you get them cut and installed. I’m offering both the original base (v 1.1) and the new one (1.3.2) so you get to choose. And both are available for 1/8" thick struts or ¼" thick struts.</p><p> </p><p><strong>Gorgeous printable case for your </strong><a href="https://docs.v1engineering.com/lowrider/"><strong>LowRider v3 CNC</strong></a><strong>, if you're using an SKR Pro 1.2 board and a BTT TFT35 E3 touchscreen. Offers some new features (see below).</strong></p><figure class="media"><oembed url="https://www.youtube.com/watch?v=gDnTHLa4Duk"></oembed></figure><p>Many thanks to <a href="https://forum.v1engineering.com/u/vicious1/">Ryan at V1 Engineering</a> for his design genius and gracious generosity in sharing his work with us all. For those whose LowRider v3 MPCNC has or will have a BTT SKR Pro 1.2 main board and a BTT TFT35-E3 v3 touchscreen, I offer my remix of Ryan's blank case CAD file. This case may fit other SKR boards, depending on dimensions. Check before printing. It may also be remixed to suit other SKR boards.</p><h5>Features: </h5><ul><li><strong>NEW (as of July 7, 2022) “Low Fat” Base option.</strong> See above.</li><li><strong>NEW (as of June 10, 2022) support for those with ¼" thick struts.</strong> The original base has an attachment rail on the back that is sized for struts cut from 1/8" thick hardboard. What about those who cut their struts from ¼" plywood? There is now an alternate base for that too. <strong> </strong></li><li><strong>Support for cooling fans</strong> — designed for two 40x40x10 fans. I use these quiet fans from Noctua: <a href="https://amzn.to/3MADkBW">NF-A4x10 FLX, Premium Quiet Fan, 3-Pin (40x10mm, Brown)</a></li><li><strong>Snap in place feature</strong> — this remix keeps the original screw hole from Ryan's design, which allows the lid to be fastened in place on the base, but my design also includes a new snap in place feature. I love it, and have not bothered with a screw.</li><li><strong>Access ports</strong> — for the SKR's USB ports and mini-SD card slot, and for the TFT touchscreen's SD card slot.</li><li><strong>DC power connector port</strong> — the base has an internal “sled” to hold the female power connector, and one of the printable parts is a little bar to screw in and clamp the connector in place. My LowRider kit from <a href="https://shop.v1engineering.com/">V1 Engineering</a> came with one of the connectors. If you need more, <a href="https://amzn.to/3xsmf8K">these are available on Amazon</a>. </li><li><strong>Ample room for wiring and power connections</strong> — with options for running wires in from below the board or above it. I recommend below, as it minimizes chances of something getting tugged loose while sliding the lid in or out. See <a href="https://www.youtube.com/watch?v=Ngv6M8hdgSs">video</a> (above).</li></ul><p><strong>Two options:</strong></p><ul><li><strong>Option A (recommended)</strong> — has the touchscreen facing out toward the X axis. <i>Print the “A” versions of parts #2 and #3 (Lid and TFT Holder).</i></li><li><strong>Option B</strong> — has the touchscreen facing out toward the Y axis. <i>Print the “B” versions of parts #2 and #3 (Lid and TFT Holder).</i></li><li>The “A” version is recommended because the X and Y movement buttons on the TFT would be oriented / aligned with the actual axes of your CNC machine.</li></ul><p>Details of my upgrade of a LowRider v2 to v3 are available <a href="https://forum.v1engineering.com/t/on-upgrade-path-lr2-lr3-clarksburg-wv-usa/32920/">here on the V1 forum</a>.</p><h5>Print and Assembly:</h5><ul><li>Print the parts as oriented. No supports needed, assuming your printer is capable of a decent amount of bridging.</li><li>Use M3x8mm screws to mount the TFT to the holder, and the holder to the lid, and the clamp that holds the DC connector in place. Use M3 screws of an appropriate length to attach your cooling fans.</li></ul><p><strong>Note:</strong> if your desired orientation requires flipping the TFT holder, then be aware that you may need to do a remix of the lid, since the cutout in the top of it is based on balancing between two constraints: one is the printing process, in which we seek to minimize bridging distance, and the other is the protrusion of the thicker aspects of the TFT circuit board. Alternatively, you may be able to print the lid as is, and then carefully cut away portions of overhang that would be invisible once the TFT holder is in place, and are only intended to reduce bridging to make the part printable without supports.</p><p>Change log:</p><ul><li>July 7, 2022, 9:25 pm (EST): added “low fat” versions of the base for both 1/8" thick struts and 1/4" thick struts. The low fat versions save 33% of the plastic and shave 25% off the printing time. </li></ul><p> </p><p><strong>My PayPal tip jar: </strong><a href="https://paypal.me/design8studio"><strong>https://paypal.me/design8studio</strong></a><strong> </strong></p><p> </p><p><strong>Various LowRider 3 CNC remixes:</strong></p><ul><li><a href="https://www.printables.com/social/127223-doug-joseph-design8studio/collections/175217"><strong>LowRider 3 CNC Collection</strong></a></li></ul><p> </p><p><strong>View all my models and remixes on Printables:</strong></p><ul><li><a href="https://www.printables.com/social/127223-doug-joseph-design8studio/models"><strong>Design8Studio 3D models</strong></a></li></ul><p> </p><p><i>*Amazon product links are affiliate links. </i> </p>
With this file you will be able to print LowRider 3 CNC - control box case for BTT SKR Pro 1.2 board and a BTT TFT35 E3 touchscreen (v1.1) with your 3D printer. Click on the button and save the file on your computer to work, edit or customize your design. You can also find more 3D designs for printers on LowRider 3 CNC - control box case for BTT SKR Pro 1.2 board and a BTT TFT35 E3 touchscreen (v1.1).