Lulzbot "Mini 2" Camera and OctoPi mount (Mashup)
thingiverse
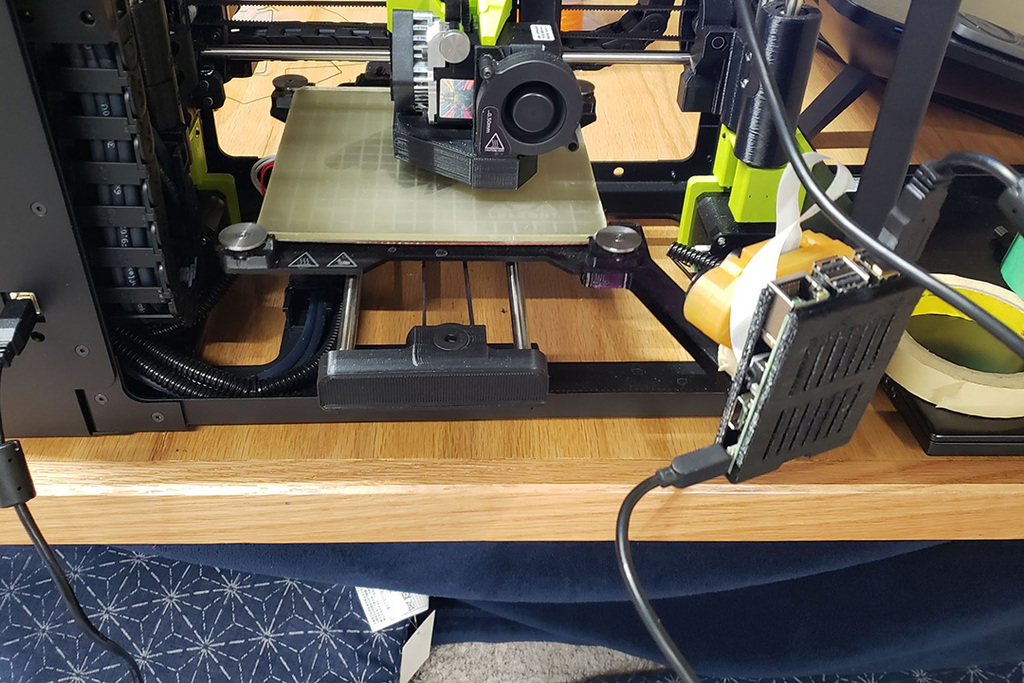
This is a big mashup between the following: * https://www.thingiverse.com/thing:2963222 - the mount bracket for the Mini 2 bed from here * https://www.thingiverse.com/thing:2990477 - the raspberry octopi case from here * https://www.thingiverse.com/thing:1637988 - the socket mount for the camera from here The Mini 2 has different bed corners than the original Mini, and I was unsuccessful in finding *any* existing camera mounts that worked out of the box with the Mini 2's bed. The Taz6 bed corners appear to be the same, but the 45 degree angle of the existing Taz mount ran into the frame on the Mini 2 when the Y axis moved far enough. In v1 I had it straight (0 degree) but that caused the RPi's USB power cable to hit the Y axis, so I modified this to be ~22.5 degrees. I also added an additional hook on the bed mount on the left side (original only hooks on the right). This gives it additional support strength. The Mini 2 also has a gigantic extruder assembly, and needs a lot of clearance. You can't easily see the extruder head unless the camera is quite low, and thus this camera mount is very low to the bed. Additionally, the camera I got on Amazon (some generic that's sold under many brands - you can see it in this one https://www.thingiverse.com/thing:1637988 - came with a short cable and I didn't want to spend another $10 to get a longer camera cable, so I needed to keep the actual Pi board close, thus mounting it to the arm. I would have liked for the Pi to be horizontal under the arm, but that would require printing with supports which I wanted to avoid. Instructions: ==== Use ABS or PET(g) for this print. The low glass temperature of PLA will cause it to eventually warp due to the heat from your build plate. My PLA print worked great for 2-3 weeks and then warped off, taking the whole assembly to the carpet and ruining a print in progress :( The PETg version seems to be doing better at the moment, and 15 prints or so later appears unaffected except for some slight bowing due to weight. I don't think it'll wear out any time soon. (Update: It's been about 9 months and countless prints now and it's still doing well). Supports are unnecessary with this print, but you will need to manually cut out the built in supports on the bed mount area (4 total). Just take an Xacto knife to them and they'll cut out easily. If printing on a Mini 2, just rotate the model 20 degrees (diagonal) and it will fit. Once printed, go to https://www.thingiverse.com/thing:1637988 and print the case and ball joint for the camera, and then you're all set! Note that I do recommend shrinking the ball piece to 98% for better tolerance. Note that I plan to remix the camera housing and/or make it all-in-one on this print. The ball joint is very fragile, so take care when inserting! If you break it (as I did) just apply some masking or duct tape. Remixing: ==== Tinkercad source here: https://www.tinkercad.com/things/396at0vwY83-lulzbot-mini-2-camera-mount-remix/edit Future: ==== I want to re-do the camera mount portion. The current ball joint system is too fragile, I've already broken the ball mount on my print and just taped it in place for now.
With this file you will be able to print Lulzbot "Mini 2" Camera and OctoPi mount (Mashup) with your 3D printer. Click on the button and save the file on your computer to work, edit or customize your design. You can also find more 3D designs for printers on Lulzbot "Mini 2" Camera and OctoPi mount (Mashup).