LulzBot TAZ 6 Remix Custom
thingiverse
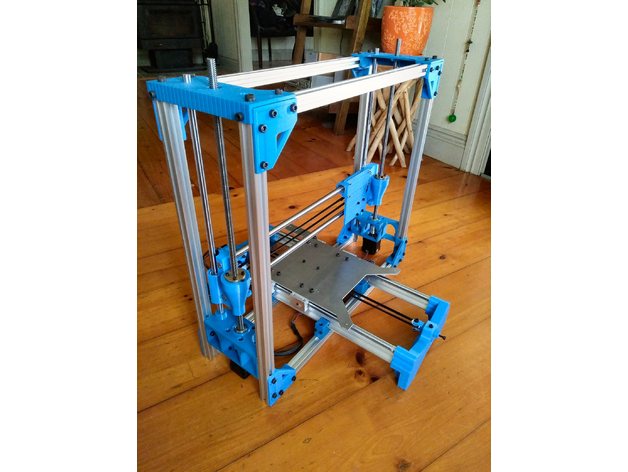
This has been totally updated into a new version of the Yaxis and other improvements https://www.thingiverse.com/thing:3819363 If you prefer this Yaxis with the supported rails... just download the updated parts from the new version. This is my version of the LuzBot TAZ 6. Based on and partly redrawn from the LulzBot Opensource files but reconfigured to get away from some of the unusual ideas like not proper belt tensioning and the badly drawn components which errors left me baffled. 2018 July: Added 10mm Bearing holders for the X axis carriage. 2018 MAJOR UPDATE: I have redrawn the lower Z axis motor mounts (version 3). This a more printer friendly and gives a little more Z axis height for certain setups (depends on motor length) X motor and idler mounts Version 3 (yes called Z still) Motor End has blind holes so no melt-in thread needed. Idler End beefed up around the tensioner. New Corner bracket for the top left rear... gives the Z axis a little more height. New Case for MKS Gen 1.4 with 60 or 80mm fans and outside reset button. New 24v Power supply Brackets 115mm hole center (print 2) new 24v PSU Wire cover and Power socket/switch 3Pin IEC320 C14 To do: A totally new Y axis has been drawn up and I have been using it for a few months. I just have a few tweaks and I will put it up. This is a OpenBuilds style with 12mm Supported Rail... easier to print and assemble. Complete Cable Management system... drawn and tested just need to check files and upload. This whole page needs a rewrite and move older files into ZIp files to make it less confusing but still accessible for anyone wanting them. -- The Yaxis is actually a protoype for testing if the cheap chinese supported rail mixed with printed parts where a viable idea... so far it looks like a success. Infact the whole build is a test to see if it was scale-able to a 500x500x500mm print volume... definitely could be possible but again just spend a few hundred more and go full Openbuilds. The Yaxis is on 12mm Supported Liner Rails with belt tensioner. The pics show the 200x300mm bed plate. I am currently waiting for my designed ali bed to be cut for 24v 300x300mm BigBed from reprap.me. Added pics of the 300x300 bed as if it was in place (waiting for the plate to be cut) You can see it is on the edge of the plate at X0 endstop and about 5-8mm past at full X travel So to answer Q about that it is ok with the cutting list of the frame. You could of course give yourself more room by cutting the 2020 parts longer and the X smoothrods. Z axis uses 10mm smooth rod and 10x2 leadscrew with 608Z bearing at bottom only but has provision for top bearing. X axis is quite modified from the LulzBot. Added X axis belt tension similar to the rest of mainstream printers. Extruder setup is Titan and E3dV6 with 3DTouch auto bed leveling (BLTouch will fit) One feature I wanted to test was the M3 insert threads. This was something I hadn't tried before and although some of them a used in a manner that would not be mechanically sound actually sort of worked pretty good.. e.g the 12mm X axis shafts held in place by this method means that that the force needed to retain the shaft but not pull the insert from the part is just almost there. the grip where I couldn't pull the shaft through the hole was at the point the grub screw started to deform the part and push the hole away from the shaft. I bought these from (Australia) Cross Tools PHONE 1800 025 500 http://www.crosstools.com.au/threaded-inserts-for-plastic%2c-wood%2c-injection---rotomolding.html#insertsforplastic Part: TH-M30-SV For those not wanting to use inserts for a Beer I could change this to a way easier system that the LulzBot guys could have implemented lol. Update: in the downloads there is a ZIP file 1st_concept_z_carriage_no_insert.zip which contains the STL's for doing the X Smooth Rods without using the Melt in inserts. These are not tested to date but should work without a problem. It uses M3 Square nuts... square because at 3mm a hexagon is almost round and it might just spin. So do a search on ebay and get some square nuts they are cheap. Note: the left hand one has a shouldered hole so you only need nuts at one end... this could also be used for the Heat Insert instead of the z_carriage_motor_ak.stl and save 2 inserts for a rainy day. Added: Y_axis_linear_rail_clamp_less_2mm.stl with 2mm more clearance for the Y axis bearing block. Added: Y_axis_endplate_Test.stl this is to make sure the endplates fit the Linear Rails Added: LulzBot X Carriage_hole_Centers.dxf Showing placement of extruder holes (23mm pitch) With this cutting list the Max Travel of Z is 250mm. You can achieve 260mm but homing with the raise before descending will catch the fame corner on the X motor. Parts: 2020 extrusion 4x 500 4x 510 SBR12 12mm Supported Linear Rail (Y axis) 2x 500 SBR12UU Bearing Block (Y axis) 4x bearing block (or three if preferred) 12mm Smoothrod (X axis) 2x 520 10mm Smoothrod (Z axis) 2x 450 10x2 Leadscrew 2x 420 Z X Axis Bearing Z 2x LM10LUU (long bearing or 4x short) X 3x LM12UU Z axis Leadscrew 2x 608Z bearing T-Slot Slide in T-nuts for 2020 Frame M5 T nuts x80+ (76 for frame and Y axis only) Bolts M5x10 Caphead x80+ (76 for frame and Y axis only) M5x25 Caphead x11 Yaxis to Main Frame and XY belt pulley +Nyloc nuts M4x30 Caphead x3 XY Belt tension +Nyloc nuts M4x20 x8 Mixture of Caphead and Countersunk for X carriage bearings +Nyloc nuts M3x55 Caphead x8 Yaxis Clamp Blocks +Nyloc nuts M3x10 Caphead x20 Nema17 motor mount and Zaxis M10x2 nut GT2 Belt X aprox 900mm Y aprox 1000mm GT2 Pulley Motor 2x 20 Tooth 5mm shaft (or your motor shaft) Idler 2x 20 (tooth or not) 5mm Y AXIS and 200x300 Bed Option: These files are in a zip file to keep them separate. I have added the parts needed to use the more STD Y axis you see using 10mm Smooth Rods instead of Supported Linear rails. This is the Wilson II system which not a bed system but has multiple parts to make the bed. Print Settings Printer: Wilson II Rafts: Doesn't Matter Supports: Yes Resolution: 0.2 Infill: 80%
With this file you will be able to print LulzBot TAZ 6 Remix Custom with your 3D printer. Click on the button and save the file on your computer to work, edit or customize your design. You can also find more 3D designs for printers on LulzBot TAZ 6 Remix Custom.