LunchBox - The DIY Midi Controller
thingiverse
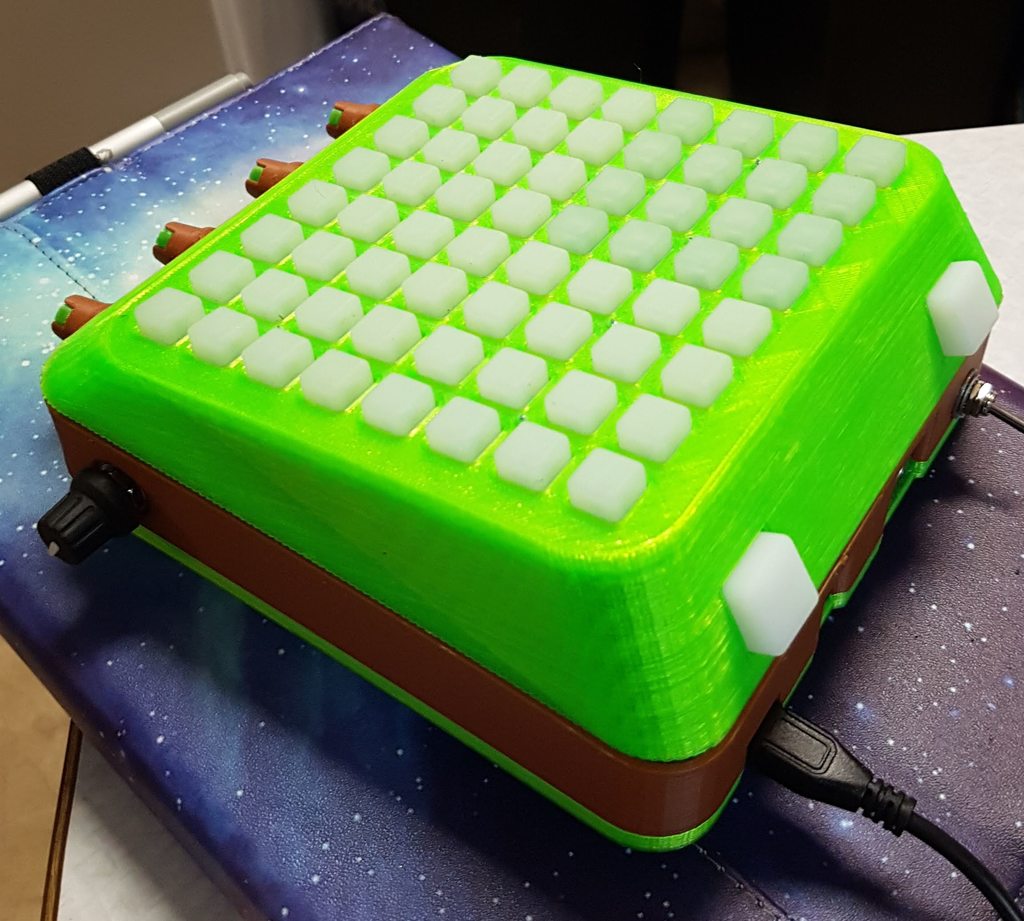
This DIY midi controller is a project based on Adafruit's Untztrument and an Instructable called 'Sugar Cube' by Amanda Ghassaei. It combines various components, notably a 2x2 array of Adafruit Neotrellis. The Arduino Leonardo serves as its brain. The setup includes two Sparkfun 15mm RGB elastomer bumper buttons (achieved by cutting a 2x2 PCB in half twice). Four potentiometers, one encoder, a 3-axis accelerometer for gesture control, five din midi out, a toggle on/off switch, and a rechargeable 7.4-volt 2200mAh battery are also part of the project. All code is still under development as I am learning it exclusively for this project, so I wanted to share it now because it will take some time before I have anything written. This is currently in its beta phase, so detailed build instructions and a list of components will be available soon. Build Instructions: The three pieces of the enclosure press together but you'll probably want to super glue the bottom to the sides and add a dab of hot glue to the cover after you're satisfied with the wiring and have tested everything. The pieces I made to hold the bumper buttons haven't been printed or tested by me yet as I used hot glue in an earlier prototype piece. You can use just hot glue to hold them, but this may risk pushing them loose. The contact rings on the SparkFun 15mm elastomer pads required too much pressure to make contact. To resolve this issue, I glued some tinfoil over top of the conductive rings and now very little pressure is needed for contact. You might need to do this as well. Don't forget to add your resistors to protect your components and pins! I missed one on an RGB lead and fried a pin. This project uses all but one pin, so I was able to swap it over, leaving minimal room for error. After setting up your multi-trellis and soldering the pads to make custom addresses, I recommend writing them down or saving a text file in your project folder with the addresses. I also created an input/output map so I knew which pins the components were wired to without having to open the case. Material List: (1x) Tenergy TLP-2000 Smart Charger for Li-Ion/LiPo Battery Packs: 3.7V - 14.8V http://www.all-battery.com/TLP2000-li-ion-packcharger-01211.aspx (1x) Tenergy Li-Ion 7.4V 2200mAh Rechargeable Battery w/ PCB (2S1P, 16.25Wh, 4A Rate)http://www.all-battery.com/li-ion1865074v2200mahrechargeablebatterymodulewithpcb-2.aspx (1x) 5-Pin MIDI Jack Digikey CP-7050-ND https://www.digikey.com/product-detail/en/cui-inc/SDF-50J/CP-7050-ND/252002 (4x) 10kOhm linear taper potentiometer Digikey 987-1308-ND https://www.digikey.com/product-detail/en/P160KN-0QD15B10K/987-1308-ND/2408885 (4x) Adafruit NeoTrellis RGB Driver PCB for 4x4 Keypad PLUS elastomer buttons https://www.adafruit.com/product/3954 (1x) Arduino Leonardo Microcontroller https://www.amazon.ca/dp/B0786LJQ8K/ref=cm_sw_em_r_mt_dp_U_WWlqCbG1TTA1Z (1x) SparkFun 2x2 RGB Button Pad PLUS elastomer buttons https://www.sparkfun.com/products/9277 (1x) Push Button Rotary Encoder https://www.adafruit.com/product/377 (1x) SPST Toggle Switch https://www.digikey.com/product-detail/en/nkk-switches/M2011SS1W01%2FUC/360-3289-ND/2105194 (2x) 5mm RGB LED (for sparkfun pcb) (1x) 220Ohm 1/4watt resistor Digikey CF14JT220RCT-ND (for Midi Out) (6x)100Ohm resistors for RGB LED (1x)Cut piece of strip board for positive and negative connections Various colors of 22 gauge wire and pin headers Super glue, Hot glue, and solder will be needed
With this file you will be able to print LunchBox - The DIY Midi Controller with your 3D printer. Click on the button and save the file on your computer to work, edit or customize your design. You can also find more 3D designs for printers on LunchBox - The DIY Midi Controller.