M1911 Rubber Band Gun 3Pin Improvements Bundle
thingiverse
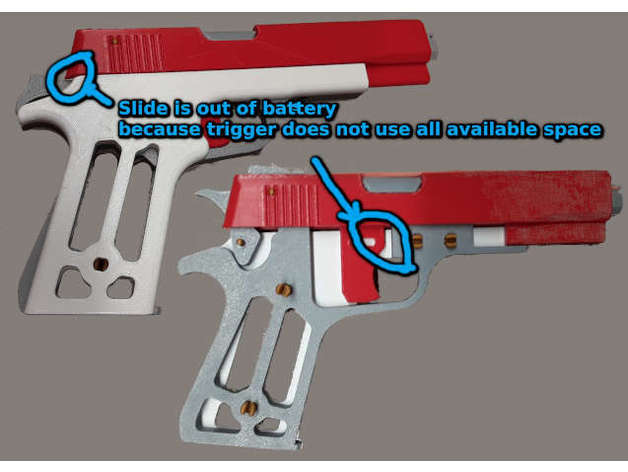
**UPDATE 2020.11.28** tjsc5f has updated his original design based on the three pin configuration originally pioneered by Snackydee. Since refining that update was about 90% of this remix's purpose (and since tj's files are sleeker than mine) you should probably hit the 'back' button and start using his v2 models instead. You might still find the ejection port useful or perhaps my build notes so this remix will stay up for now. - - - As far as I am concerned tjsc5f's [M1911 Rubber Band Gun](http://www.thingiverse.com/thing:3053501) is pretty much THE gold standard for armed rubber aggression. There are also some mods in the comments and a few tiny details I've been annoyed with enough to fix so I've combined them all into a single remix. Here's what's new: * All of the original files have been re-exported from the included STEP file in higher resolution. Of note that means the grips are smoother (that had a subtle effect on my slicer) and the supports are now gone. I much prefer generating my own supports and I don't always use a .4mm nozzle so this is a welcome change. * A 3 pin design has been added which fixes the issue of slide lift, a problem plaguing many builders that often resulted in all of the rubber bands going off at once if loaded to capacity. * * The 3 pin design was made by Snackydee and posted to the comments. Snackydee didn't say anything about licensing so I'm going to assume it inherits "cc-attr" like its predecessor. * The 3-pin design was modified to give the slide some extra movement range. The net result is it doesn't look out of battery now (but it doesn't go back as far as the 2 pin variant unfortunately). See photos for an example of what I mean. * New rotors added, sourced by calisto (assumed cc-attr) and Aerodeck. All files should be oriented for optimal printing (but you may want to rotate them around in order to tetris as many on your build plate as you can). If you've never printed small plastic pins before you might not know that for pins 'best' is almost always 'flat on the build plate'. Now you know. There are a few parts I also recommend you change scale for. The original model is very loose fitting and a tighter fit feels much better in the hand so I have provided my recommendations below. Printers and tolerances differ so adjust and experiment as needed--pins don't take much plastic so make several in a given range and decide what works best for you. # Print Settings # Choose between the standard 2 pin and 3 pin barrel configuration. The three pin configuration is highly recommended. 2 Pin: * 1911 - SLIDE.stl 20% infill. Supports on build plate. Drilling holes afterwards is optional. * 1911 - LEFT SIDE PLATE.stl 20% infill. Drilling holes afterwards is recommended. This piece is ripe for a manual color change after the 6mm layer. * 1911 - RIGHT SIDE PLATE.stl 20% infill. Drilling holes afterwards is recommended. 3 Pin: * 1911 ALT - SLIDE 3PIN THICKTRIGGER.stl 20% infill. Supports on build plate. If your printer can't bridge effectively choose 'everywhere' and expect to clean out the slot on the trigger. * 1911 ALT - LEFT SIDE PLATE 3PIN.stl 20% infill. Drilling holes afterwards is recommended. This piece is ripe for a manual color change after the 6mm layer. * 1911 ALT - RIGHT SIDE PLATE 3PIN.stl 20% infill. Drilling holes afterwards is recommended. Choice of Rotors: * 1911 - ROTOR SQUARE.stl * 1911 ALT - ROTOR RECTANGLE NOTCH.stl * 1911 ALT - ROTOR TRIANGLE NOTCH.stl 20% infill. Drilling holes afterwards is recommended. The square rotor is classic for a reason but I can see why people also like the triangle notch. I've experimented with oval cutouts but can't say I noticed any improvement. * 1911 - BARREL.stl 60% infill. Supports on build plate. * 1911 - EJECTION PORT.stl 20% infill. Supports on build plate. If you're having issues with this piece staying in place and don't want to use glue try printing "1911 ALT - EJECTION PORT WIDER.stl" instead. * 1911 - HAMMER.stl 20% infill. * 1911 - INNER FRAME.stl 20% infill. * 1911 - LEFT GRIP.stl * 1911 - RIGHT GRIP.stl 20% infill for both grips. If slicing results in an unsightly single or double width line as the last layer you may want to cut the last couple layers off the top of these models. Also, these work well printed in TPU. I would even go so far as to say I prefer TPU grips. * 1911 - ROTOR PIN.STL x 2 or 3 60-100% infill. The pin you will use for the rotor should be scaled minimally. Perhaps even left as is. The hammer and (optional) trigger pin diameters can be increased slightly (102%) for an easy fit, or more (105%) for a fit that'll require clamping The hammer and (optional) trigger pins should be shortened by ~1mm (roughly 95%, and yes a pair of tin snips does just fine in a pinch). * 1911 - SHORT PIN.STL x 2 60-100% infill. Recommended increase diameter to 105%. * 1911 - LONG PIN.stl x 2 60-100% infill. Recommended increase diameter to 105%.
With this file you will be able to print M1911 Rubber Band Gun 3Pin Improvements Bundle with your 3D printer. Click on the button and save the file on your computer to work, edit or customize your design. You can also find more 3D designs for printers on M1911 Rubber Band Gun 3Pin Improvements Bundle.