M8 Nut and Screw
thingiverse
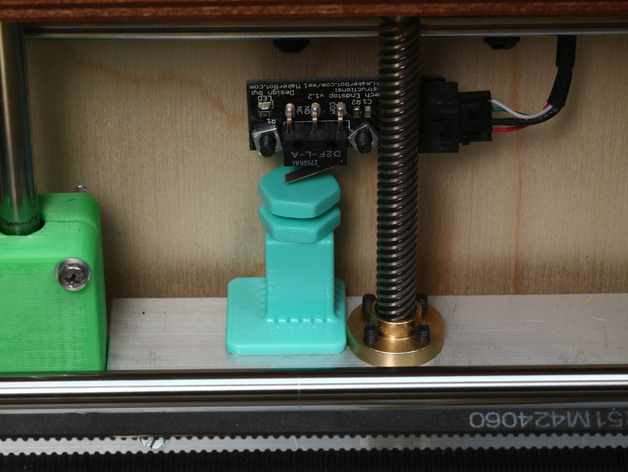
In fact, this is a Z Endstop Trigger for the 3 Points Leveling for Makerbot Replicator... ( http://www.thingiverse.com/thing:106474 ) Together with the thing mentioned above, it makes it very easy to switch between different thickness of glasses or not glass at all or this tape or the other... ...once the platform is level, just choose the build surface you'd like to use and adjust the endstop trigger accordinly, no need to level anything again! The OpenSCAD scripts I used are not available for download, the reason is that I'm using a new library for nuts'n'bolts which is still under development and has too much details to polish. Sorry for that. I suspect there's no gonna be much need for this thing, that's why I give it such a name. The Screw and the Nut are a nice thing to print and may have other uses. Instructions I used ABS (plus acetone vapor bath), PLA should work also. For the screw and nut set I used a 60% infill, for the base the value was set to 25. The other settings are common: 1 extra shell, slightly low flowrate, active cooling (+ extrusion temp raised 3 degrees) and layer height... well I used 0.08mm however it should print fine with a value up to 0.2 or may be even more (?). Solid layers number should be set in such a way that they make a solid surface of, at least, 0.4 to 0.5 mm. Finally, the most important setting is the speed, too fast or too slow and the threads will not print nicely, they may still be usable but... In my case, 32 mm/s did the trick,values like of 28 or 35mm/s were showing some aesthetical issues. I used double side tape to install it in the stage.
With this file you will be able to print M8 Nut and Screw with your 3D printer. Click on the button and save the file on your computer to work, edit or customize your design. You can also find more 3D designs for printers on M8 Nut and Screw.