Mad Mare Studio's Super-Worm Drive Gearbox
thingiverse
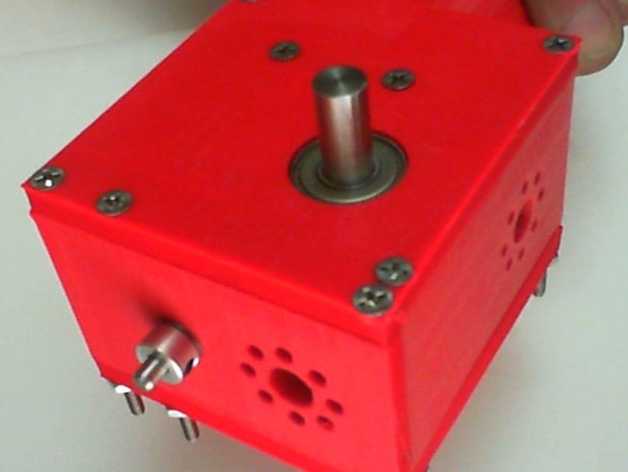
This is a set of 3D models that I designed to take a ServoCity Worm-Drive Gearbox that I got at http://www.servocity.com/html/vertical_shaft_worm_drive_gear.html, and turned it into a more robust platform for robotic applications. The ServoCity Worm-Drive Gearbox motor, which is typically used for non-robotic slow-moving time-lapse-like applications, and I turned it into a motor/casing kit that I plan to use half a dozen times in different parts of my Xdroid project. The new enclosure is 3D printed using my MakerBot Industries Support Replicator 1, though I am working with a good friend of mine right now on CNC milling the drive-gear and top/bottom plates to make a version that can Really handle the high-torque needs of an Xdroid. All models were made by hand in Blender. My personal belief is that the Worm-Gear is under-appreciated in the robot world, as it has the Magic property (in my mind anyway) of being able to "Hold Its Position Without Power Applied!". This isn't new of course, worms are used in many robot applications today, but not so much in the Maker/Open Hardware movement yet. I hope to change this for the movement, as for all of my future robots (including my Xdroid), I plan to follow, "the Way of the Worm Gear" for all my mechanics! Note! This is not an in-expensive solution. :( I am still hounding ServoCity about their pricing. ;) You will need to buy some additional bits that I include in the installation instructions if you want to build a Super Worm-Drive Gearbox. Instructions Each model in my Super-Worm Drive Gearbox is designed specifically for 3D printing, and have the minimum-possible vertices/pixels. Each model has a specific orientation that you should print it (i.e. a specific bottom-side), so that each model prints right and looks good. :) I printed this with ABS plastic, but it should be printable in PLA as well. I use a MakerBot Replicator 1-dual for all of my printing, and set my heated platform to 115C (prevents warping, you can set it to whatever works for your printer and plastic combo). Printing: NOTE! You do NOT need to download/print ALL of the models I included in this thing! In fact I give you a set of options for the Front and Back plates that you can choose from, depending on your application. To make this thing, you need to print One of the following models: One Top Plate One Bottom Plate One Drive Gear (optional, the stock gear is much stronger than ABS). One Front Plate (among the options available). One Back Plate (among the options available). One Motor Cap. My GoogplePlus page for this has comments/instructions on each picture (something I recommend Thingiverse add one day as well!): https://plus.google.com/u/0/117228107982719398401/posts/NXHdKMWVpGN A total of Six things need to be printed per Super-Worm, but there are some additional metal bits you'll need to purchase as well (or an equivalent): A Worm Drive Gearbox: ; http://www.servocity.com/html/vertical_shaft_worm_drive_gear.html One of their precision motors, I recommend the 90 RPM (the fastest), as worm gear drives are slow by design and the 90RPM motor will still give you 4,140 Oz./In. of torque! ; http://www.servocity.com/html/90_rpm_precision_gear_motor.html Seven of the Flat-Head #6 3" screws ; http://www.servocity.com/html/6-32_flat_head_phillips_machin.html) Seven of the #6-32 Nuts ; http://www.servocity.com/html/machine_screw_hex_nuts.html Four of the Flat-Head #6 wood screws, 1/2" long http://www.servocity.com/html/_6_flat_head_phillip_screws.html Four of the Flat-head #6 screws, 1/2" long ; http://www.servocity.com/html/6-32_flat_head_phillips_machin.html Twelve of the #6 Washers ; http://www.servocity.com/html/standard_washers.html One 3/16" diameter, 2" long shaft ; http://www.servocity.com/html/3_16__precision_shafting.html Two 3/16" diameter Alum shaft collars ; http://www.servocity.com/html/aluminum_set_screw_collars.html Two 3/16" inch of the ultra-precision ball berings ; http://www.servocity.com/html/ball_bearings.html Two 3/8" diameter Aluminum Shaft collars ; http://www.servocity.com/html/aluminum_set_screw_collars.html Again I know its not cheap, hope they will bring the prices down in the future! If you want to use one of the Front or Back plates that has a .770"-3/8" pattern on it (the 8-holes with a 3/8" hole in the center), I recommend these bits per-770 port: A. Two 0.125 Aluminum hub spacers ; http://www.servocity.com/html/hub_spacers.html B. Four 3/4" inch long Flat Head screws, 1/2" long ; http://www.servocity.com/html/6-32_flat_head_phillips_machin.html. That will allow you to put one spacer in front and back. Each spacer has 4 holes that have screw threads and four that don't. Make sure to position the each spacer so that they are Not aligned, so that you can screw in the 4 1/2" screws from the Back. This will leave with with a situation where you can attach things to the .770 porthole from the front-side of the pate by simply using #6-32 screws from the front-side (this is hard to describe in text, so I uploaded a picture of what this looks like front and back to help visualize it. I plan to use these on all my .770 portholes, as that will give me strong attachment points on the sides of each super worm. I plan to make more updates to the models to make them even easier and with more attachment points, but for now I've moved-on to the next part of my Xdroid (Web page pending). Let me know if you have any questions, all feedback is welcome! Cheers, Kris
With this file you will be able to print Mad Mare Studio's Super-Worm Drive Gearbox with your 3D printer. Click on the button and save the file on your computer to work, edit or customize your design. You can also find more 3D designs for printers on Mad Mare Studio's Super-Worm Drive Gearbox.