Moment Lens Case
prusaprinters
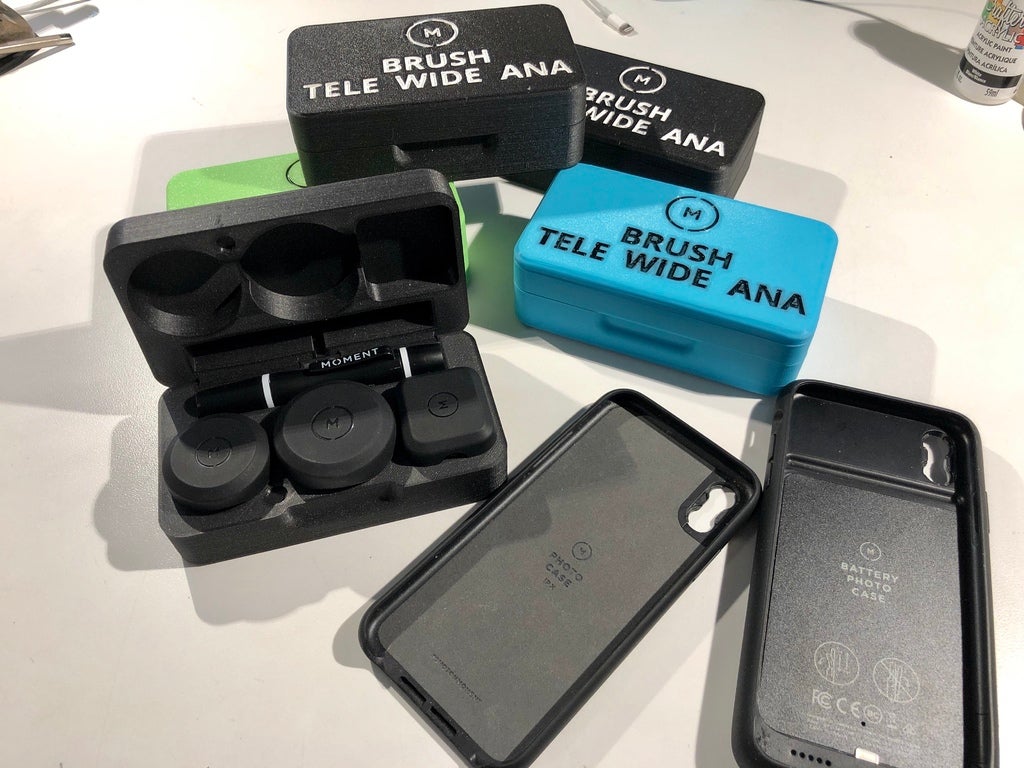
<p><strong>Update 10-19-20</strong></p> <ul> <li>I added a new set of STL files that fit just a single Moment Wide V2 lens </li> <li>You can find this file on OnShape to edit if you want. <a href="https://cad.onshape.com/documents/4309bde3c456e0cf7f0579c3/w/18419b8364dd02bb56725b19/e/1a98132801d24674f4d6bbbe">https://cad.onshape.com/documents/4309bde3c456e0cf7f0579c3/w/18419b8364dd02bb56725b19/e/1a98132801d24674f4d6bbbe</a> </li> </ul> <p><strong>Update 01-02-19</strong></p> <ul> <li>I added a new set of STL files that fit the new Moment Telephoto lens (it is bigger) </li> <li>The width is 4 mm wider than than v2 one. </li> </ul> <p><strong>Update v2:</strong></p> <ul> <li>I removed the back two holes for the magnets ( not needed with the hinge ) </li> <li>reduced the fillet around the top and bottom edge from 3mm to 2mm. </li> </ul> <p><strong>Summary:</strong><br/> Moment makes lens for iPhones and Android phones. I have the Wide, Telephoto and Anamorphic lens with their lens brush also. I love their products.</p> <p>I made a simple case to carry everything so that I don't have to worry about losing any of the pieces.</p> <p>I tried to make the case as small and tight as I can without a lot of wasted space.</p> <p>To attach the cover, just place both parts together standing up on its front. Then just "smack" the cover down into the base and viola, the top is now attached.</p> <p>I put some holes in the cap and base to use small magnets to hold top shut. I put three in, but I only use the front one because that is all that is needed to hold it closed.</p> <h3>Print instructions</h3><h3>Category: Tool Holders & Boxes Summary</h3> <p><strong>Update 10-19-20</strong></p> <ul> <li>I added a new set of STL files that fit just a single Moment Wide V2 lens </li> <li>You can find this file on OnShape to edit if you want. <a href="https://cad.onshape.com/documents/4309bde3c456e0cf7f0579c3/w/18419b8364dd02bb56725b19/e/1a98132801d24674f4d6bbbe">https://cad.onshape.com/documents/4309bde3c456e0cf7f0579c3/w/18419b8364dd02bb56725b19/e/1a98132801d24674f4d6bbbe</a> </li> </ul> <p><strong>Update 01-02-19</strong></p> <ul> <li>I added a new set of STL files that fit the new Moment Telephoto lens (it is bigger) </li> <li>The width is 4 mm wider than than v2 one. </li> </ul> <p><strong>Update v2:</strong></p> <ul> <li>I removed the back two holes for the magnets ( not needed with the hinge ) </li> <li>reduced the fillet around the top and bottom edge from 3mm to 2mm. </li> </ul> <p><strong>Summary:</strong><br/> Moment makes lens for iPhones and Android phones. I have the Wide, Telephoto and Anamorphic lens with their lens brush also. I love their products.</p> <p>I made a simple case to carry everything so that I don't have to worry about losing any of the pieces.</p> <p>I tried to make the case as small and tight as I can without a lot of wasted space.</p> <p>To attach the cover, just place both parts together standing up on its front. Then just "smack" the cover down into the base and viola, the top is now attached.</p> <p>I put some holes in the cap and base to use small magnets to hold top shut. I put three in, but I only use the front one because that is all that is needed to hold it closed.</p> <h3> Print Settings</h3> <p><strong>Printer Brand:</strong></p> <p>Prusa</p> <p><p class="detail-setting printer"><strong>Printer: </strong> <div><p>i3 MK3 MMU 2</p></div><strong>Rafts:</strong></div></p> <p>No</p> <p><p class="detail-setting supports"><strong>Supports: </strong> <div><p>No</p></div><strong>Resolution:</strong></div></p> <p>.15 mm</p> <p><p class="detail-setting infill"><strong>Infill: </strong> <div><p>20%</p></div><br/> <strong>Filament:</strong><br/> Prusa PLA Galaxy Black <br/> <p class="detail-setting notes"><strong>Notes: </strong> </p><div><p>Be sure to flip the lens cap 180 degrees in your slicer so that the text is on the bottom. That way you don't need any supports.</p> 3 perimeters<br/> 7 bottom layers on the cap ( definitely overkill )<br/> 4 top layers<br/> Gyroid fill pattern ( any pattern will do )<br/> Extra perimeters if needed was checked<br/> Seam position Rear ( make sure the hinge potion of the model is pointing towards the back )</div></div></p> <h3> Post-Printing</h3> <p>Attaching the top is a piece of case. Hold them together and smack it down.</p> <p>As for attaching the 1/4 in x 1/16 in magnets, you can use glue or some 3M two sided tape.</p> <p>https://www.amazon.com/Universal-Magnets-Magnetic-Organizers-Fasteners/dp/B077YT1X5F/ref=sr\_1\_3?ie=UTF8&qid=1544582199&sr=8-3&keywords=1%2F4+1%2F16+magnets</p> <h3> How I Designed This</h3> <p><strong>Designed in OnShape</strong></p> <p>If you would like to have access to all the files, you can create a free OnShape account and then go here to duplicate my CAD.</p> <p><a href="https://cad.onshape.com/documents/cfa6af8d80296f11da033411/w/78786c6e69d82458125a3b68/e/35e8a4453b897e294eba7054">https://cad.onshape.com/documents/cfa6af8d80296f11da033411/w/78786c6e69d82458125a3b68/e/35e8a4453b897e294eba7054</a></p></p></p></p>
With this file you will be able to print Moment Lens Case with your 3D printer. Click on the button and save the file on your computer to work, edit or customize your design. You can also find more 3D designs for printers on Moment Lens Case.
