Magnetic Endstop Prusa i2
thingiverse
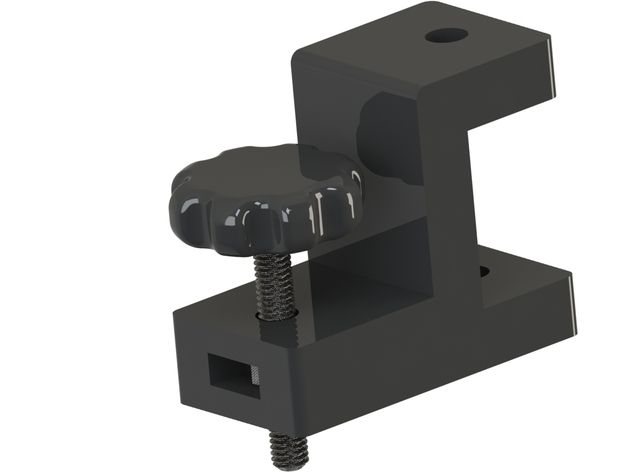
Here is a magnetic Z endstop I made for my Prusa i2. It is very reliable and easy to adjust. This one is printed from ABS and polished with acetone! Instructions Ok here is how it is built. You will need: -M3 x 20mm (or whatever range you need adjust) -M3 x 8 - 16mm for the clamp (it is the part that clamps to the x carriage) -2 M3 nuts (pushed into the side of the adjuster block) -Epoxy (I used JB Weld -> looked nice after 24 hr cure) -1 2mm x 1mm Nd-Fe-B magnet (you can 100 on ebay for about $3) -Vacuum grease (optional for viscous turning of the 'knob' -Small protoboard to solder parts on -1 A3144 magnet detection IC (dirt cheap on ebay) -1 ~22pF capacitor (might not really need this) -1 ~10k resistor -wire -connector to whatever board you use on your printer. Create the IC circuit first (it is shown as one of the pictures). 5 volts, a ground, and a multimeter should let you see the signal go from 0-5V when the magnet face is near. Be MINDFUL that it ONLY responds to one pole of the magnet... north, south... I forget. Whichever side of the magnet it responds to, mark that side of the magnet with a permanent marker. So I carefully JB welded my nuts (teehee) to the ABS 'adjuster' making sure not to get any on the treads. Let it sit until cured. make sure you put the marked side of the magnet facing away from the bolt!!! Or else your endstop will not work... remember that the IC only works on one side of the magnet. Jb welded the 2mm magnets to the end of the M3 bolt while JB welding the 'knob' onto the head of the bolt... let sit until cured. Do not get any on the threads. Clamp the endstop adjuster onto your X carriage. I used hotglue to attach the circuit to the default Z endstop of the prusa i2; BUT ONLY after aligning it exactly under the IC chip. Make sure you bend the IC so that the labeled side is facing upwards like in the picture. You want a small magnet for this device so that it is super repeatable. The distance between the IC and the sensor is about 1 to 2 mm. If calibrated while your bed and hotend are up to temp, it should be extremely reliable. I have printed for about a week without needing much of an adjustment.
With this file you will be able to print Magnetic Endstop Prusa i2 with your 3D printer. Click on the button and save the file on your computer to work, edit or customize your design. You can also find more 3D designs for printers on Magnetic Endstop Prusa i2.