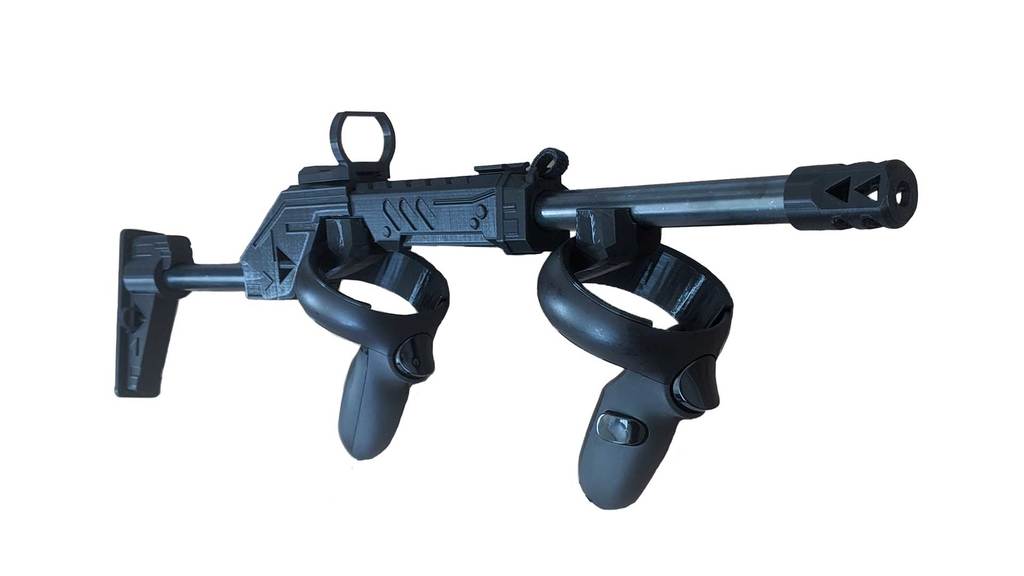
Magnetic Gunstock for Oculus Quest 1, Quest 2
thingiverse
June 8, 2021: I updated the barrel, coupler, and body! See "UPDATED_Rifle Parts_062021.zip" file! Body: sliced it a bit near the controller area Coupler: made it slimmer and pipe goes in more Barrel: simplified it to match the new coupler **Aim better in VR!** One of the main problems I had with other gun stocks in the market is "panic reload". Blindly mounting back the controllers in a small area is very frustrating! My solution for it is the magnetic controller mounts + metal pipe front. This allows you to easily mount anywhere on the pipe! This also means that you don't need to adjust your gun stock every time you change loadout. You can mount closer for SMGs and farther for rifles and snipers! The controller mounts comes with 2 different magnet strengths. 90lb pull force for trigger hand and 60lb pull force for reload hand. This is to prevent you from accidentally unmounting the wrong controller when reloading. They can also be easily installed and removed on the controllers --- no extra tools needed! Reminder: pipes from local hardware stores will not fit. This was designed with the lightweight pipes from Amazon (see link below). You can try the INT (internation) version if you got the regular 1/2" pipes. They may fit but not 100% sure... --- **Videos** Tracking test: https://youtu.be/2YEF3JLGErA Onward weapons compatibility: https://youtu.be/1qmbrhOn3Es Video overview: https://youtu.be/MrpoyoZ3SbY Contractors demo: https://www.youtube.com/watch?v=g09D1NOTCng Installation video: https://youtu.be/jz6_Hlkt3Rc New drop test: https://youtu.be/6wx9J2w1xeM --- **Print Settings** Recommended Infill: 20-40% Controllers - 40-60% Body, front coupler - 20-40% The rest can be 20% **3D parts (ZIP)** Rifle Parts = gun stock parts. Quest 1 and Quest 2 are the same. This is for the US version using the exact pipes linked below. Long buttstock and buttstock extender are designed for taller players (6'+). You can use either one. Quest 1 mounts = Quest 1 mounts. They are interchangeable so it doesn't matter if you're right or left handed. INT means International (designed for pipes outside the US) Quest 2 RIGHT handed mounts = Quest 2 mounts for right handed people Quest 2 LEFT handed mounts = Quest 2 mounts for left handed people Sanlaki-Rifle-INT = International version of the gun stock. --- **Material links** 90lb pull force magnets: https://www.amazon.com/dp/B07YBBCJ5W/ref=cm_sw_r_cp_apa_fabc_K2W27E721A55NRWYRN7S?_encoding=UTF8&psc=1 60lb pull force magnets: https://www.amazon.com/dp/B085RD28JW/ref=cm_sw_r_cp_apa_fabc_ZYZSPJ8DGGM5SEZQVMHE?_encoding=UTF8&psc=1 no. 6 5/8" Screws: Metal Pipes, 1/2" x 8": https://www.amazon.com/dp/B07STYP75H/ref=cm_sw_r_cp_apa_fabc_Q3YMTER5HJ7Z4P4EV7J5?_encoding=UTF8&psc=1 Sling: Double sided tape for controllers: Velcro: --- Also available here: https://sanlaki.shop/products/magnetic-rifle-gunstock and here: https://www.etsy.com/listing/836730315/magnetic-rifle-gunstock-oculus-quest Archived description --- **11/19/20 UPDATES:** * Added extension and buttstock-extended for taller people (6'+). Each adds about 1.5 to 2.6 inches extra length **11/12/20 UPDATES:** * Q2 Mounts for INT size - see file names for pipe size and magnet size. STLs comes with 2 pieces **11/04/20 UPDATES:** * Added separated Q2 Quest 2 controller mounts **10/30/20 UPDATES:** * Body (v07) - added more headset clearance when aiming down the sight * Buttstock - I added a hole for velcro to put in a sling. # QUEST 2 controller mounts are up! They are named 2PC_right dominant and 2PC_left dominant **Tips:** * Add double sided tape or a rubber band (see photos) for better grip/snug * Attach sling on the body + buttstock (see photo) * Use right dominant version if you're right handed and left dominant if you're left handed. The Quest 2 controller grips are offset to the side so the magnets are on the side as well to align them with the in-game weapons/hands. This was the trickiest part of making these mounts! ---- Onward weapons compatibility: https://youtu.be/1qmbrhOn3Es Video overview: https://youtu.be/MrpoyoZ3SbY New drop test: https://youtu.be/6wx9J2w1xeM [UPDATE] Aug 5, 2020: I added a zip file (Sanlaki-Rifle-INT.zip) that has the International version of the rifle. Pipe size outside diameter = 21.2mm Magnet size for mount = 32mm x 6mm. Try to get 60lb pull force magnet Magnet size for mount = 32mm x 8mm. Try to get 90lb pull force magnet magnet. 60 lb is ideal for reloading hand but might be too weak for trigger/dominant hand. I also highly recommend testing/printing the front coupler first to see if your pipe fit! --- Minor issues and fixes: * Floaty hands - this happen when the magnetic controller mounts smack really, really, really hard on the metal pipe! It usually happen when reloading. Fix: mount slightly sideways and be more gentle. Practice unmounting and mounting to develop muscle memory! * Wandering sight - this happen when aiming down the sight and the weapon feels like it's floating//wandering. Fix 1: check out the sling! The Quest 2 controllers are offset to the side so there's a high chance of occlusion when not properly installed. Fix 2: disable gun and scope smoothing (Onward). Want to see and share your photos on our website and social feed?! Email us at: sanlaki.games@gmail.com Aim better in VR! Demo: https://www.youtube.com/watch?v=g09D1NOTCng Install video: https://youtu.be/jz6_Hlkt3Rc Also available here: https://sanlaki.shop/products/magnetic-rifle-gunstock and here: https://www.etsy.com/listing/836730315/magnetic-rifle-gunstock-oculus-quest [UPDATES] July 22, 2020 * Rifle body and buttstock are updated **I upgraded the rifle body to allow more clearance for headset when aiming down sights. Now, you should be able to use it right out of the box without the need of any calibration!** Print Settings Recommended Infill: 20-40% Controllers - 40% Body, front coupler - 30-40% the rest can be 20% You can use either of the controller mounts. I personally like v02 with 90lb magnet on my dominant hand and v01 on my non-dominant hand but it cost more. It's important to use this exact magnets or magnets with same size! Controller Mount v01 use this for non-dominant hand and this magnet: https://www.amazon.com/gp/product/B07YBBCJ5W/ref=as_li_tl?ie=UTF8&camp=1789&creative=9325&creativeASIN=B07YBBCJ5W&linkCode=as2&tag=sanlaki-20&linkId=ff3bb7c1ebdd4cff60735007c035f1e7 Controller Mount v02 use this for dominant hand and this magnet: https://www.amazon.com/gp/product/B07YBBCJ5W/ref=as_li_tl?ie=UTF8&camp=1789&creative=9325&creativeASIN=B07YBBCJ5W&linkCode=as2&tag=sanlaki-20&linkId=ff3bb7c1ebdd4cff60735007c035f1e7 no. 6 5/8" Screws: https://www.amazon.com/gp/product/B07YBBCJ5W/ref=as_li_tl?ie=UTF8&camp=1789&creative=9325&creativeASIN=B07YBBCJ5W&linkCode=as2&tag=sanlaki-20&linkId=ff3bb7c1ebdd4cff60735007c035f1e7 Metal Pipes are 1/2" x 8" schedule 40: https://www.amazon.com/gp/product/B07YBBCJ5W/ref=as_li_tl?ie=UTF8&camp=1789&creative=9325&creativeASIN=B07YBBCJ5W&linkCode=as2&tag=sanlaki-20&linkId=ff3bb7c1ebdd4cff60735007c035f1e7 Screw for controller mounts + magnet = #6 5/8 inch --- this is important!!! 2 point sling set up = velcro + triangle hole of the buttstock + small hole on front coupler Sling Recommendation: https://www.amazon.com/gp/product/B07YBBCJ5W/ref=as_li_tl?ie=UTF8&camp=1789&creative=9325&creativeASIN=B07YBBCJ5W&linkCode=as2&tag=sanlaki-20&linkId=ff3bb7c1ebdd4cff60735007c035f1e7 Double sided tape for controllers: https://www.amazon.com/gp/product/B07YBBCJ5W/ref=as_li_tl?ie=UTF8&camp=1789&creative=9325&creativeASIN=B07YBBCJ5W&linkCode=as2&tag=sanlaki-20&linkId=ff3bb7c1ebdd4cff60735007c035f1e7 Velcro: https://www.amazon.com/gp/product/B07YBBCJ5W/ref=as_li_tl?ie=UTF8&camp=1789&creative=9325&creativeASIN=B07YBBCJ5W&linkCode=as2&tag=sanlaki-20&linkId=ff3bb7c1ebdd4cff60735007c035f1e7 Perks of using this magnetic gunstock: * RELOAD FASTER * STABILIZE AIM * NATURAL FEEL * COMPATIBLE WITH MOST WEAPONS (rifles, heavy, smgs) Why choose this? Natural feel: the magnetic snap design is located on top Easy installation: the kit snaps easily on the controllers - no extra tools needed! Works with wide range of weapons. Beginner friendly Other gunstocks in the market are super hard to use and can take weeks to learn. That is why we made our magnetic rifle gunstock with metal mounts so you can easily play within minutes! Helpful tips: Add a clear double sided tape on the controllers for better fit! Practice unmounting and mounting the controllers before putting your headset to develop muscle memory. Add a couple layers of Gorilla tape on the magnets to dampen strength. Assembly time: 3-5 minutes. [Update] July 13, 2020: front coupler was updated to better hold a sling and it's a lot sturdier now. Drop test here: https://youtu.be/eIqT4vDvbkk Sight is updated to v2 better fit the rail! ----- These are my personal recommendation if you're looking for your first 3D printer! Get the PRO it's totally worth it. 3D printer I used: Creality Ender 3 PRO https://www.amazon.com/gp/product/B07YBBCJ5W/ref=as_li_tl?ie=UTF8&camp=1789&creative=9325&creativeASIN=B07YBBCJ5W&linkCode=as2&tag=sanlaki-20&linkId=ff3bb7c1ebdd4cff60735007c035f1e7 Black Filament: https://www.amazon.com/gp/product/B07YBBCJ5W/ref=as_li_tl?ie=UTF8&camp=1789&creative=9325&creativeASIN=B07YBBCJ5W&linkCode=as2&tag=sanlaki-20&linkId=ff3bb7c1ebdd4cff60735007c035f1e7 Gold Silk: https://www.amazon.com/gp/product/B07YBBCJ5W/ref=as_li_tl?ie=UTF8&camp=1789&creative=9325&creativeASIN=B07YBBCJ5W&linkCode=as2&tag=sanlaki-20&linkId=ff3bb7c1ebdd4cff60735007c035f1e7
With this file you will be able to print Magnetic Gunstock for Oculus Quest 1, Quest 2 with your 3D printer. Click on the button and save the file on your computer to work, edit or customize your design. You can also find more 3D designs for printers on Magnetic Gunstock for Oculus Quest 1, Quest 2.