Magnetic Gunstock for Oculus Quest 2 (Improved & Simplified)
prusaprinters
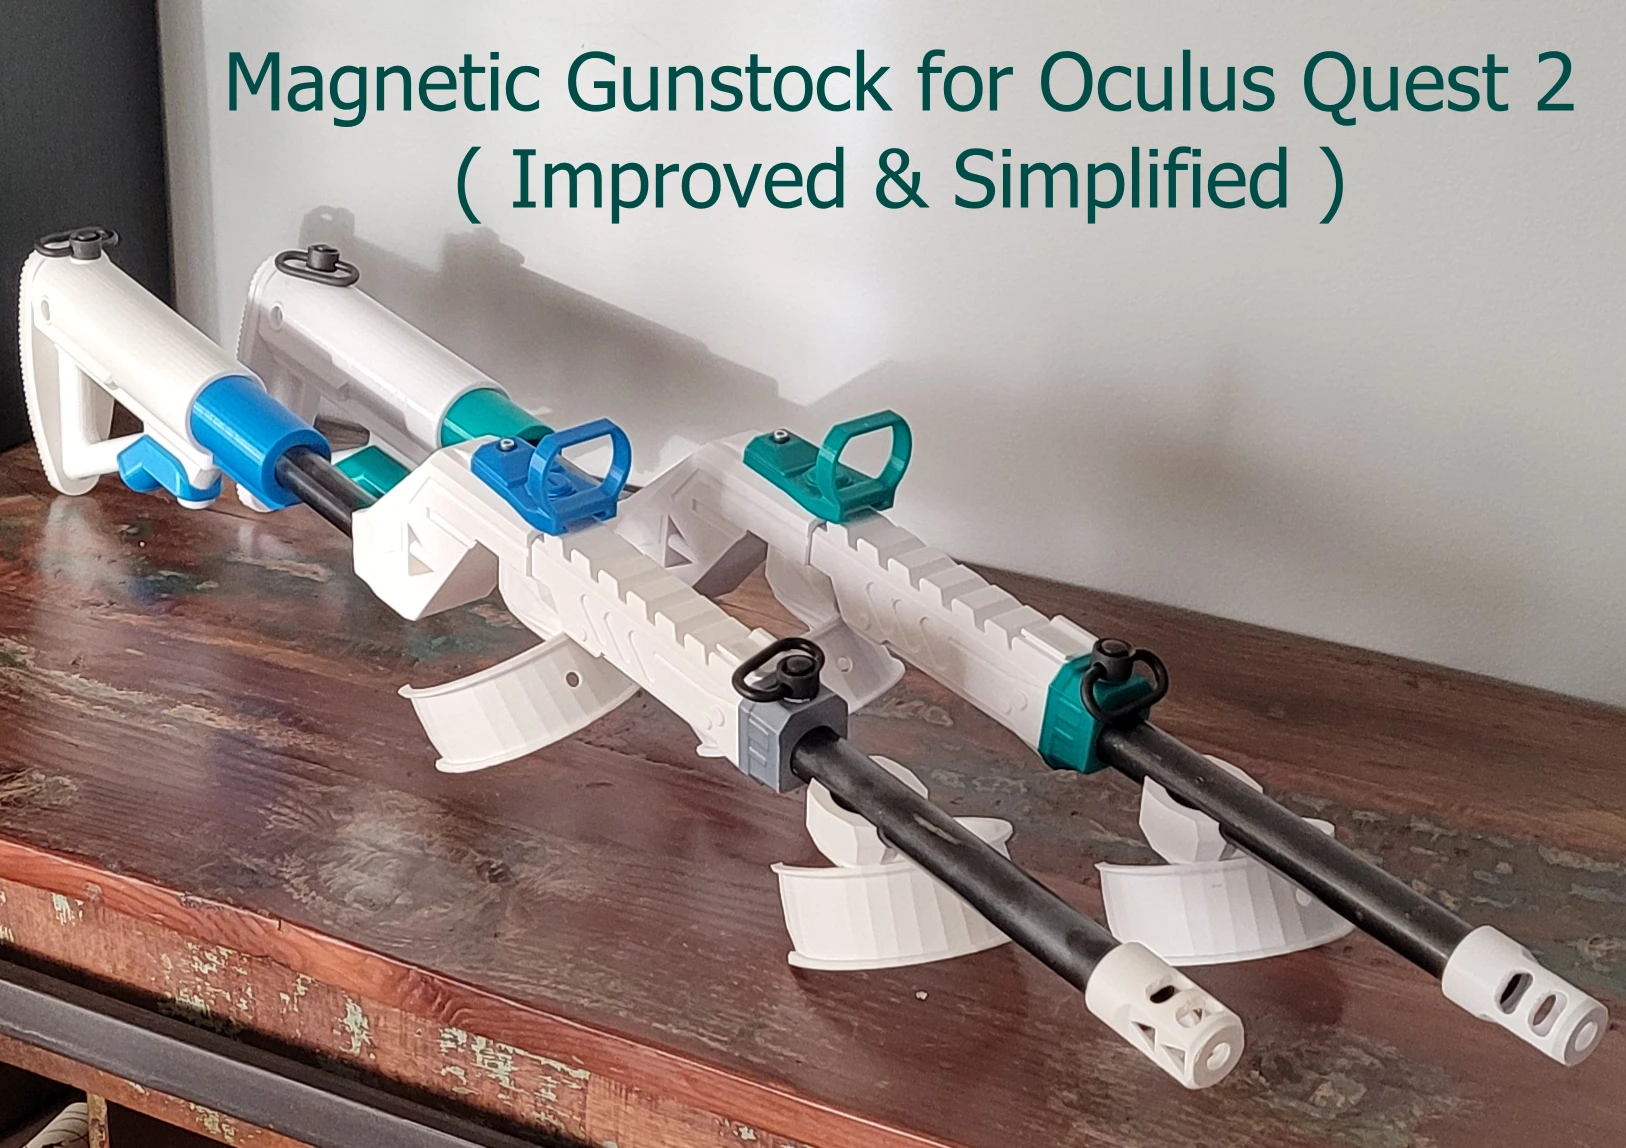
<h3>Magnetic Gunstock for Oculus Quest 2 (Improved & Simplified)</h3><p>After printing three of these for friends I decided to improve a few issues I found and greatly simplify the process for others. Most of the source models have disparate and confusing instructions, so I tried to put everything here in once place. The addition of the adjustable buttstock makes this feel really high quality. Generally I tried to make this a cleaner build.</p><h4>Required Materials</h4><ul><li>Normal stuff<ul><li>(2) M3x5mm caphead for cushion</li><li>(1) M3x8mm caphead for sight</li><li>(1) M3x40mm caphead for adjustable stock</li><li>(2) M3 nuts</li><li>(1) 0.5x6x20mm spring for adjustable stock</li><li>(2) #6x(5/8)" or #6x0.5" countersunk woodscrews for controllers</li><li>Loctite / Superglue</li></ul></li><li>Amazon Stuff<ul><li>(3) <a href="https://www.amazon.com/Home-TZH-Threaded-Furniture-Decoration/dp/B083XFNNYS/">0.5x8" Lightweight Steel Pipes</a> (nothing at Home Depot will work)</li><li>(1) <a href="https://www.amazon.com/dp/B085RD28JW/">32x8mm 90lb magnet for Right Hand</a></li><li>(1) <a href="https://www.amazon.com/dp/B07YBBCJ5W/">32x6mm 65lb magnet for Left Hand</a></li><li>(2) <a href=" https://www.amazon.com/gp/product/B07JGGHGF7/">optional sling mount</a> (these look & work great even if you don't get the sling)</li><li>(1) <a href=" https://www.amazon.com/gp/product/B0799DDT6C/">optional sling</a></li><li>(2) <a href="https://www.amazon.com/gp/product/B07K22VWS6/">optional double-sided removable stickers</a></li></ul></li></ul><p>If you buy everything you will have enough materials to make three of these gunstocks. The parts you need end up being about 80 USD.</p><h4>Printing</h4><p>In the <code>3mf</code> I grouped all the files into “A_”, “B_”, etc so you can print each group overnight instead of one big mega print. None of the files require any supports.</p><ul><li>Groups A, B, and C should be printed in your primary color - in the photos I chose white.</li><li>Group C should be printed with a big brim since there is a large overhang to support.</li><li>Group D should be printed in your accent color.</li><li>Group E is just the buttstock cushion and ideally should be TPU but it probably doesn't matter. For this I did Archimedean Chords at low infill, with 1 perimeter, and 2 top & bottom layers. If you don't print this with air it will be rock hard.</li></ul><p>Since PLA is garbage I did everything out of PETG / HTPLA+ / ASA since you get a bit of flex and higher strength overall. You should use 3+ perimeters and 15%+ gyroid infill. For rectilinear go much higher infill.</p><p>I printed some parts w/0.6mm nozzle but I think it's worth using the 0.4mm for better resolution. Variable layer height for all parts.</p><h4>Assembly</h4><ul><li>Adjustable Buttstock<ol><li>See image</li><li>Hold “B_Lock-Pin” with pliers and screw in the long M3 screw all the way down. This can't be easily done by hand - drill recommended.</li><li>Insert this part with the spring into “A_buttstock-body” and hold the screw tight w/pliers.</li><li>Place “D_FGC9-PART” on and thread on “A_Washer”. Leave just enough thread for both nuts.</li><li>Loctite and screw on both nuts.</li><li>For the cushion use the two short M3 screws to attach.</li></ol></li><li>Main Parts<ol><li><a href="https://www.youtube.com/watch?v=jz6_Hlkt3Rc&t=4s">start with this video by sunlaki</a></li><li>Screw in the M3 screw into the sight to lock in place.</li><li>Place a double-sided removable sticker on each controller to solidly attach controllers.</li></ol></li></ul><h4>Remix Info</h4><ul><li>For “C_Body” part I eliminated branding allowing high quality-supportless printing.</li><li>For “C_Front” part I eliminated branding to smooth out handle.</li><li>For “D_Sight” part I added a M3 screw hole to fix loose sight in position.</li><li>For adjustable gunstock, increased M3 hole dimensions so no drilling is required.</li><li>The “D_Coupler” height impacts overall assembly heavily and since it's the weakest part you don't want to overtighten. I included two alternative parts that are +0.5mm or +1.0mm height. Depending on the pipe threading you may need a taller part.</li><li>For “E_Cushion” I aligned the part with the build plate correctly.</li><li>Grouping parts & removing legacy components.</li></ul><h4>Source Models</h4><ul><li>The main source is <a href="https://www.thingiverse.com/thing:4538594">thing:4538594</a> by <a href="https://www.thingiverse.com/sanlaki">sanlaki</a> and he seems to keep links updated. My version is from 2021-03.</li><li>The adjustable buttstock is <a href="https://www.thingiverse.com/thing:4565145">thing:4565145</a> by <a href="https://www.thingiverse.com/slykittycat">slykittycat</a>, which is actually a remix of <a href="https://www.thingiverse.com/thing:4412938">thing:4412938</a> by <a href="https://www.thingiverse.com/Untangle">Untangle</a>.</li></ul><h4>Notes</h4><p>The <a href="https://www.thingiverse.com/thing:4538594">original on thingiverse</a> contains various videos & a jillion extra notes. If you want left-hand controllers or parts for Oculus 1 go there.</p><p>The meshes for some of these parts are A+ and really clean, but the controllers and front coupler meshes look terrible so feel free to post a clean remix.</p><p>Blender forever.</p>
With this file you will be able to print Magnetic Gunstock for Oculus Quest 2 (Improved & Simplified) with your 3D printer. Click on the button and save the file on your computer to work, edit or customize your design. You can also find more 3D designs for printers on Magnetic Gunstock for Oculus Quest 2 (Improved & Simplified).