Magnetic Keychain Connector
thingiverse
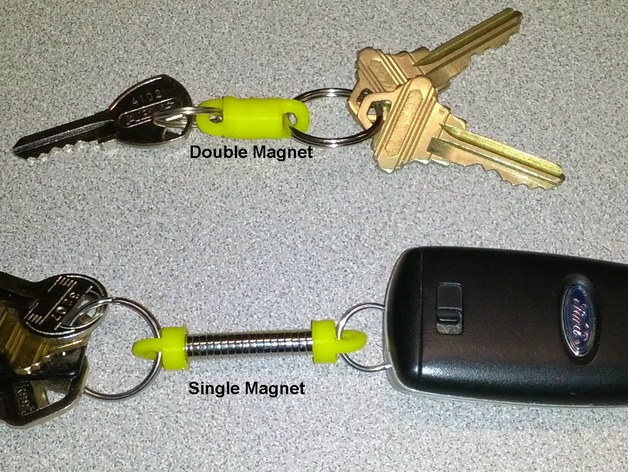
This magnetic keychain connector keeps your house keys and car keys together in your pocket or purse but allows easy separation when needed. It uses readily available 1/4â X 1/16â Neodymium Disc Magnets embedded in the ABS during the printing process. There are two versions included; one using a single magnet and another using two magnets. The single magnet version is a bit more compact and serves a double function of serving to hold a supply of extra magnets to have with you at all times (Iâm constantly finding uses for these babies). The double version has a stronger magnetic field and works better if you donât need to carry extra magnets. In either case, simply slice and print the corresponding stl, pausing after the pocket is formed, just before the enclosing layer. I use use the @pause feature within Repetier-Host which works beautifully. Insert the magnet(s) and resume printing. Works fine at .3mm resolution. This project was designed in FreeCAD. Iâve included the FreeCAD fcstd files in case you want to make modifications. One source for the magnets is:http://www.amazon.com/gp/product/B001ANVAHI/ Enjoy! Instructions This project requires printing to the top of the pocket, pausing, adding the magnet(s), and resuming the print. I found Repetier-Host to be the most intuitive for accomplishing this so these instructions are written for that tool. If you know how to do the same thing using Pronterface or another program, please add instructions in the comments. Load two (or more) of the stlâs into Repetier-Host Slice the stl (I use Slic3r). These are small objects but .3mm still works fine. Using the Visualization tab in the G-Code editor while watching the 3D View pane, choose Single Layer and cycle through the layers until you find the topmost open layer. (At .3mm, this will probably be somewhere around layer 8 for the single version and layer 14 for the double) Insert a line of code into the G-Code between when the open layer ends and the closed layer begins. Type this code into that line: @pause Add Magnet(s) Run the job When the pause dialog pops up, insert magnet(s) into each pocket. Be sure to observe polarity of each magnet so the segments attract each other instead of repel. Continue the print job. Done!
With this file you will be able to print Magnetic Keychain Connector with your 3D printer. Click on the button and save the file on your computer to work, edit or customize your design. You can also find more 3D designs for printers on Magnetic Keychain Connector.