Magnetic Levitation
thingiverse
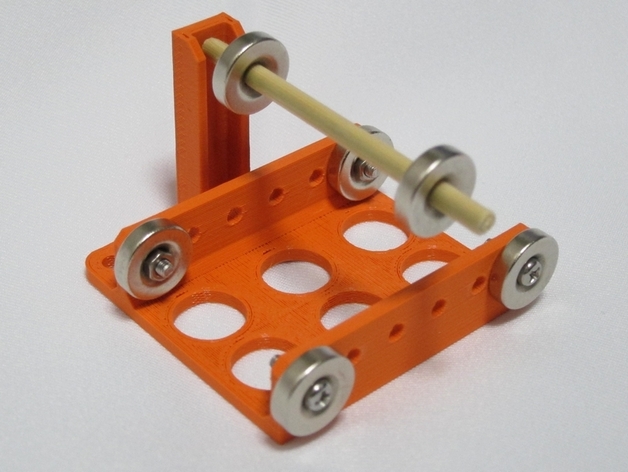
This is a thing that makes use of 6x Neodymium Csunk ring magnets to levitate a chopstick. Just something to pass a boring day! Instructions Check out this video:http://youtu.be/Hgsc3omdPBo Build the thing with 10% fill. *just realised that I'd posted the link to the wrong magnet. The seller actually sent me a diameter 4mm magnet instead of the 3mm. Corrected the link and spec below. Sorry for the blunder :( Required materials: 01x Disposable Chopstick 06x Neodymium Disc Countersunk Ring Magnets D15*4mm hole 4mm: http://www.aliexpress.com/store/product/Free-shipping-30-pack-super-Powerful-n35-NdFeB-Neodymium-Disc-Countersunk-Ring-Magnets-D15-4mm-hole/213181_610756476.html 01x Staple 04x M3 screw, flat washer & nut. Instruction: Print out the thing. Attach the magnets using the M3 screws, flat washers & nuts. Make sure all magnets are facing in the same orientation. If your chopstick comes with a tapered end, snip it off. Break off the 2 short ends of the staple. Force the center portion of the staple into one end of the chopstick, leave about 2mm of it protruding out. Fit 2 of the magnets through the chopstick, make sure they are in the same orientation as that of the 4 magnets installed earlier. The magnets I used fit the chopsticks perfectly, you might need to glue them or use inserts if they do not fit. Adjust the distance of the magnets on the chopstick by trial and error. Once they are balanced, make an indent on the thing with the staple, this makes it easier to balance the chopstick. Have Fun! :) Inspired by this video: http://youtu.be/Q0DRY7VsL-8
With this file you will be able to print Magnetic Levitation with your 3D printer. Click on the button and save the file on your computer to work, edit or customize your design. You can also find more 3D designs for printers on Magnetic Levitation.