Magnetic, Low Profile, Floating Head, Door Catch - Medium Pull
prusaprinters
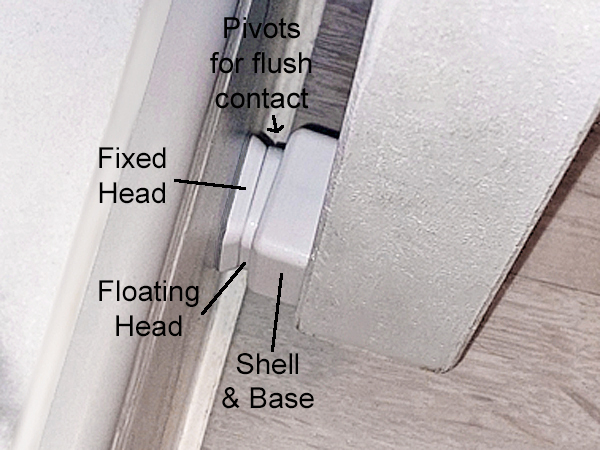
<p>This is a low profile, compact, quiet, magnetic door catch with a floating head to accommodate moderately nonparallel door and wall surfaces. The head tilts and is held in place by opposing magnets. It consists of a base, which is typically screwed to a door in the usual position that a doorstop would be located; a shell or outer housing, which attaches to the base by the use of compression tabs; a floating head, which fits inside the shell and protrudes out partially from the front opening of the shell; and a fixed head, which is typically attached to a wall or a surface, by some form of durable adhesive, such as heavy-duty mounting tape. See the attached photos for a better understanding of the assembly, size, how the pieces fit together, and the arrangement of the magnets. The design uses 12 '10mm x 3mm' (the magnets are actually closer to 9.95mm x 2.67mm).</p><p>This is a spin-off from my earlier light-pull magnetic door catch: https://www.printables.com/model/209370-magnetic-low-profile-floating-head-quiet-door-catc , but it has greater magnetic attraction so that it holds the door slightly firmer.</p><p>The floating head and the fixed head are magnetically attracted to each other. This holds the door against the wall surface. The base has an array of 4 magnets which are positioned in opposition to an array of 4 magnets in the floating head. The fixed head also has an array of 4 magnets which are positioned to attract to the floating head. The base magnets push against the floating head, which keeps the floating head extended out beyond the face of the shell. This magnetic opposition acts like an opposing spring mechanism, but there is very little noise associated with it. The process of using the door catch is fairly silent. The level of magnetic attraction between the floating and fixed heads is enough to hold the door in place, but the door can easily be pulled away, breaking the contact. There is also very little sound associated with breaking the contact.</p><p>12 small neodymium magnets are used in three arrays of 4 magnets. Each magnet measures roughly 10mm wide x 2.7mm tall. They are fairly common and easy to purchase from various online retailers. I used “Scotch Heavy Duty Clear Mounting Tape” to adhere the fixed head to the wall surface.</p><p>NOTE: this door catch is not intended to be a door stop, which extends out from a door or wall sufficiently to prevent a doorknob from contacting and damaging a wall. I designed it because we have a bathroom door that won’t stay open. When opened, it swings in toward a shower door that has a tiled water retaining wall at the bottom, and because of that wall the shower enclosure is set in far enough that the door handle will not strike the enclosure, it will bump against the tile with little or no negative effect.</p><p>ASSEMBLY AND INSTALLATION INSTRUCTIONS</p><p>Prior to assembly, it is advised to lightly sand any of the surfaces that are rough or which come in contact with each other. This will increase the smoothness of the floating head’s pivot.</p><p>The pieces are designed to be installed parallel with the swing of the door or cupboard for the pivot mechanism to function properly and provide the greatest amount of adjustability. In other words, the pivot mechanism pivots sideways or up & down, not diagonally/corner to corner.</p><p>For the mechanism to work properly, it is important to arrange the magnet arrays properly, in terms of their polarity. See the photos for polarity arrangements. Mark or scratch with a dot or a line the same polar side of all 12 of the magnets. It doesn’t matter which side (positive or negative) that you mark, just as long as you’re consistent and mark all of the same sides.</p><p>BASE: Glue in place 4 magnets into the receiving holes in the base, WITH THE DOT OR MARK FACING UP, MEANING IT IS VISIBLE. The unmarked side is not visible. A very small amount of cyanoacrylate GEL glue (Super Glue, etc.) works well and allows time for positioning the magnets. It is also helpful to have a flat ended steel rod that is smaller than 10 mm in diameter to use to help push in place the magnets. With the magnet on the tip of the rod, block all of the empty holes and installed magnets with your fingers, except for the hole in which you are inserting the magnet. Push the magnet in place, making sure that you have the magnet in the correct polar orientation and that it did not flip and reverse sides during the process.</p><p>FLOATING HEAD: With the face of the floating head facing down, exposing the magnet receiving holes, insert 4 magnets in the holes WITH THE DOT OR MARK FACING OUT, MEANING IT IS VISIBLE, the unmarked side is not visible. When the floating head is flipped over to its proper assembly orientation, the magnets in the base should oppose the magnets in the floating head.</p><p>FIXED HEAD: With the face of the fixed head facing down, exposing the magnet receiving holes, insert 4 magnets in the holes WITH THE MARKINGS HIDDEN, OR NOT VISIBLE, the marked side is facing down into the hole and out of sight. With the magnets properly oriented in the floating and fixed heads, the two faces should attract each other.</p><p>Using a pan head screw, screw the base to the door at the desired location. You may also use some type of adhesive, instead of using a screw, if it is strong.</p><p>Insert the floating head into the housing shell in the proper orientation, with the face of the floating head extending out beyond the face of the shell.</p><p>With the floating head properly oriented inside the housing, carefully push the housing onto the base. The housing will click into place when it is fully inserted, and it should be flush against the door or mounting surface, and even with the back of the base that is touching that surface.</p><p>Apply heavy duty adhesive backing to the backside (exposed magnet side) of the fixed head. If you are using an adhesive tape or mounting tape, leave the backing on the exposed side of the adhesive for the time being. Trim off any excess that extends outside of the fixed head’s perimeter. IMPORTANT: Do not adhere the fixed head to the wall or surface yet, because it is difficult to get the proper alignment, unless you follow the next step.</p><p>IMPORTANT: with the fixed head face magnetically stuck to the floating head face (they should be magnetically aligned properly), remove the backing from the mounting tape, if applicable. At this stage, the base is mounted to the door, with the housing attached to the base and the floating head inside the housing with the face protruding out, and the fixed head is magnetically aligned with and attached to the floating head, with the backside of the fixed head pointing out or away and with adhesive on it. If necessary, clean the area of the wall or surface to where the fixed head will adhere. You are now ready to adhere the fixed head to its designated wall or surface. This is done by swinging the door fully open until the adhesive side of the fixed head comes in contact with the surface to which it will adhere. IMPORTANT: if the door face is not parallel to the wall surface, before adhering the fixed head, tilt the floating and fixed heads so that when the fixed head adhesive touches the wall it is parallel to the surface and it will hit it evenly; this ensures the best magnetic contact because the fixed head is adhered in complete alignment with the floating head.</p><h3>Print Settings</h3><p><strong>Printer Brand:</strong></p><p>Creality</p><p><strong>Printer:</strong></p><p>Ender 5</p><p><strong>Rafts:</strong></p><p>No</p><p><strong>Supports:</strong></p><p>No</p><p><strong>Resolution:</strong></p><p>.16mm</p><p><strong>Infill:</strong></p><p>100%</p><p><strong>Filament:</strong> Overture PETG</p><p>White</p><p>Category: Bathroom</p>
With this file you will be able to print Magnetic, Low Profile, Floating Head, Door Catch - Medium Pull with your 3D printer. Click on the button and save the file on your computer to work, edit or customize your design. You can also find more 3D designs for printers on Magnetic, Low Profile, Floating Head, Door Catch - Medium Pull.