Magnetic Mini Keyboard Thumb Joystick V1
prusaprinters
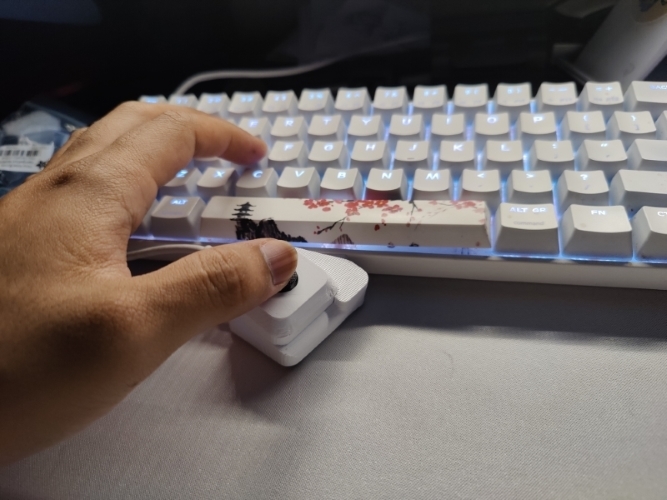
<h3>What the hell is this?</h3><p>This is the first iteration of my desperate need for a<i>cheap</i> keyboard joystick attachment.</p><p>Don't judge me but I've played Rainbow Six Siege for years on PC using a Razer Orbweaver, using the joystick/dpad for WASD movement. But let me tell you, I'm a gentle person and I've gone through a literal dozen of those things.. and they're not cheap.</p><p>Over the years I learned how to repair them pretty easily, but the components weren't easy to find and it was honestly just not fun to constantly worry about it breaking. Razer's terrible software that always needs to run in the background was the salt on the wound. What made it so frustrating was that I didn't care about the rest of the device, I<i>just wanted a thumbstick</i>.</p><p>I know there are some solutions out there. Someone sells something similar to this online, and there are other keypads with thumbsticks available. But a lot of them just add unnecessary bulk and cost, and often the thumbstick is analog. Some games don't play nice with simultaneous analog stick + keyboard input.</p><p>Enter my mini thumbstick. Made of cheap components (Under $20 to make from scratch, well under $5 to repair) that are off the shelf and simple to assemble. It emulates the arrow keys for simple keybinding and to avoid conflicts with inputs.</p><p>Plus, it has magnets and<i>I love magnets</i>.</p><h3>Post-Printing</h3><p><strong>Bill of Materials</strong></p><p>Prices are at time of writing and may vary for regions.</p><p>1x Seeeduino XIAO board ($5.60)<br>1x Adafruit Mini Thumbstick Breakout Board ($1.50)<br>1x Adafruit Mini 2-Axis Analog Thumbstick ($2.50)<br>4x M2x10mm Socket Head Cap Screws (~$1.00)<br>4x 8x3mm Round N50 Neodymium Magnets ($8.00)</p><p><i>Link with some sources:</i> <a href="https://1drv.ms/x/s!AuJEnCdpVszXluUzJPEeXMz-L_6DpA?e=s9Kaoh">https://1drv.ms/x/s!AuJEnCdpVszXluUzJPEeXMz-L\_6DpA?e=s9Kaoh</a></p><p>The only parts you'd really need to replace are the thumbstick and breakout board. Maybe not even the breakout board. I'll have to test wear over time.</p><p>You'll also need:</p><ul><li>A soldering iron</li><li>Some thin gauge wire (I used 18awg, but thinner is better as it'll all be squished into the shell)</li><li>Double sided adhesive tape and super glue. Or just a hot glue gun.</li></ul><p>A USB-C cable to connect to your PC. <strong>Assembly Instructions</strong></p><ol><li>Print both parts. No supports are needed, but if you want the screw holes to be extra clean you can use build plate supports. Everything is already in printing orientation.</li><li>Solder the mini thumbstick to the thumbstick breakout board. It only fits one way.</li><li>Cut four pieces of ~1inch wire and strip the ends. Solder the breakout board to the Seeeduino XIAO (see pics for reference!). On one side, voltage and ground, on the other, pin 1 and 2. Make sure you have the boards oriented correctly (bottoms facing each other & USB port on the side with the white text).</li></ol><p>Using a small piece of double-sided adhesive tape or a bit of hot glue, adhere the breakout board and Seeeduino XIAO together. The USB port should be on the same side as the white text on the bottom of the breakout board. Roughly line the edges of the board up so that the USB port sticks out a bit. I don't have good photos to show this part but do your best to follow my terrible instructions. Also keep in mind I designed the shell AFTER I adhered them together, so using the BottomShell as a guide might help.</p><p>The electronics assembly can now be seated into the BottomShell printed part. Do your best to smoosh all the wires in there, and just make sure the screw holes line up and the USB port fits.</p><ol><li>Remove the black thumbstick cap by gently pulling it off. Turn the cap at an angle and push half of it through the TopShell printed part.</li><li>Hold the two printed parts together while making sure the thumbstick cap doesn't fall back through the TopShell. Press it back onto the thumbstick.</li><li>Screw the M2 bolts in, securing everything in place.</li><li>Super glue or hot glue the 8x3mm round magnets into the side of the shell.</li></ol><p>Glue some magnets onto your keyboard's shell wherever you want the thumbstick to sit. Mess around with it beforehand to find an ideal position. I printed a shell that fit around the magnet I used on the keyboard side (a 20x10x1mm magnet).</p><p>Connect it to your PC via USB-C.</p><ol><li>Download the latest Arduino IDE software (<a href="https://www.arduino.cc/en/software">https://www.arduino.cc/en/software</a>)</li><li>Download the Seeeduino boards using the instructions on their website (<a href="https://wiki.seeedstudio.com/Seeed_Arduino_Boards/">https://wiki.seeedstudio.com/Seeed\_Arduino\_Boards/</a>)</li><li>Open my .ino sketch</li><li>In the Arduino IDE, under the Tools menu, make sure the board is the Seeeduino XIAO, and the COM port is recognizing the board.</li></ol><p>Upload the sketch onto your board by pressing the Upload button (right arrow at the top). That should be it. If everything went smoothly, your thumbstick should now send arrow-key keystrokes to your PC when you move the stick. My setup has UP towards the keyboard and DOWN away from it.</p><p>If you wanted to change what keystrokes it sends, you can do so by replacing the "KEY_UP_ARROW" bits with whatever key you want. Check the Arduino guides out there for help on that.</p><p><strong>What's the point?</strong></p><p>I hate buying products, I hate fixing Razer garbage, and I HATE using<i>three fingers</i> just to move around in a game! Three birds with one compact magnetic stone.</p>
With this file you will be able to print Magnetic Mini Keyboard Thumb Joystick V1 with your 3D printer. Click on the button and save the file on your computer to work, edit or customize your design. You can also find more 3D designs for printers on Magnetic Mini Keyboard Thumb Joystick V1.